Botanical Explorations with the Dissecting Scopes
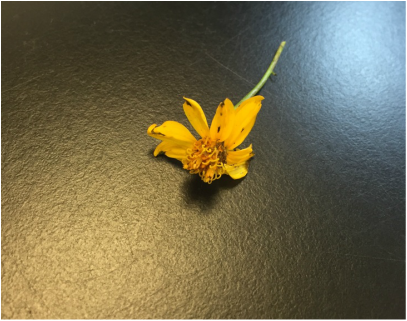
Copper Canyon Daisy (Tagetes lemmoni). No magnification.
Photographed by Kourtnei.
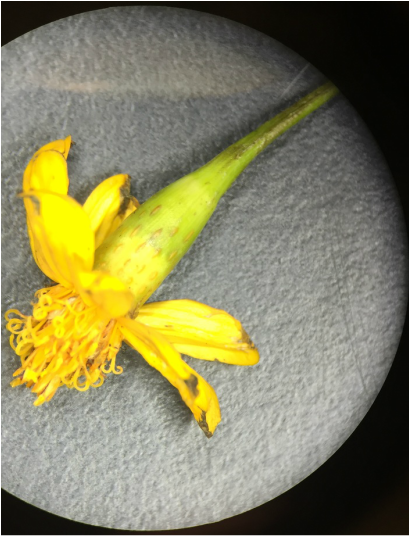
Copper Canyon Daisy (Tagetes lemmoni). 7.5X Magnification.
Photographed by Kourtnei.

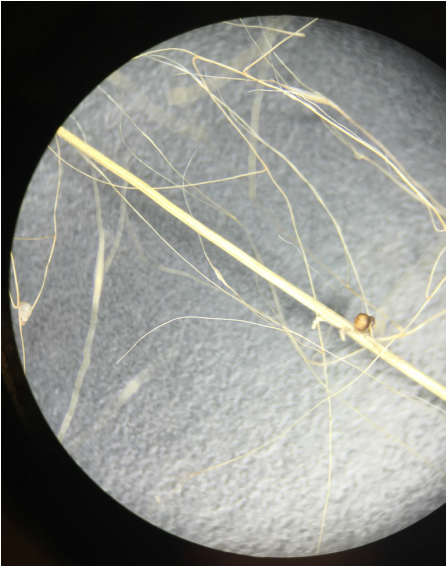
Muhly Grass (Muhlenbergia capillaris). No magnification.
Photographed by Nooriya.
Muhly Grass (Muhlenbergia capillaris). 7.5X Magnification.
Photographed by Nooriya.
Plant Cells and Scientific Drawings |
We located these samples on the Armstrong campus (outside of the Science Center and near the mailroom). We chose these samples because of the color of the Copper Canyon Daisy, and texture of the Muhly Grass. The Copper Canyon Daisy is a beautiful yellow orange color and the Muhly Grass has a wispy, furry texture. We obtained the samples and observed them under a dissecting scope. We noticed the color and shape of the stigma of the Copper Canyon Daisy which was yellow and curled outward and resembled a fallopian tube. We also noticed that the stem of the Muhly grass had tiny black dots and there were bulbs on some of the florets.
- Kourtnei & Nooriya 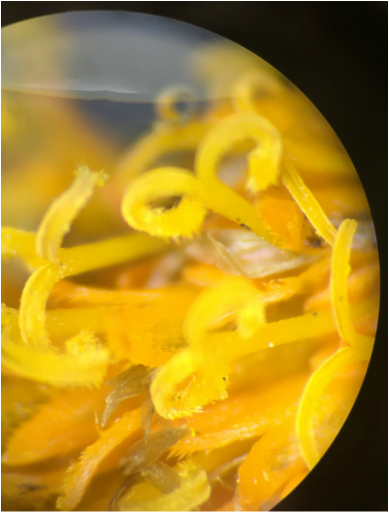
Stamen of Copper Canyon Daisy (Tagetes lemmoni). 50X Magnification.
Photographed by Kourtnei.
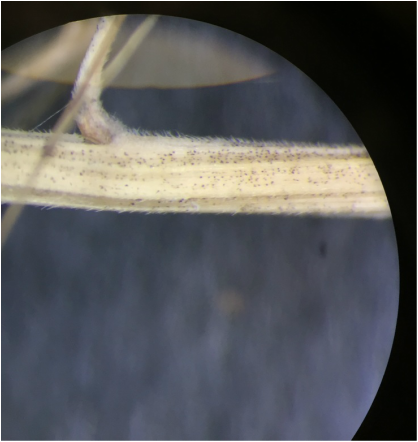
Stem of Muhly Grass (Muhlenbergia capillaris). 50X magnification.
Photographed by Nooriya.
|
For today's lab our objectives were:
We isolated samples of the following plants. We learned different staining techniques for different specimens, the visual difference between a chloroplast and chromoplast, we were able to see the differences in starch between a ripe and unripe banana, that the vacuole in the epidermal cell of the onion was the reason for the nucleus being pressed up against the cell wall.
-Kourtnei and Nooriya
- prepare a wet mount slide for viewing under a compound microscope
- recognize the different slide preparations techniques of: whole mount, epidermal peel, sections (cross and longitudinal) and smears
- Find and identify visible features of the plant cell (cell wall, vacuole, nucleus, chloroplasts, cytoplasm etc.)
- Using biological stains to make features of plant cells visible for microscopic study
- Produce a scientific diagram
We isolated samples of the following plants. We learned different staining techniques for different specimens, the visual difference between a chloroplast and chromoplast, we were able to see the differences in starch between a ripe and unripe banana, that the vacuole in the epidermal cell of the onion was the reason for the nucleus being pressed up against the cell wall.
-Kourtnei and Nooriya
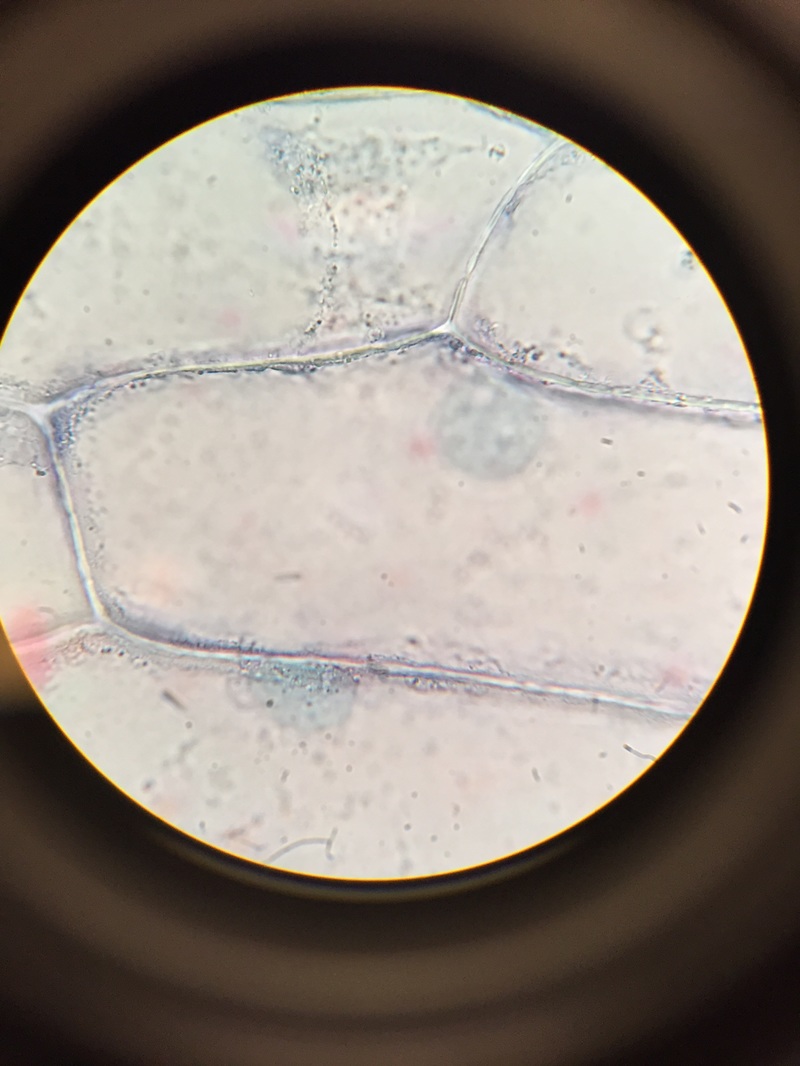
Epidermis of Allum cepa . The staining helped to visualize aspects of the cell like the cell wall, nucleus, cytoplasm etc. The nucleus appears to be pushed up against the cell wall because of the vacuole that is filled with water in the cell. Photograph taken by Kourtnei
|
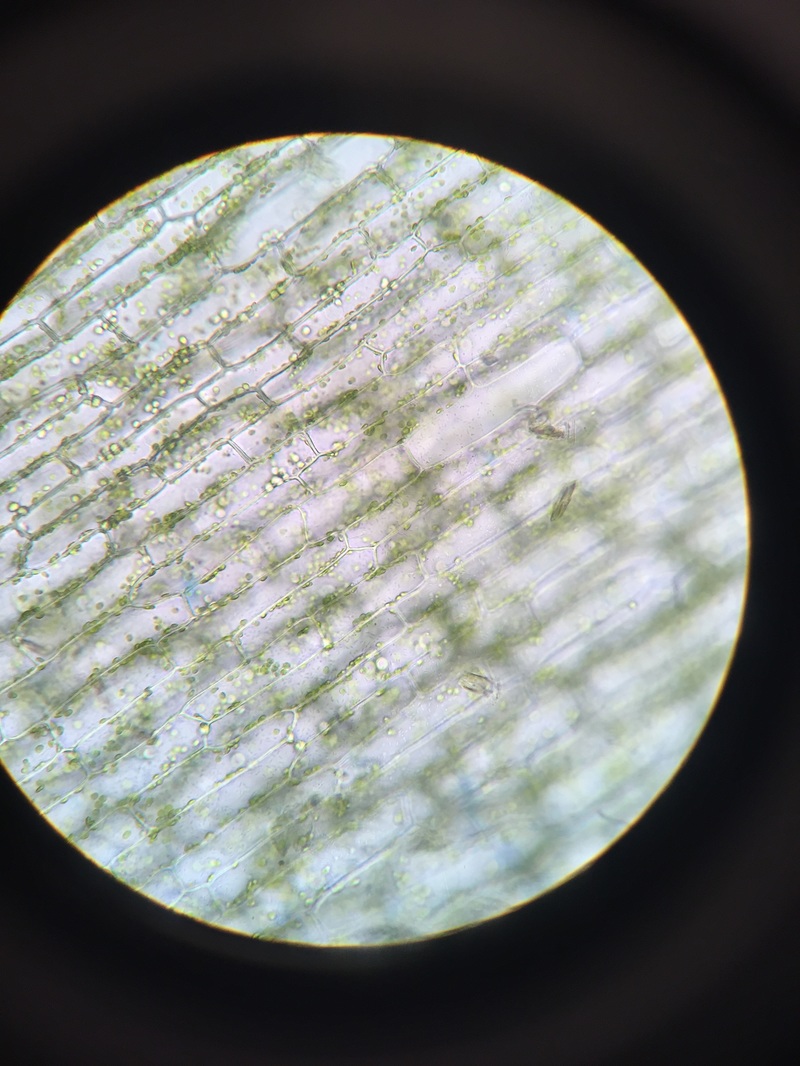
Elodea canadensis before adding 5% CaCl. Photograph taken by Kourtnei
|
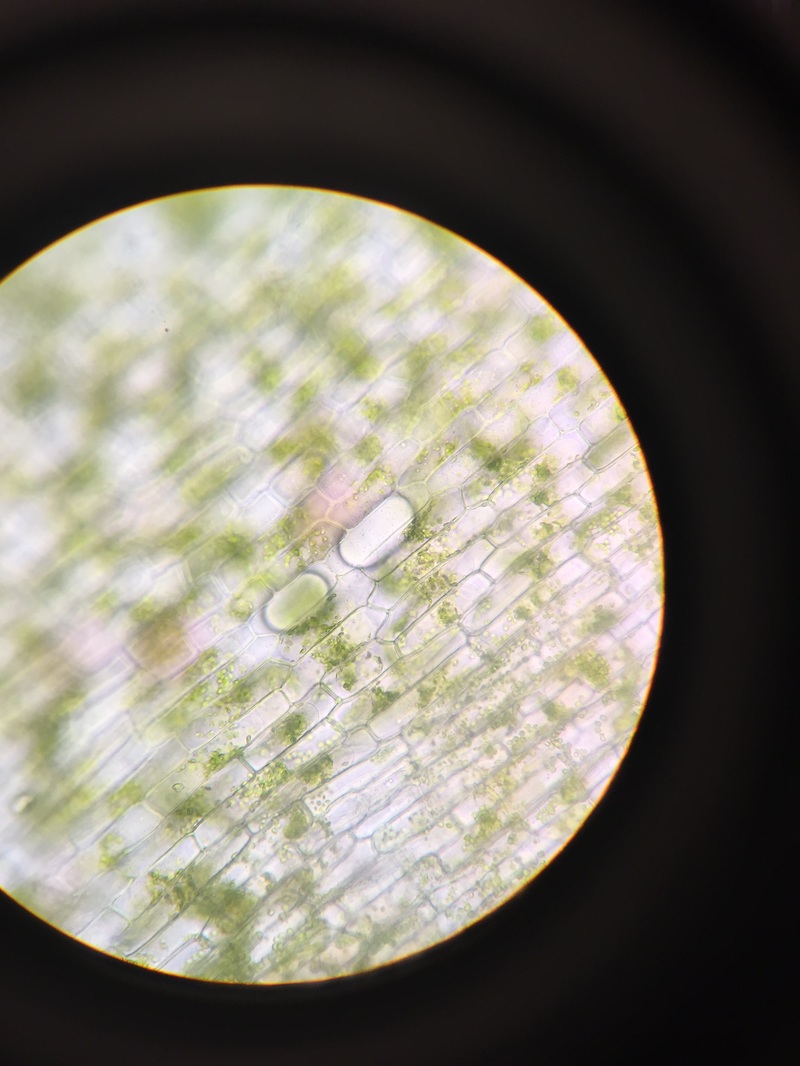
Elodea canadensis after adding 5% CaCl. What happened in this cell was that the chloroplasts clumped together as they emptied out of the vacuole and now the vacuoles appear to be clear. Photograph taken by Kourtnei. This was my favorite specimen because you can see the movement of the chloroplasts in and out of the vacuoles.
|
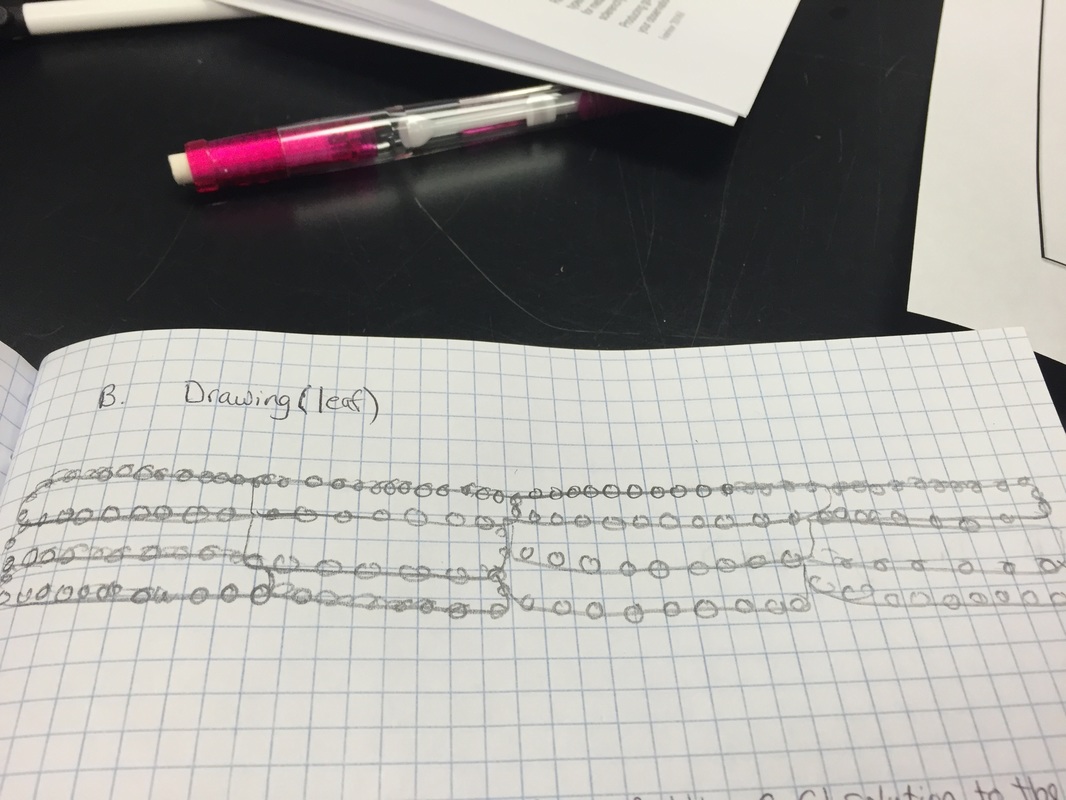
Drawing by Kourtnei of the cells of Eldoea canadensis
|
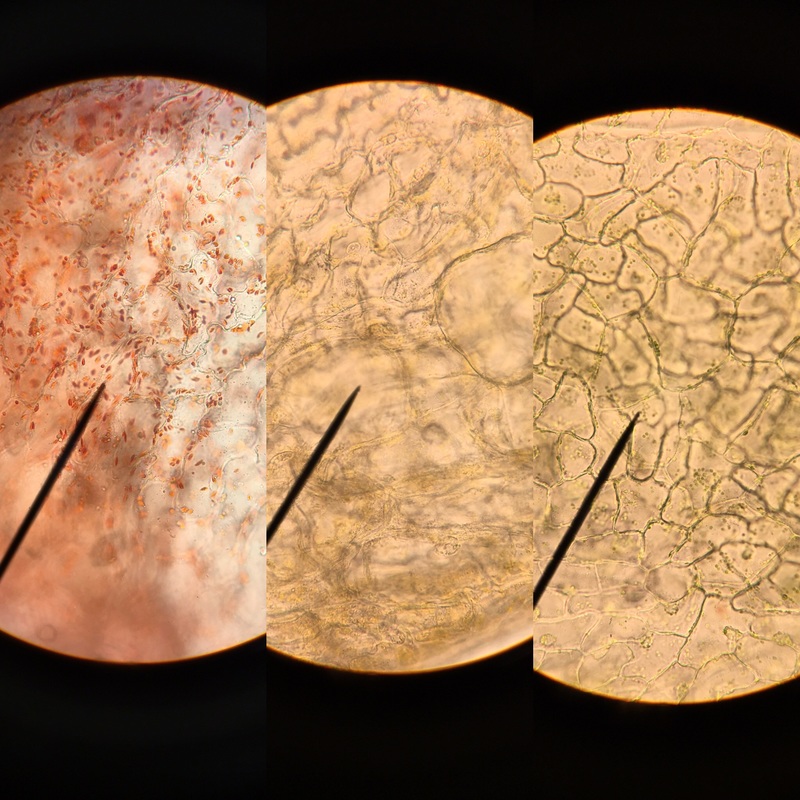
Capsicum annum (Bell Pepper) Fruit. Green Red pepper (far left), yellow pepper (middle), and green bell pepper (far right). Observed under 400x magnification.
Photo taken by Nooriya.
|
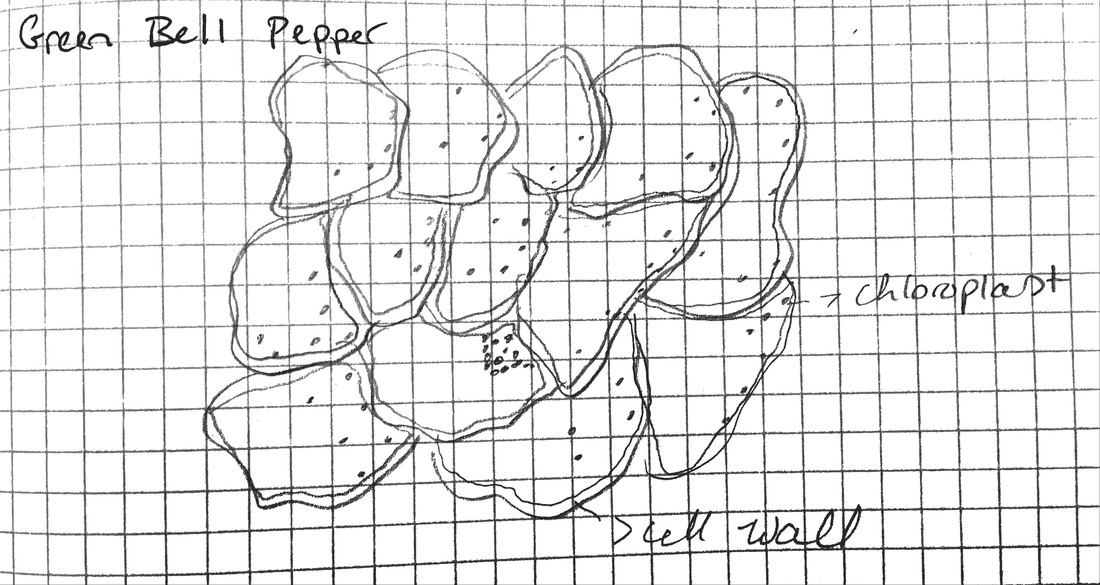
Green Bell pepper illustration by Nooriya. Observed under 400x magnification.
|
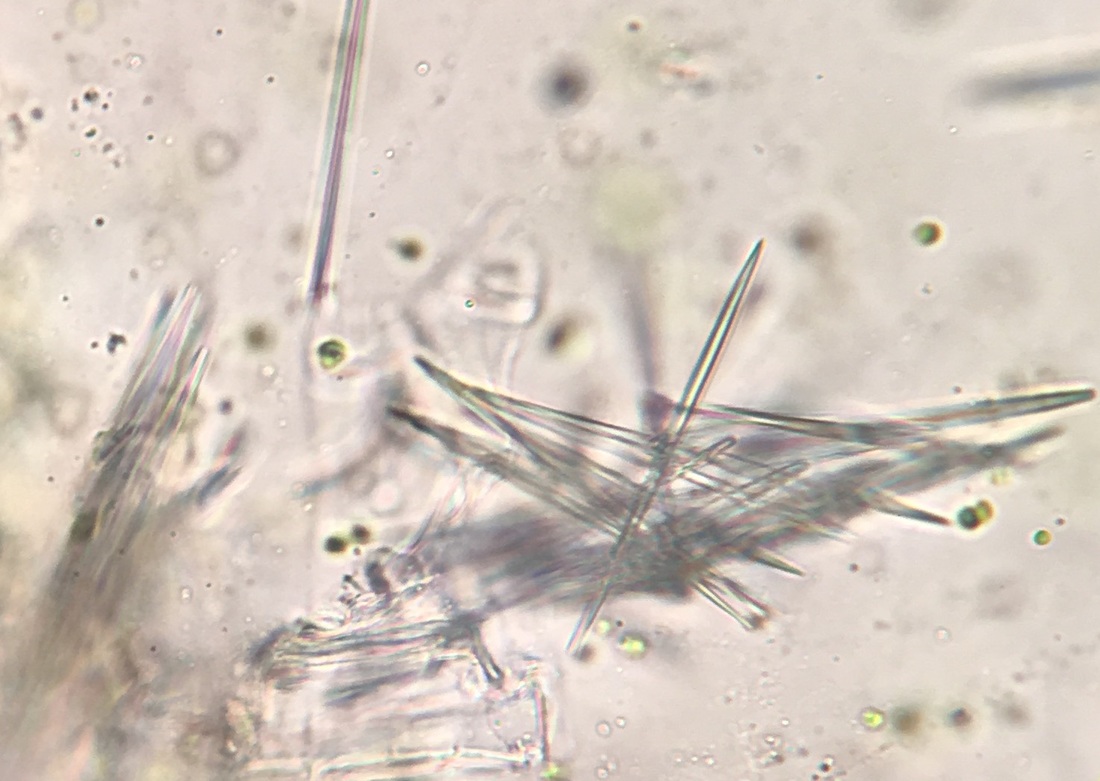
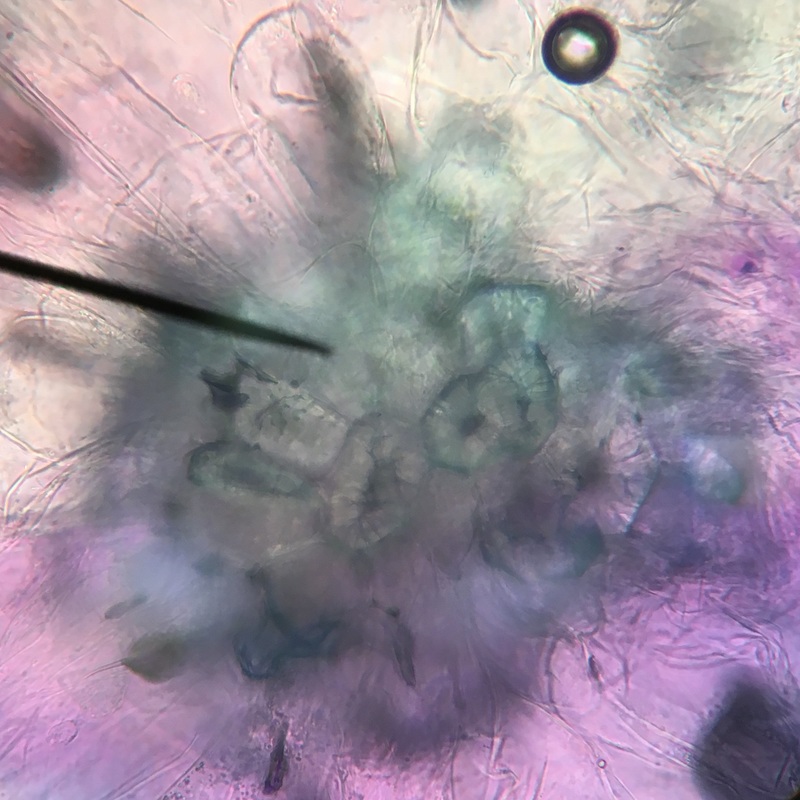
Tradescantia Stem Cross Section. In this particular photo you can see the needle-like calcium oxalate raphides. Observed under 400x magnification.
Photo taken by Nooriya.
|

Musa (Banana). Dark purple (left) is unripe. Colorless (right) is ripe. This was my favorite specimen because you can see the color difference between the ripe and unripe. Observed under 400x magnification.
Photo taken by Nooriya.
|
Photosynthesis
Objectives for this lab:
This week in lab, we used chromatography to extract pigments from a Magnolia leaf and then used a spectrometer to measure the light absorption of each pigment. We used phenol red to observe carbon dioxide consumption in photosynthesis by adding Elodea to 2 test tubes containing phenol red with carbon dioxide (introduced from our own breath via straw). We then placed one test tube in the light and one in the dark along with controls (which did not contain the Elodea). We tested starch using leaves from the coleus plant. We removed the anthocyanin by dipping it in boiling water, then we removed the chlorophyll by dipping the same leaf in boiling ethanol. After this we added iodine and observed the staining pattern.
"My favorite part of this lab was using the spectrometer because I enjoyed working with scientific equipment and learning how to effectively use it to obtain results for an experiment." - Nooriya
We learned how to extract pigments using chromatography and how to use a spectrometer. We also learned that phenol red turns yellow when it is acidic, but orange when some carbon dioxide is introduced (too much carbon dioxide reacts to form carbonic acid which turns the phenol red solution yellow). We learned that more starch is present in leaves that are in the light than the dark.
- Kourtnei & Nooriya
- Use chromatography to separate and identify various pigments found in photosynthetic plant tissues.
- Explain why it would enhance a plant's success to have more than one type of photosynthetic pigment.
- Demonstrate that carbon fixation during the "synthesis" reactions of photosynthesis is dependent on products of the light-dependent reactions (that is, not carbon will be synthesized in carbohydrates unless the light-dependent reactions are taking place simultaneously).
- Use a starch test to examine the effects that carbon-starvation and light-deprivation have on the synthesis reactions of photosynthesis.
This week in lab, we used chromatography to extract pigments from a Magnolia leaf and then used a spectrometer to measure the light absorption of each pigment. We used phenol red to observe carbon dioxide consumption in photosynthesis by adding Elodea to 2 test tubes containing phenol red with carbon dioxide (introduced from our own breath via straw). We then placed one test tube in the light and one in the dark along with controls (which did not contain the Elodea). We tested starch using leaves from the coleus plant. We removed the anthocyanin by dipping it in boiling water, then we removed the chlorophyll by dipping the same leaf in boiling ethanol. After this we added iodine and observed the staining pattern.
"My favorite part of this lab was using the spectrometer because I enjoyed working with scientific equipment and learning how to effectively use it to obtain results for an experiment." - Nooriya
We learned how to extract pigments using chromatography and how to use a spectrometer. We also learned that phenol red turns yellow when it is acidic, but orange when some carbon dioxide is introduced (too much carbon dioxide reacts to form carbonic acid which turns the phenol red solution yellow). We learned that more starch is present in leaves that are in the light than the dark.
- Kourtnei & Nooriya
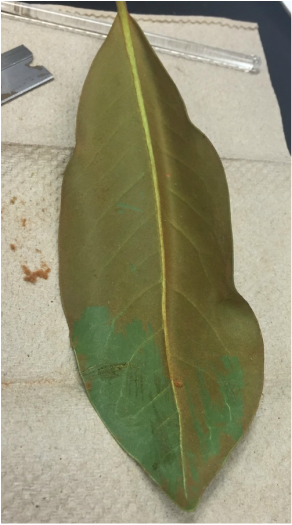
Magnolia grandiflora that was use for the chromatography pigment seperation. Photo taken by Kourtnei.
|
Our chromatography paper during separation. The solvent used was petroleum ether and methylene chloride (2:1). We obtained the pigments by scratching off the fuzzy side of the leaf (as shown in the picture above) we then ran a line across the magnolia leaf as it laid fuzzy side down on top of the chromatography paper.
|

Illustration of the completed chromatography paper

Chlorophyll A Absorption Spectrum
|

Chlorophyll B Absorption spectrum
|

Carotene Absorption Spectrum
|

Xanthophyll Absorption spectrum
|

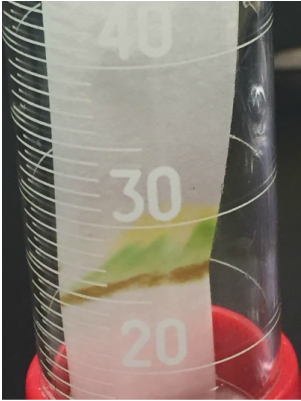
Before and after tubes of Elodea leaf in phenol red with carbon dioxide placed under light. In the before tube photograph (right), the phenol red is a very pale orange, whereas the after tube (left) is slightly less pale and toward the top of the tube, around the leaf, it is turning red. This means the Elodea leaf is consuming the carbon dioxide, thus returning the the phenol red to a more basic pH.
|

This is the before (right) and after (left) of the control (without Elodea of phenol red with carbon dioxide that was placed in light. There was no change in color.
|

This is the before (right) and after (left) of the control (without Elodea of phenol red with carbon dioxide that was placed in the dark. The after picture is a paler orange than before.
|

Before and after tubes of Elodea leaf in phenol red with carbon dioxide placed in the dark. In the before tube photograph (right), the phenol red is a very pale orange, whereas the after tube (left) is very yellow. This means the Elodea leaf did not consume the carbon dioxide, thus the carbon dioxide that was present was converted to carboxylic acid.
|

Coleus leaf before starch test
This is Kourtnei's favorite test because you can immediately see the results very clearly.
|

Coleus leaf after starch test. In the parts of the leaf where there were pink or white, there was a clear area so that meant there was a negative test for starch. In the areas where there were green, there were now dark areas which indicate that the test was positive for starch. Not all parts of the leaf are photosynthetic because if they were the parts of the leaf where there were pink and white would have been stained dark as well.
|
Simple & Complex Tissues
Objectives:
1. Compare and contrast parenchyma, collenchyma, and sclerenchyma cells and tissues (ground tissue system).
2. Recognize the three tissue systems of the plant body.
3. Identify water-conducting cells of the vascular tissue system and relate their structural features with their functions.
4. Describes the characteristics of the epidermis.
In this week's lab we collected and observed simple and complex tissue samples from plants. We learned how to correctly collect and stain tissue samples and how to identify parenchymal, collenchymal, and sclerenchymal tissues. We also learned how to identify complex tissues such as xylem, phloem and epidermal tissue.
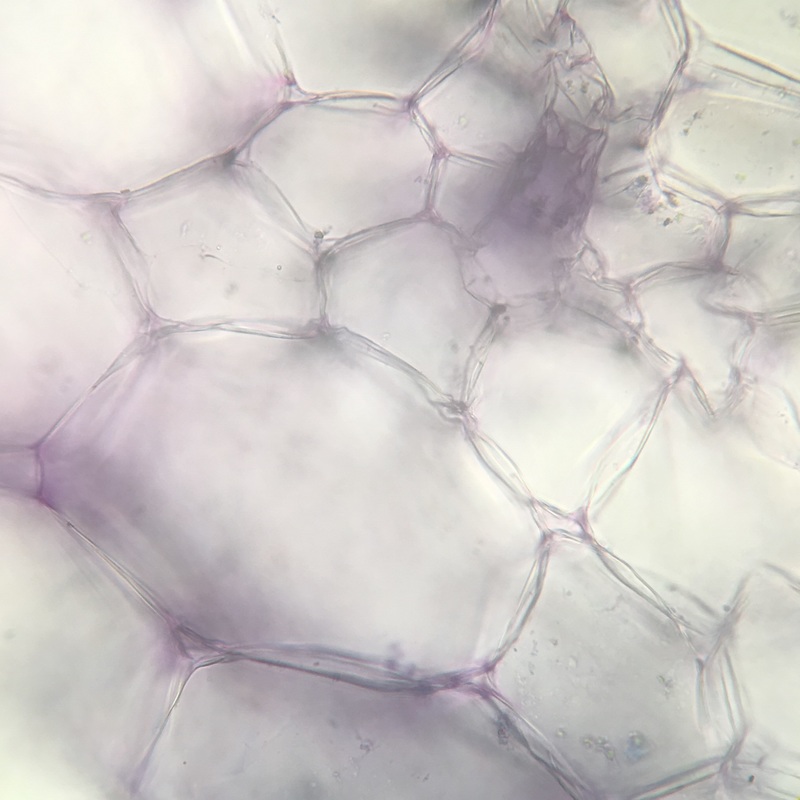
Cross section of Apium graveolens (celery) petiole. This image is showing parenchyma cells The sample was stained with Toluidine Blue O (TBO). Observed under 400x magnification.
Photo taken by Nooriya.
|

Cross section of Apium graveolens (celery) petiole. This illustration is of the collenchyma cells. The sample was stained with Toluidine Blue O. The collenchyma cells were blue and much smaller than the parenchyma cells. Observed under 400x magnification.
Illustration by Nooriya.
|
Sclerenchyma of Pyrus communis (pear fruit) stained with TBO. The grey/blue are the brachysclerids and the pink stained cells surround it are parenchyma simple tissues. Observed under 400x magnification.
Photo taken by Nooriya.
|

Sclerenchyma of Persea americana (avocado fuit) stained with phloroglucinol-HCl. The red cells are the sclerenchyma cells, and they are stained red because of the lignin present in the cell walls.Observed under 100x magnification. This was my favorite specimen because the stain's interaction with lignin produced this beautiful red color. Photo taken by Nooriya.
|

Cross section of sclerenchyma fibers of Sansevieria trifasciata (snake plant) stained with TBO. The blue stained cells are the fibers in the mesophyll and the green in the surrounding tissue are chloroplast. The fibers stain blue because of the thickened secondary cell wall or the presence of lignin. Observed under 100x magnification. Photo taken by Nooriya.
|

Sclerenchyma fibers of snake plant ( Sansevieria trifasciata ), Longitudinal section and stained with TBO. Photographed by Kourtnei.
|

Upper epidermis of inch plant ( Tradescantia zebrina ) Shown are the chloroplasts in the guard cells. Photographed by Kourtnei.

Lower epidermis of inch plant ( Tradescantia zebrina ). Shown in the lower epidermis are the anthocyanin pigments in neighboring cells. Photographed by Kourtnei.

Longitudinal section of coleus ( Plectranthus scutellariodes ) This is with no stain. You can clearly see the vascular tissue. Photographed by Kourtnei.

Longitudinal section of coleus ( Plectranthus scutellariodes ) This is with the stain phloroglucinol-HCL. You can see the vascular tissue clearly in this picture. Photographed by Kourtnei.

Cross section of wax plant ( Hoya carnies ). Stained with phloroglucinol-HCL. 40x lens. Photographed by Kourtnei.

Cross section of wax plant ( Hoya carnosa ) Stained with phloroglucinol-HCL. 100x lens. Photographed by Kourtnei.

Cross section of wax plant ( Hoya carnosa ) Stained with TBO. 40x lens. This was Kourtnei's favorite because of the blue color it turned out to be :) . Photographed by Kourtnei.

Cross section of wax plant ( Hoya carnosa ). Stained with TBO. 100x lens. This is Kourtnei's second favorite because of the blue of course :) . Photographed by Kourtnei.

Drawing of Sclerenchyma fibers of snake plant ( Sansevieria trifasciata ). Drawn by Kourtnei. Note to Dr. LP: I tried to move it where its by the picture of the snake plant but it kept messing up.
GMO Investigation
The objectives for this lab are:
-Kourtnei &Nooriya
- explain what a genetically modified organism is.
- describe the process of extracting DNA from store-bought food products.
- describe how polymerase chain reaction amplifies target DNA sequences
- discuss some of the implications for genetic engineering of agricultural crops, both positive and negative, in regards to plant biodiversity, ecosystems, co-evolution of plants and their pests, human health, and economics.
-Kourtnei &Nooriya
The food that we tested today was a Kashi Chocolate Almond and Sea Salt with chia seeds granola bar. The ingredients of this granola bar are: Rolled Whole Grain Blend (Hard Red Wheat, Oats, Rye, Triticale, Barley), Brown Rice Syrup, Roasted Almonds, Soy Protein Isolate, Semisweet Chocolate Chunks (Organic Cane Syrup, Chocolate Liquor, Cocoa Butter, Soy Lecithin, Ground Vanilla Beans), Invert Cane Syrup, Defatted Soy Grits, Dried Cane Syrup, Chocolate Liquor, Chicory Root Fiber, Chia Seeds, Degermed Yellow Corn Flour, Honey, Expeller Pressed Canola And Safflower Oil, Rice Starch, Cocoa, Vegetable Glycerin, Sea Salt, Oat Fiber, Nonfat Milk, Kashi Seven Whole Grains & Sesame Flour (Whole: Oats, Hard Red Wheat, Rye, Brown Rice, Triticale, Barley, Buckwheat, Sesame Seed), Natural Flavors, Soy Lecithin, Peanut Flour, Mixed Tocopherols For Freshness. We hypothesize that this will test negative for GMO because we learned in class that wheat has not been approved for GMO to be added and one of the main ingredients in our test food is wheat.

Kashi Chocolate Almond and Sea Salt with chia seeds bar

Kashi Chocolate Almond and Sea Salt with chia seeds bar before processing.

Certified Non-GMO Grain. The purpose of including this sample in this experiment is for our negative control to test for contamination.

Kashi Chocolate Almond and Sea Salt with chia seeds bar after grinding with mortar/pestle. It is very important to disrupt the cell walls in order to liberate the DNA because if this process did not happen, then we would not be able to isolate our DNA.

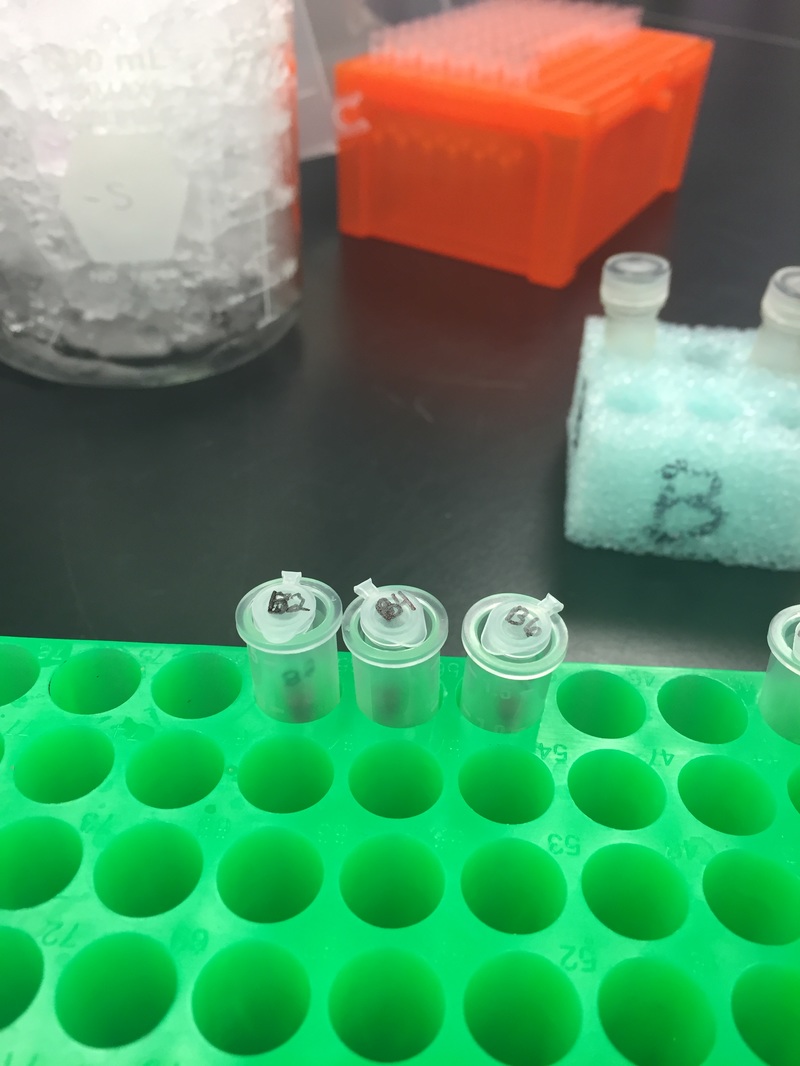
Our samples (labeled with a B for our group) in the water bath. The time in the water bath is useful because as our samples are in the water bath the enzymes that could possibly interfere with our process are getting denatured which removes any ability of the enzymes to be a problem.
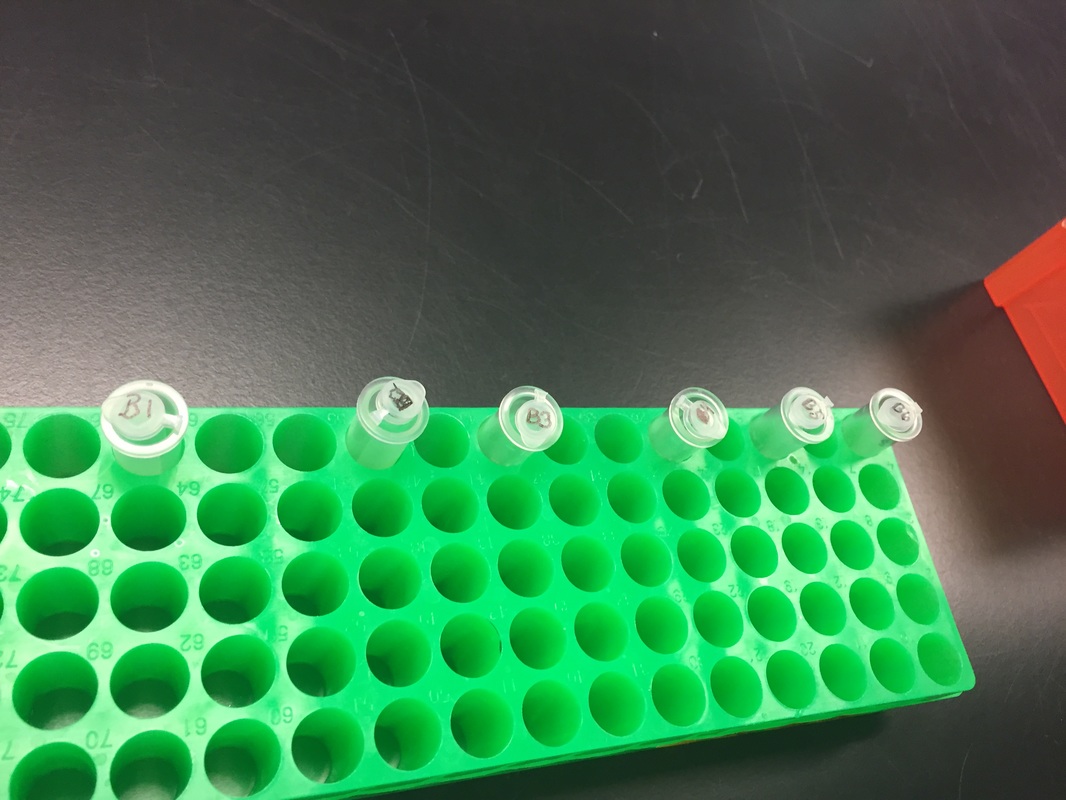
Preparation of PCR tubes (tubes all labeled)
Preparation of PCR tubes
Tubes 2,4,6 all have the red master mix which contain the GMO associated primers. The red master mix is a way to identify the DNA sequences that are common to most GM plants using primers specific to those sequences, which are red.

Preparation of PCR tubes.
Tubes 1,3,5 all have the green master mix which determine if you have extracted plant DNA or not. The green master mix is a way to identify the DNA sequences that are common to most photosynthetic plants using primers that specifically amplify a section of the chloroplast gene used in the light reaction, which are green.

Preparation of PCR tubes
Bottom of Tubes 2,4,6 all have the red master mix which contain the GMO associated primers. The red master mix is a way to identify the DNA sequences that are common to most GM plants using primers specific to those sequences, which are red.

Preparation of PCR tubes.
Bottom of Tubes 1,3,5 all have the green master mix which determine if you have extracted plant DNA or not. The green master mix is a way to identify the DNA sequences that are common to most photosynthetic plants using primers that specifically amplify a section of the chloroplast gene used in the light reaction, which are green.
Preparation of PCR tubes.
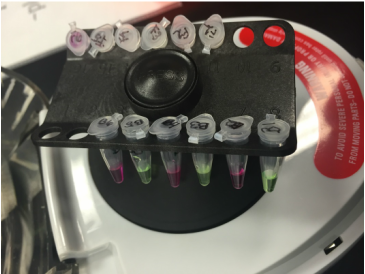
Centrfiuging tubes to get all of solution to the bottom.

Our test tubes in the thermocycler. The thermocycler, or PCR machine, carries out the 40 cycle reaction of PCR. Each cycle consists of a denaturing step, annealing step, and extending step. First it will denature the DNA template by heating it to 94°C. Then the temperature will be cooled to 59°C so the primers can anneal to the DNA. Finally, the temperature will be increased to 72°C, which is the optimal temperature for DNA polymerase functionality.
Next week we will use gel electrophoresis to visualize the products of the polymerase chain reaction and will obtain the results of this experiment.
GMO Investigation Part Two: Gel Electrophoresis
The goals for this lab were to:
-Kourtnei & Nooriya
- explain the process of electrophoresis
- interpret the results of gel electrophoresis of your PCR samples from last week
- describe how both positive and negative controls were necessary in order to assess the validity of our results for this investigation
- discuss some of the implications for genetic engineering of agricultural crops, both positive and negative, in regards to plant biodiversity, ecosystems, co-evolution of both plants and their pests, human health and economics.
-Kourtnei & Nooriya
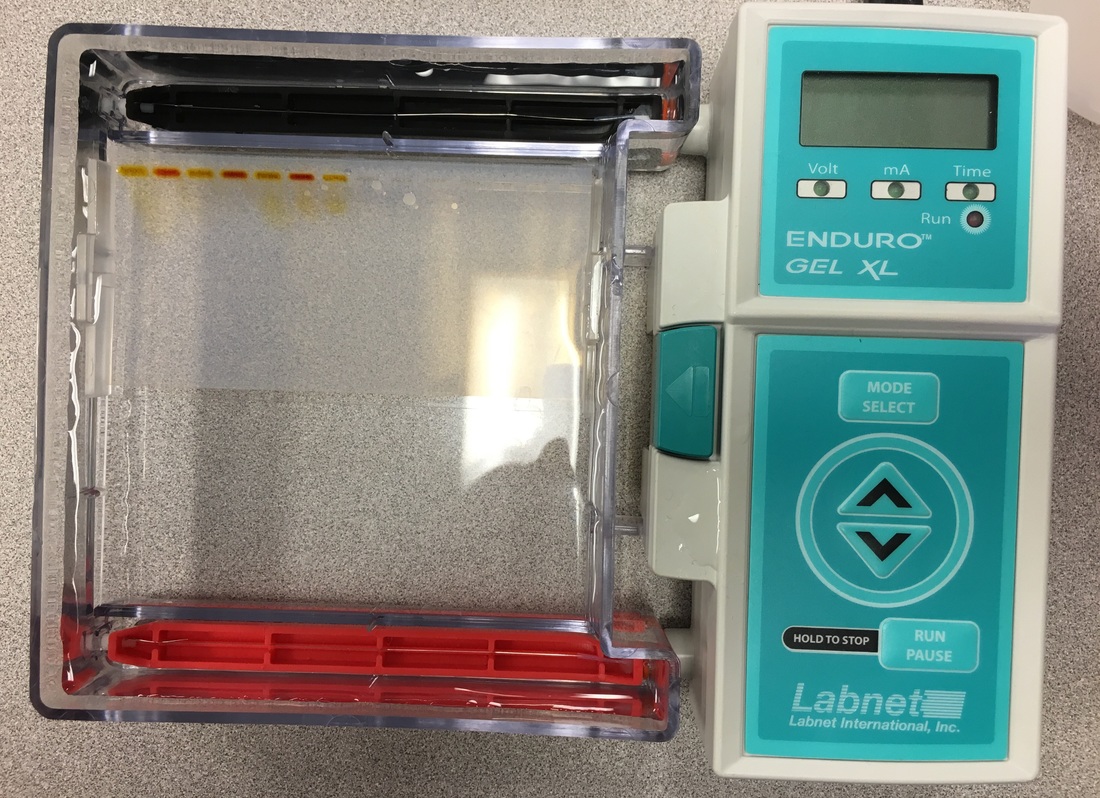
Picture of our gel for gel electrophoresis.
Gel electrophoresis is a way to separate mixtures by size. The way gel electrophoresis works is that the molecules we are trying to separate are getting pushed through an electric field through a gel that contains small pores. These will show up as bands, which will be different sizes based on the type of molecule. The type of stain we are using to view our molecules is called SafeView.
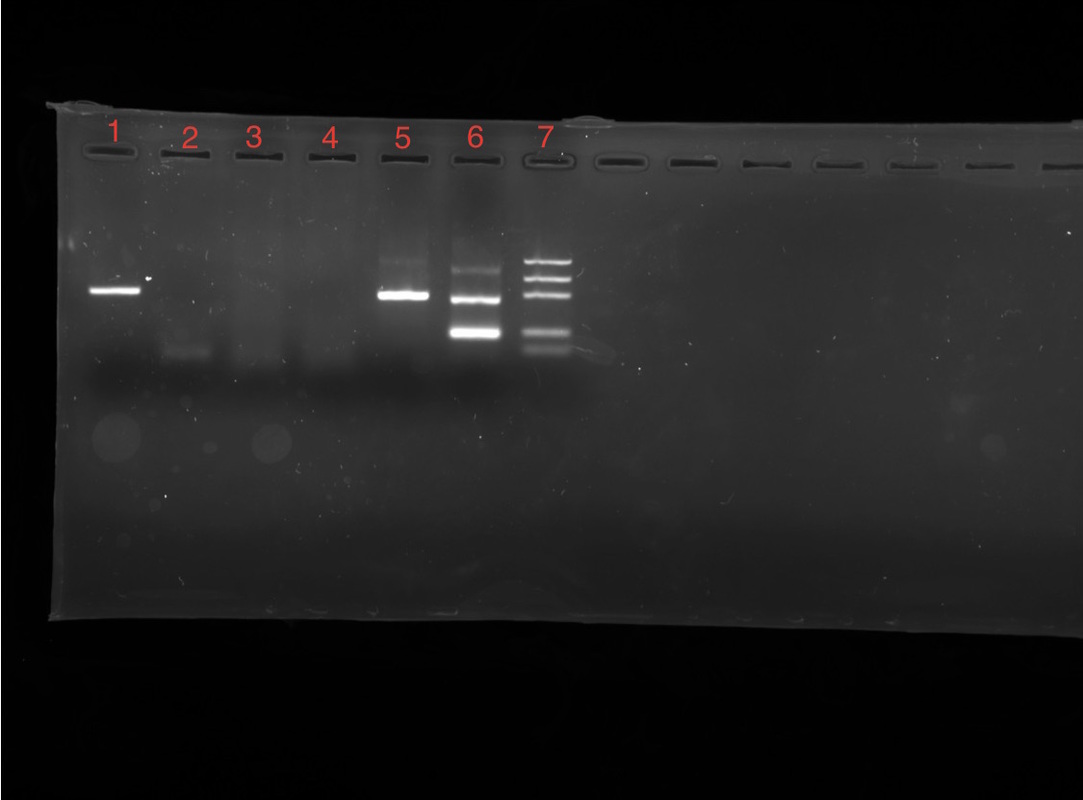
The first lane (1) was non GMO w/ plant primer and that showed a band. The second lane (2) had our negative control to test for contamination had no band so there was no contamination. Our test foods (3&4) showed inconclusive results for our test foods. The next two lanes (5&6) had our GMO positive controls and they both had a band so that ensured the PCR worked. Lane 7 had our MWR so we could measure how big the bands were.
Results of our gel:
Questions about our GMO Investigation:
Questions about our GMO Investigation:
- What was your test food? Kashi Bar
- Did your test food generate a 200 bp band with GMO primer (lane 4)? No
- What does this tell you about the GMO status of your food? Our results were inconclusive.
- What other information do you need to confirm the GMO status of your sample? That is, how do the results of your other five PCR samples help support or undermine your result for your test food? The other five PCR samples proved that our experiment did work, we just didn't extract any DNA from our test food.
- If you were to repeat the procedure, what laboratory practice might yield better results? We would use a lot more sample to try and actually get some DNA extracted as well as try and pipette better to try and reduce human error.
Bryophytes and Ferns
Lab Objectives:
1. Recognize representatives of the Phylum Bryophyta and the Phylum Hepaticophyta (non-vascular) plants.
2. Recognize representatives of the seed-free vascular plants-the Monilophytes (also known as ferns) both as the microscopic and macroscopic level.
3. Use the nomenclature, both scientific and common, associated with each nonvascular taxon observed.
4. Describe the sequence of events that occur during the life cycles of each taxon observed and recognize the gametophyte and sporophyte generations.
5. Describe the general characteristics of the nonvascular taxa observed, and how those characters are used in their classification.
We prepared slides and observed different structures that are characteristic of Bryophytes. We did the same for ferns. We observed them at different stages in their life cycles both microscopically and macroscopically.
We learned about the structural changes that occur in the life cycle of Bryophytes and ferns, as well as the characteristics that distinguish them.
- Kourtnei & Nooriya

This is a whole mount of Polytrichum moss spores.
They are produced via meiosis in the peristome of a sporophyte. Once the spores are released from the peristome, they germinate and
grow into gametophytes. Viewed under 400x magnification. Image taken by Nooriya.

Whole mount of moss protonema belonging to Phylum Bryophyta. Some spores germinate and grow into protonema. Then the protonema becomes a male gametophyte. The spores that do not become protonema become female gametophytes. Viewed under 400x magnification. Image taken by Nooriya.

Polytrichum sp. (haircap moss) gametophytes with sporophytes attached. Image and drawing by Nooriya.

Whole mount of Sphagnum sp. (peat moss) gametophyte. The left is unstained. you can see the green chloroplasts towards the bottom and the empty looking hyaline cells. In the image on the right, the specimen has been stained with Phenol-Red to detect lignin, however lignin is absent in this group, therefore there is no red color. This was my favorite specimen because of how clearly I could see the hyaline cells. Viewed under 400x magnification. Image by Nooriya.

Marchantia sp. (Liverwort thallus) viewed under a dissecting scope. The pores can be seen all over. Gas exchange occurs through these pores, since there are no stomata. Image taken by Nooriya.

Drawing of sporophyte generation of Davallia sp. fern belonging to Phylum Monilophyta. Drawing by Nooriya.
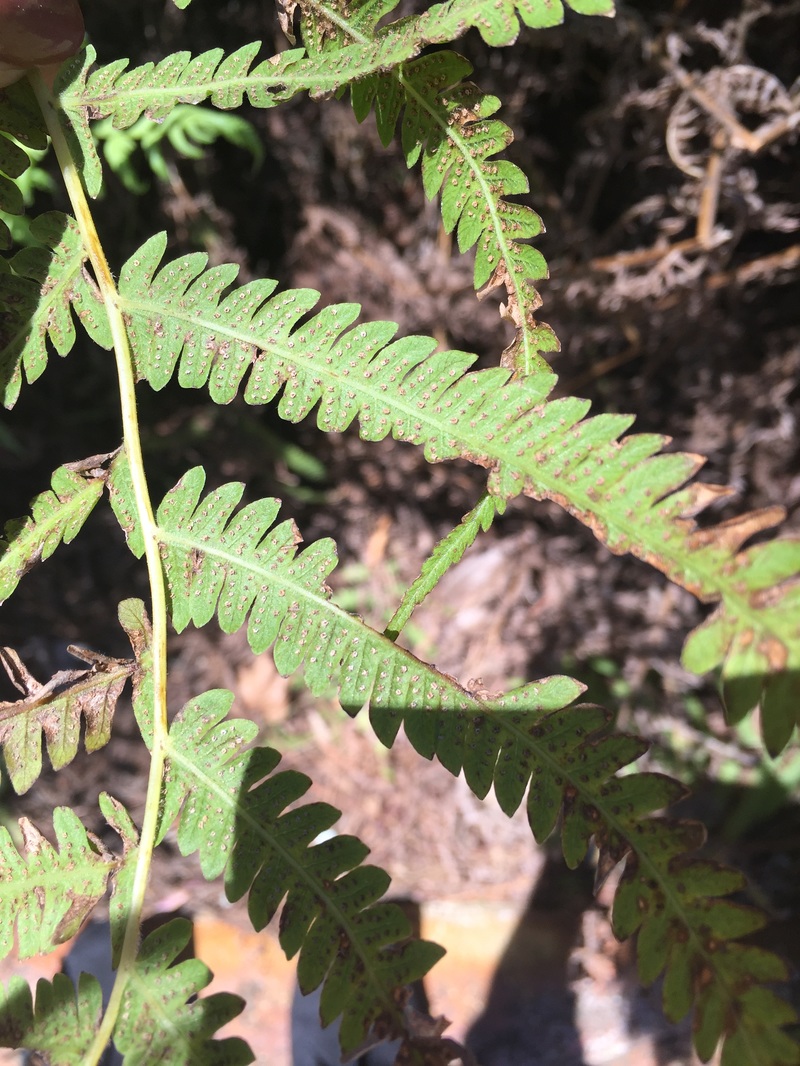
Fern frond.
Sporophytes produce spores through meiosis within the sporangia. The male sex organ is called the antheridia. The female sex organ is archegonia.
Photo taken by Kourtnei.
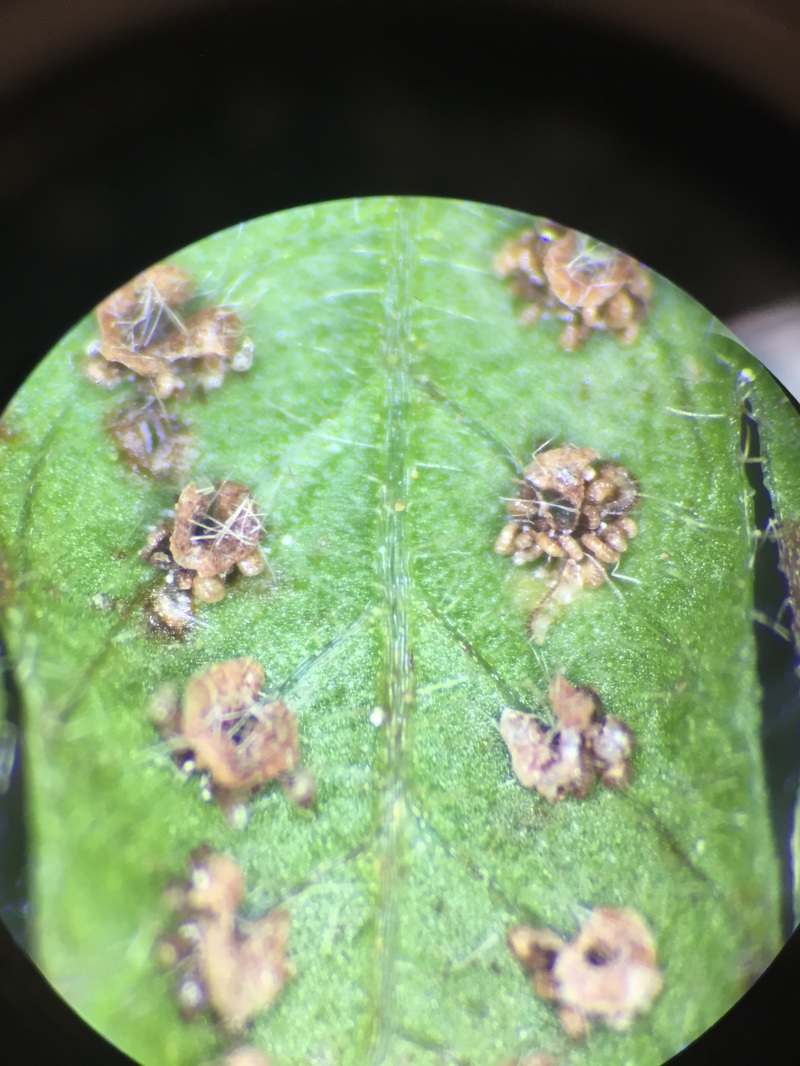
Sori on underside of fern frond. Photo taken by Kourtnei. This was my favorite specimen as the spores definitely didn't look like spores to me, they looked like bugs!
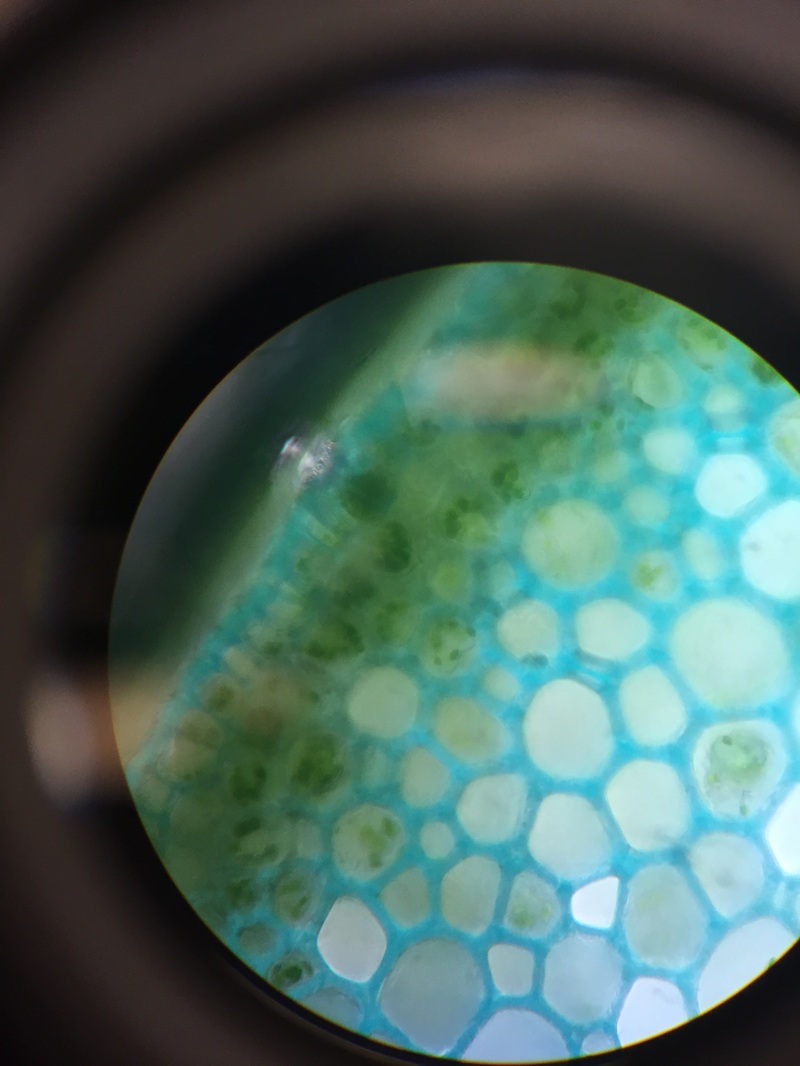
Cross section of Psilotum nudum .The areas that are blue have lignin in them. These are the sclerenchyma fibers and sclereids and within the water conducting cells of the xylem. Photo taken by Kourtnei.

Image of Equisetum sp. . Photo taken by Kourtnei.
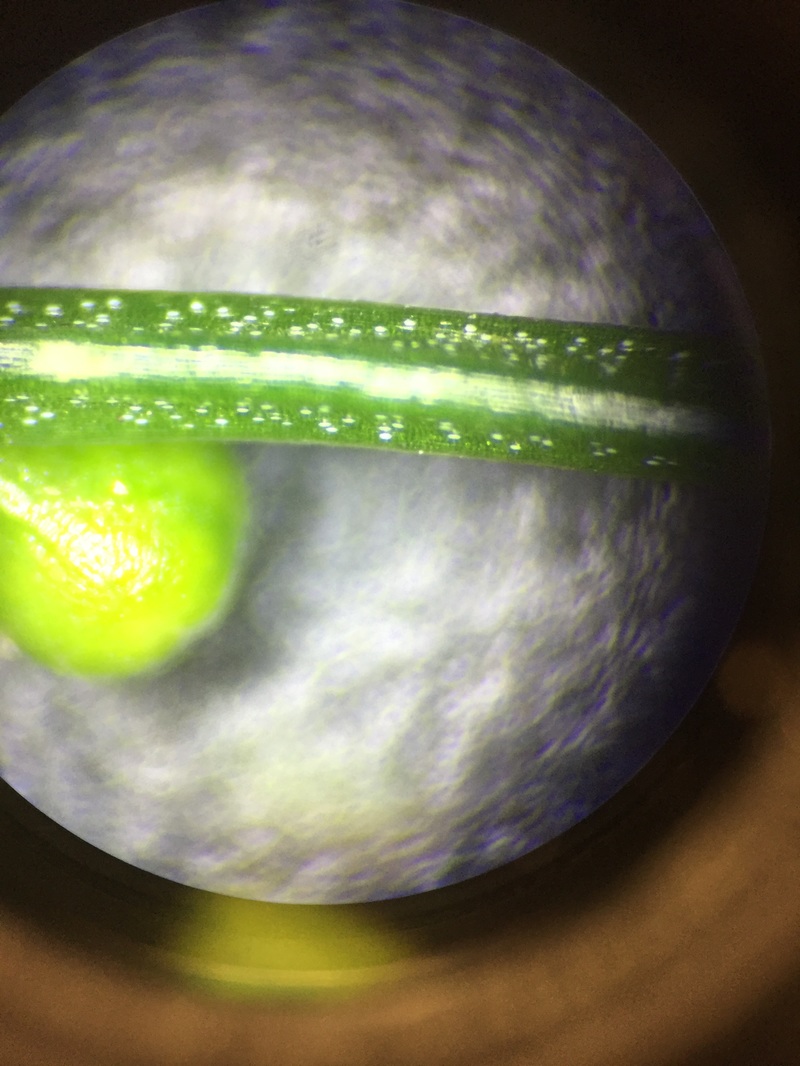
Image of Psilotum nudum . Photo taken by Kourtnei.
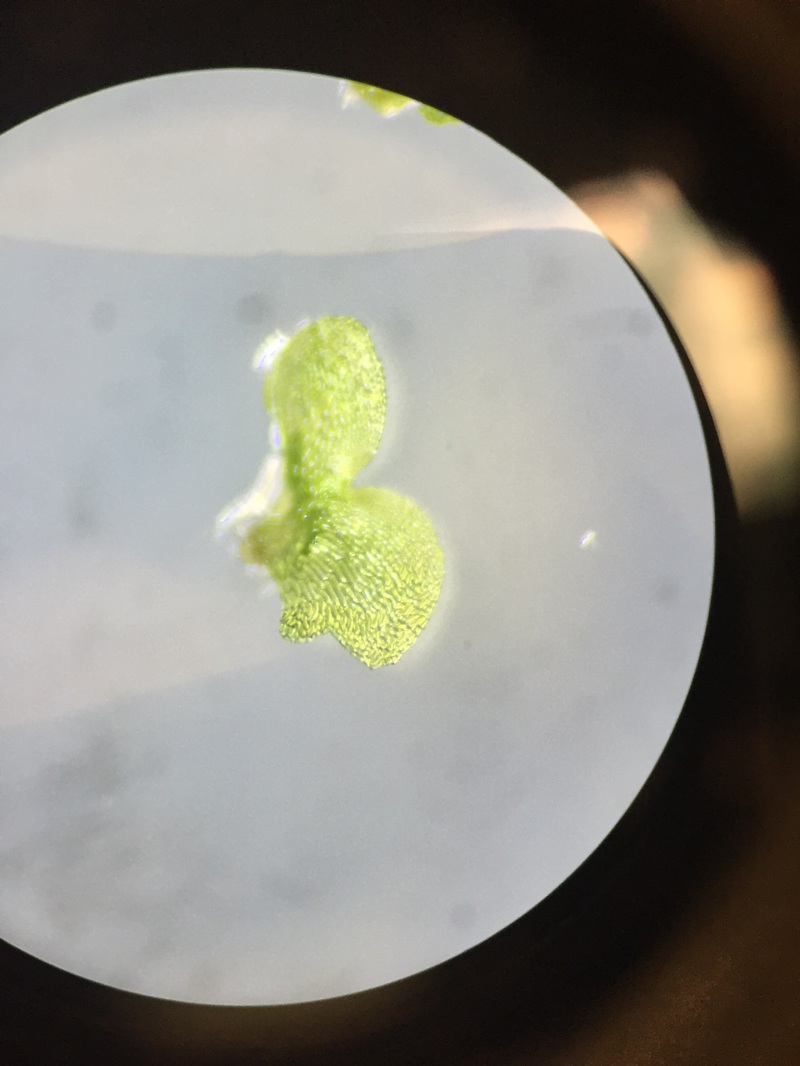
C-fern gametophytes two weeks after sowing spores. C-fern . in phylum Monilophyta. Pictured is the gametophyte. 40X magnification. Photo taken by Kourtnei.
AngioSperms and GymnoSperms
The objectives for this lab:
1. Recognize representatives of the gymnosperms and angiosperms.
2. Describe the sequence of events that occur during the life cycles of each taxon observed and recognize the gametophyte and sporophyte generations.
3. Identify the parts of a flower and describe their functions.
4. Understand the terms related to ovary position, presence and absence of floral organs, and floral symmetry-and be able to use them to describe a specimen.
5. Prepare diagrams to record important features revealed during a floral dissection.
We learned the structures of a flower, and their functions. We also observed Cycads, Ginkgos and Conifers around campus and their distinguishing characteristics.
- Kourtnei & Nooriya

Observation of mature Pine embryo. This relates to the picture of the female cone in you can see the depressions in the cone. In those depressions, you have seeds and those seeds contain an embryo like the one shown in this picture.
Photo taken by Kourtnei.

Pine mature male cone at 40X.
Photo taken by Kourtnei.

Pine mature male pollen grains at 400X. Photo taken by Kourtnei. You can clearly see the two air bladders coming off the grain to help keep it buoyant in the air. This was my favorite as you can the details of the male pollen grain like we discussed in class.

Female cone. Photo taken by Kourtnei.

Image of Raphiolepis indica . This was the beginning of the flower dissection. Photo taken by Kourtnei.

Image of R. indica after flower dissection. This flower has a bilateral symmetry, is complete, perfect and ovary inferior. You can see there is two styles that are interconnected. Photo taken by Kourtnei.

Longitudinal section of a carpel. Photo taken by Kourtnei.
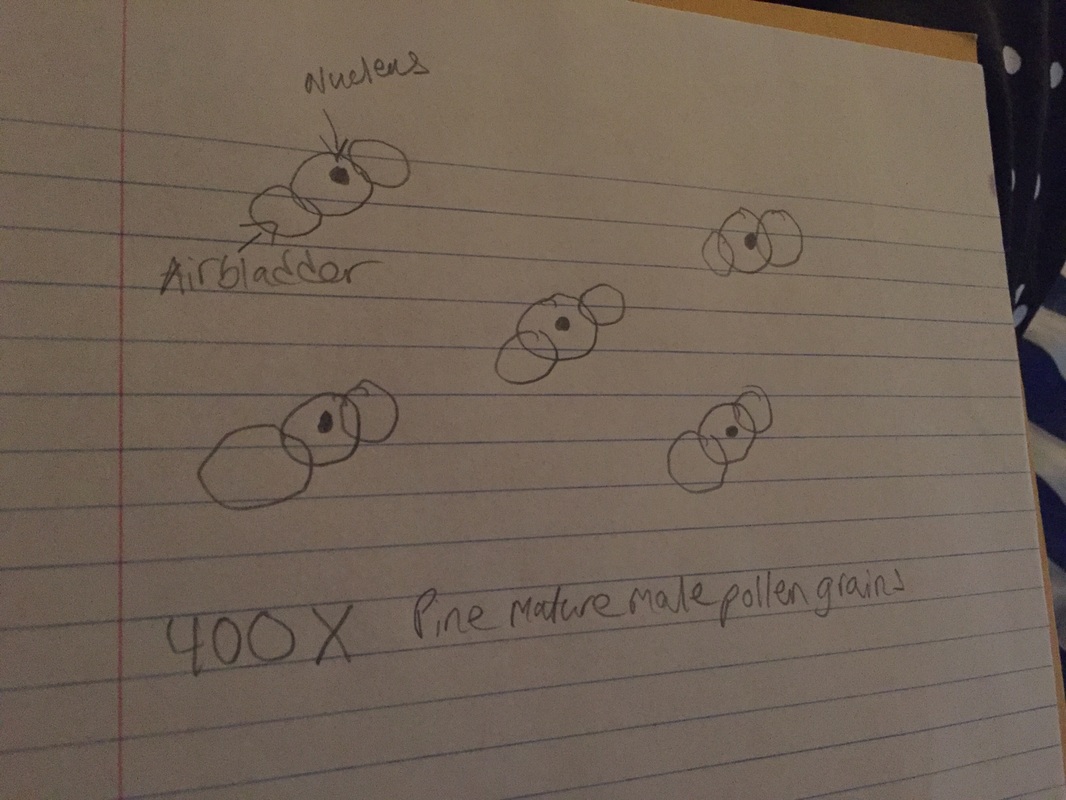
Drawing of the pine mature male pollen grains at 400X. The nucleus is in the center of the pollen grain and there are two air bladders coming off if them to help the grain keep its buoyancy in the air. Drawing by Kourtnei.

Ginkgo biloba is the only surviving species of Ginkgophyta. This is a deciduous species, that is why the tree has so few leaves right now. Ginkgos have flagellated sperm. Photo taken by Nooriya.

Dioon edule is a member of cycadophyta. Cycads are the only gymnosperms with compound leaves and appeared 300 million years ago. They were dominant vegetation at that time. Cycads have roots that stick out of the grown that contain nitrogen fixing cyanobacteria. Cycads have flagellated sperm and are insect pollinated. Photo taken by Nooriya.

Tsuga canadensis is a member of coniferophyta. Conifers have male and female cones. In these pictures you can see the male cones. Conifers are wind pollinated. Photo taken by Nooriya.

Metasquoia glyptostroboides. A member of coniferophyta. Photo taken by Nooriya.

Raphiolepis indica. This is the flower I chose for my dissection. In this photo it has not been dissected yet and you can see the stamen, petals and sepals. Photo taken by Nooriya.

The photo on the top left is of the flower with the sepals removed. The top right is with the sepals and petals removed. The bottom photo shows the carpel and two styles, with stigma at their tips. This flower is zygomorphic and complete. It is perfect and has an inferior ovary. This was my favorite specimen because I enjoyed dissecting the flower. Photos taken by Nooriya.

Flower carpel, longitudinal section. The carpel is the female reproductive organ. Pollen is received at the stigma (which is at the tip of the style). The style connects the stigma to the ovary, which contains the ovules. These ovules contain egg cells. Drawing by Nooriya.
Roots & C-Fern Observations (& Shoot Cuttings)
how identfyThe goals for this lab are to:
-identify external features of plant roots, including root hairs
-identify internal anatomy of plant roots
-distinguish monocot roots from those of dicots, both from external morphology and from internal anatomy
-describe the principle functions of roots
We learned how to identify external features of the dicot (pea) and monocot (corn). We also learned to identify root hairs and root caps. We learned how to do mitotic squashes and learned how to shoot cut as well as learned the functions of roots.
-Kourtnei and Nooriya

Sketch of dicots (pea). Shown are the taproot, shoot. The one on the left is 1 week old, the one on the right is 3 weeks old.
Sketch drawn by Kourtnei.

A monocot (corn) at 3 weeks. Drawing by Nooriya.

Roots from C-fern culture. Shown are the root hairs , which are surrounding the root cap. If you look closely, you can see some of the parenchyma cells peeling off. Image at 40X. Photo taken by Kourtnei.

Mitotic squashes of the onion ( Allium cepa ). The mitotic phase shown is metaphase. 100X w/oil immersion. This was Kourtnei's favorite specimen as you can clearly see the different mitotic stages in the cells versus on a prepared slide. Photo taken by Kourtnei.

Mitotic squashes of the onion ( Allium cepa ). The mitotic phase shown is anaphase. 100X w/oil immersion. Photo taken by Kourtnei.

Cross section of dicot (pea) root. Shown at 4X: Epidermal cells along the outside of the cell, dark cortex in the center of the cell, and the three areas stained light blue is where the stain Toluidine Blue tested positive for blue. Photo taken by Kourtnei.

Cross section of monocot (corn) root stained with Toluidine Blue. 100x magnification. Photo taken by Nooriya.

This is the shoot that I cut from the Tradescantia zebrina plant. I first cut the stem and then plucked off all but 3 leaves. I then placed the cut end in water and under light. In a few weeks, roots should form (hopefully). Photo taken by Nooriya.

These are pictures of the C-fern sporophytes. The top is a picture of C-fern sporophytes prepared by Dr. LP, and the bottom are my sporophytes. My sporophytes did not develop as well and did not develop any roots at all, so I used the top sporophytes for my transplant. Photos taken by Nooriya.

Sporophytes after transplanting to potting media. Photo taken by Kourtnei.
