Week 1: Botanical Explorations with (and without) Dissecting Microscopes
1/11/2016
Goals
Our initial goal was to familiarize ourselves with the dissecting scopes with an emphasis on the usefulness, applications, and skills. We then successfully established a comfortable relationship between ourselves and developed a safe and friendly atmosphere for cooperative learning. The final aspect of our goal was to openly ask questions and prepare our minds for the interestingly awesome botanical journey we have ahead of us.
Our initial goal was to familiarize ourselves with the dissecting scopes with an emphasis on the usefulness, applications, and skills. We then successfully established a comfortable relationship between ourselves and developed a safe and friendly atmosphere for cooperative learning. The final aspect of our goal was to openly ask questions and prepare our minds for the interestingly awesome botanical journey we have ahead of us.
This was our first lab of the semester! We went around campus in search of a plant item apiece. Kevin and I decided to look around the Student Recreation Center, wherein we found our two specimens. We examined each under the dissecting scope and using our unaided eyes (aided in my case). I was most surprised to see such fine hairs on the underside of my leaf, however, I could not feel them.
- Loye
- Loye
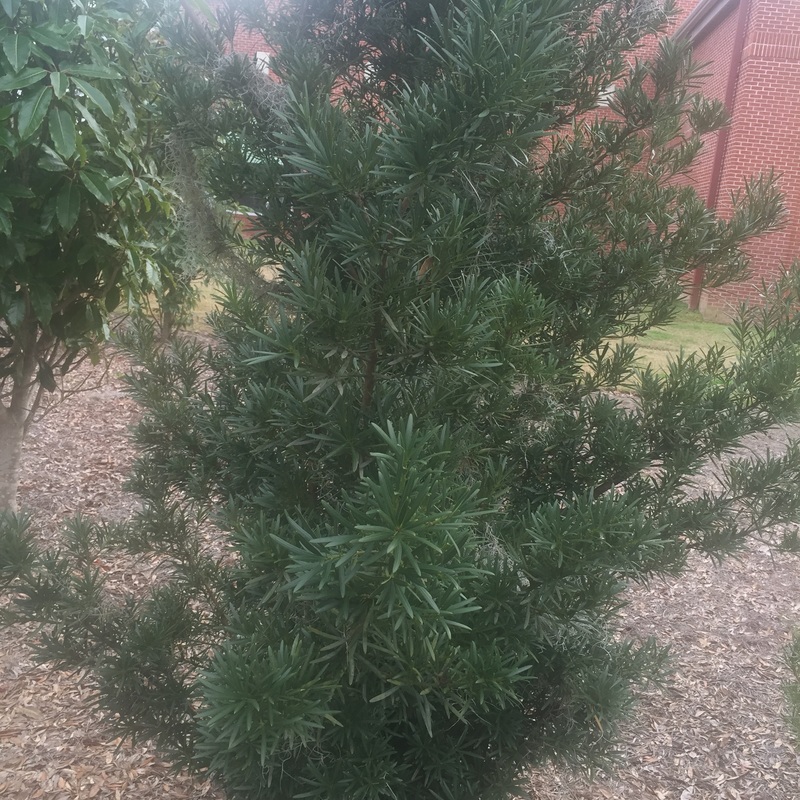
Podocarpus chinensis Located at the SRC
- Photographed by Kevin |

Podocarpus chinensis viewed through the dissecting scope at 7.5x.
- Photographed by Kevin |

Daphinphyllum himalaense ssp. macropodum viewed without the aid of a microscope.
- Photographed by Loye |

Daphinphyllum himalaense ssp. macropodum viewed at 50x total magnification with the boom arm dissecting microscope. - Photographed by Loye
|
Week 2: Plant Cells & Scientific Drawings
1/25/2016
Goals
Our goal for this exercise was to practice preparing a wet-mount slide of plant cells in order for viewing under a compound microscope. We had to recognize the various and different slide preparation techniques of the whole mount, the epidermal peel, the sections (such as longitudinal and cross), as well as smears. Once we achieved recognition we were able to find and identify the visible characteristics of a living plant cell such as the cell wall, vacuole, nucleus, chloroplasts, and the cytoplasm. After we were able to identify the characteristics of a living plant cell we used biological stains in order to make those characteristics visible for a microscopic study. Our final goal was to be able to accurately produce a scientific diagram with a fully labeled living plant cell.
Our goal for this exercise was to practice preparing a wet-mount slide of plant cells in order for viewing under a compound microscope. We had to recognize the various and different slide preparation techniques of the whole mount, the epidermal peel, the sections (such as longitudinal and cross), as well as smears. Once we achieved recognition we were able to find and identify the visible characteristics of a living plant cell such as the cell wall, vacuole, nucleus, chloroplasts, and the cytoplasm. After we were able to identify the characteristics of a living plant cell we used biological stains in order to make those characteristics visible for a microscopic study. Our final goal was to be able to accurately produce a scientific diagram with a fully labeled living plant cell.
Today we reviewed the details and tricks of our compound microscopes, which at the beginning of any semester is always welcomed. We also reviewed how to make wet-mount slides for specimens that are not of the bacterial persuasion. Once we had the basics down we prepared numerous slides to identify various features of a living plant cell. Also, we used two stains, Iodine and Toluidine Blue to help provide contrast so that we could easily view these structures. In addition to all of this we worked on our first scientific diagrams and hashed out the finer details of maintaining our lab notebooks.
- Loye & Kevin (Team Beard)
- Loye & Kevin (Team Beard)
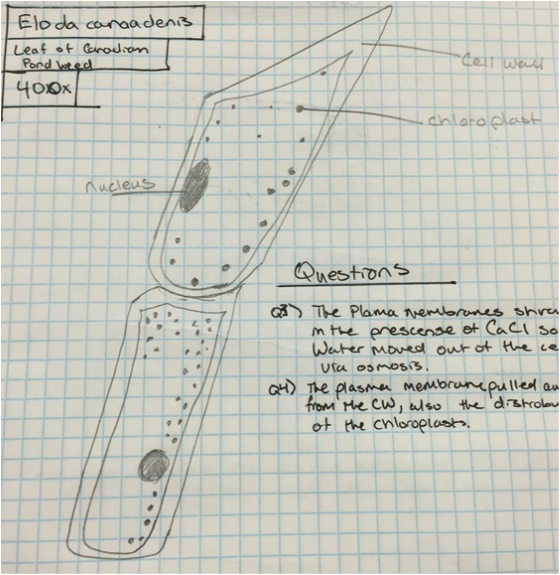
Whole mount leaf of Canadian pondweed,
Eloda canadensis, viewed at 400x using compound microscope. - Drawn by Loye
|

Whole mount Epidermis of Allium cepa (onion) stained with toluidine blue viewed at 400x using compound microscope. - Drawn by Kevin
|
|
In the image to the right the nucleus is situated against the cell wall due to turgor pressure caused by the vacuole. |

Epidermal peel of Allium cepa toluene blue viewed
at 400x viewed with compound microscope. - Slide prepared and photographed by Loye |

Whole mount of Eloda canadensis leaf prior to 5% CaCl solution, viewed at 400x with compound microscope.
- Slide prepared and photographed by Loye |

Whole mount of Eloda canadensis leaf after addition of 5% CaCl solution, viewed at 400x with compound microscope.
- Slide prepared and photographed by Loye This was my favorite specimen of the day, it was awesome to see how quickly the plasma membrane will shrink after loss of water. - Loye |
In the image to the direct left you can visualize how much the cytoplasm has pulled away from the cell wall. This is due the CaCl solution pulling water from inside the cell and into the environment by osmosis. |

Cut of Capsicum annuum (yellow bell pepper) viewed Unstained at 400x with compound microscope.
- Slide prepared and photograph by Kevin |

Cut of Capsicum annuum (green bell pepper) viewed Unstained at 400x with compound microscope.
- Slide prepared and photograph by Kevin |

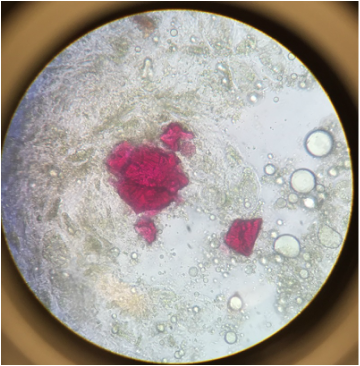
Cut of Capsicum annuum (red bell pepper) viewed Unstained at 400x with compound microscope.
- Slide prepared and photograph by Kevin |
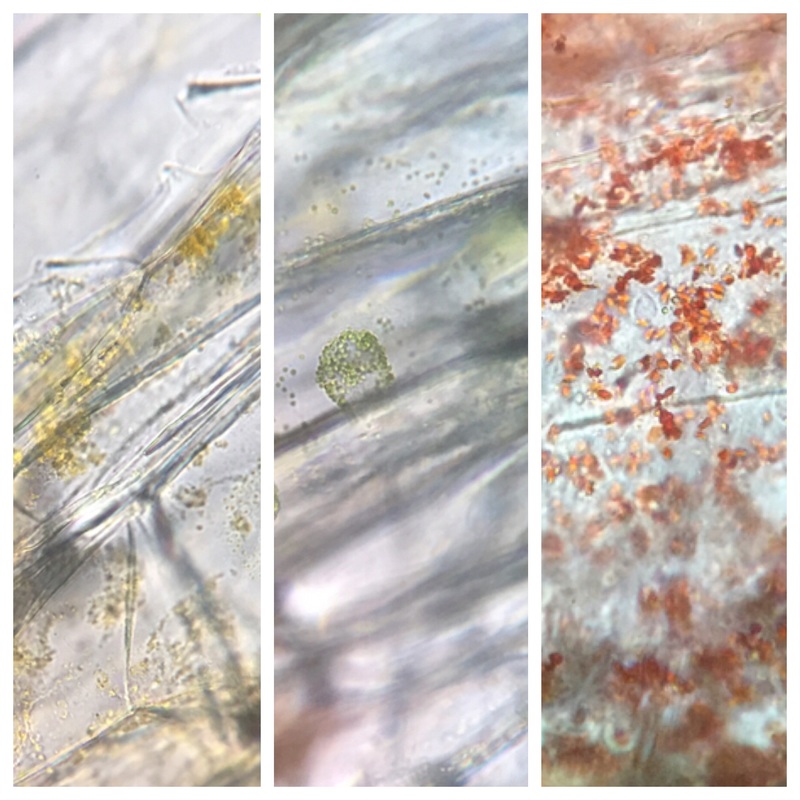
Cut of Capsicum annuum Side-by-side viewed Unstained at 400x with compound microscope.
- Slide prepared and photograph by Kevin |
In this view we can see the size comparison from each stage of the pepper as it turns read the chromoplasts are larger. The shapes differ as well from round to a more jagged edge in the red pepper. |
|
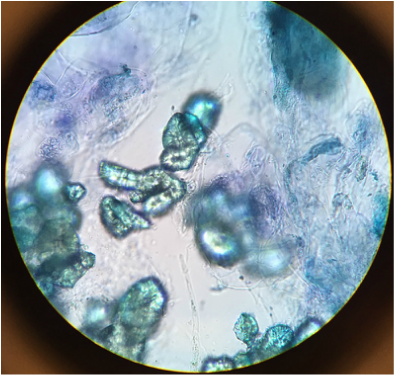
This was my favorite specimen of the day, the Raphides are needle-shaped calcium oxalate crystals to dissuade the eating of this plant. So I like that crystals aren't only formed deep inside of our planet but inside plants as well. - Kevin |

Cross section of Tradescantia sp. (spiderwort) viewed Unstained at 400x with compound microscope.
- Slide prepared and photograph by Kevin |
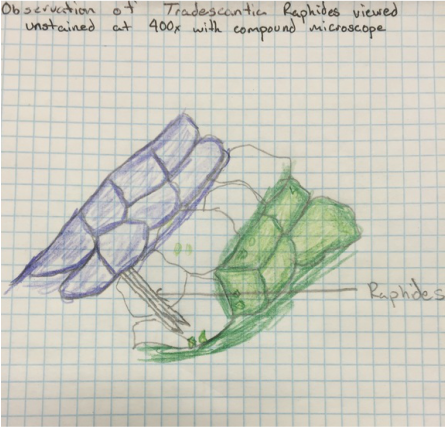
Cross section of Tradescantia sp. (spiderwort) viewed Unstained at 400x with compound microscope.
- Slide drawn and photograph by Kevin |

Section of Solanum tubersoum viewed with Iodine stain at 400x with compound microscope.
- Slide prepared and photograph by Loye
- Slide prepared and photograph by Loye

Smear of unripe Musa sp. (banana) viewed with Iodine at 100x with compound microscope.
- Slide prepared ad photograph by Loye |

Smear of over-ripe Musa sp. (banana) viewed with Iodine at 100x under compound microscope.
- Slide prepared and photograph by Loye |
Week 3: Photosynthesis
02/01/2016
Goals
Our goal this week is using chromatography to separate and identify various pigments found in photosynthetic plant tissues. Then develop an explanation of why having more types of photosynthetic pigment would enhance a plant's success. Using an experiment to demonstrate that carbon fixation during the "synthesis" reactions of photosynthesis is dependent on products of the "photo" reactions. Finally using a starch test to examine the effects of carbon-starvation and light-deprivation have on the synthesis reactions of photosynthesis.
- Loye & Kevin (Team Beard)

Leaf of Magnolia Grandiflora viewed without the aid of a microscope
- photograph by Kevin |

Loye setting up Chromatography paper
- prepared by Loye photograph by Kevin |
|

Absorption spectrum for Cartoene

Absorption spectrum for Xanthophyll

Absorption spectrum for Chlorophyll a

Absorption spectrum for Chlorophyll b
|


|
|
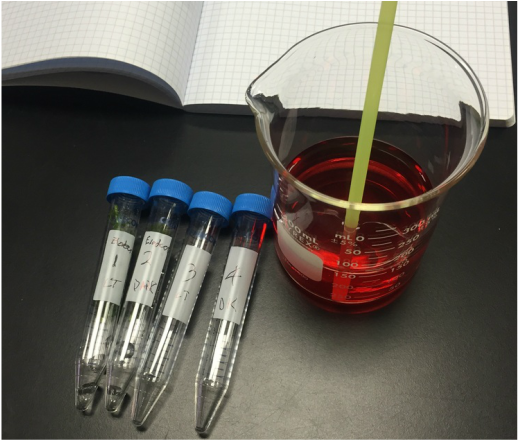
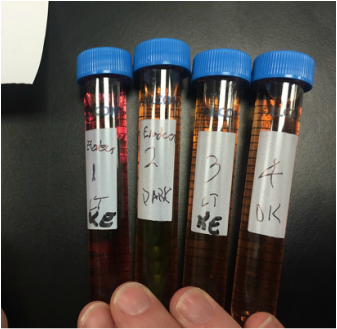
Tubes 1 and 3 were positioned under lamps, while tubes 2 and 4 were kept in the dark. We used phenol red in water as a pH indicator solution, which at close to neutral is red. We introduced CO2 through a straw, which was held in solution as carbonic acid, changing the solution to a light orange color. After this a sprig of Elodea was placed in the tubes 1 and 4, then respectively left in the light and dark. Tube 1 showed us that the Elodea was still undergoing photosynthesis and raised the pH of the solution, changing the color to red.
Seeing the active science behind photosynthesis was my favorite part of today. Seeing is believing.
- Loye |
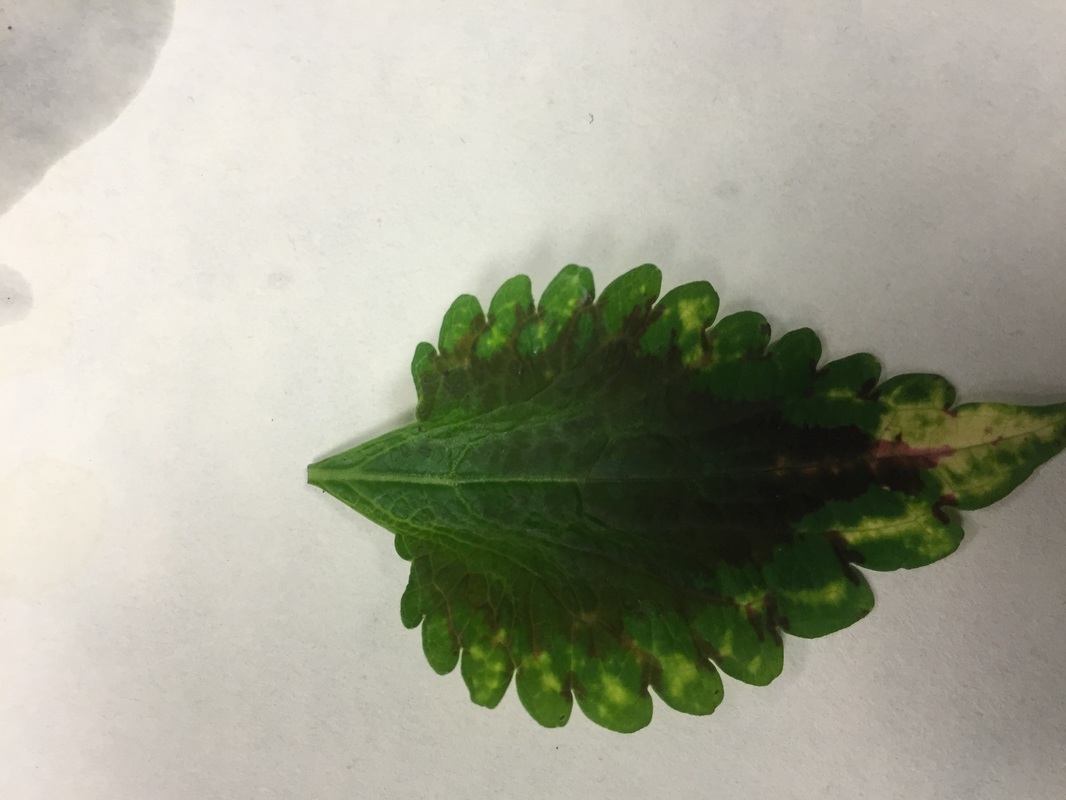
Leaf of Plectranthus scutellarioides before boiling and staining viewed without the aid of a microscope
- prepared by Kevin and Loye photograph by Kevin |

Leaf of Plectranthus scutellarioides after boiling in water viewed without the aid of a microscope
- prepared by Kevin and Loye photograph by Kevin
|

Leaf of Plectranthus scutellarioides after boiling in ethanol viewed without the aid of a microscope
- prepared by Kevin and Loye photograph by Kevin |

Leaf of Plectranthus scutellarioides during iodine stain viewed
without the aid of a microscope - prepared by Kevin and Loye photograph by Kevin |

Leaf of Plectranthus scutellarioides stained with iodine viewed
without the aid of a microscope - prepared by Kevin and Loye photograph by Kevin |
In the image to the direct left the lighter areas show that starch was present in the locations of the leaf that were green or contained chlorophyll. This was my favorite activity of the day, boiling the leaf and then seeing the difference from staining was science in motion. - Kevin |

|

|
Team Beard Sciencing the ---- out of it.
Week 4: Simple and Complex Tissues
2/8/2016
Goals
This week we were to compare and contrast parenchyma, collenchyma, and sclerenchyma cells and tissues, which are part of the ground tissue system. Also, we recognized the three tissue systems of the plant body, dermal, ground, and vascular. We identified the water-conducting cells, the vascular tissue system, and their structural features and functions. And upon an epidermal peel we saw the features of the epidermis.
- Loye & Kevin (Team Beard)
Cross-section of wax plant (Hoya carnosa) stem stained with Toluidine Blue O, viewed with compound microscope at 400X.
Drawn and Photograph by Loye 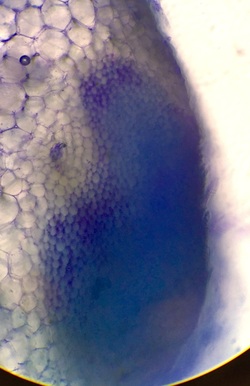
Cross-section of celery (Apium graveolens), stained with Touidine Blue O and viewed at 100x with compound microscope
Photograph by Loye. |
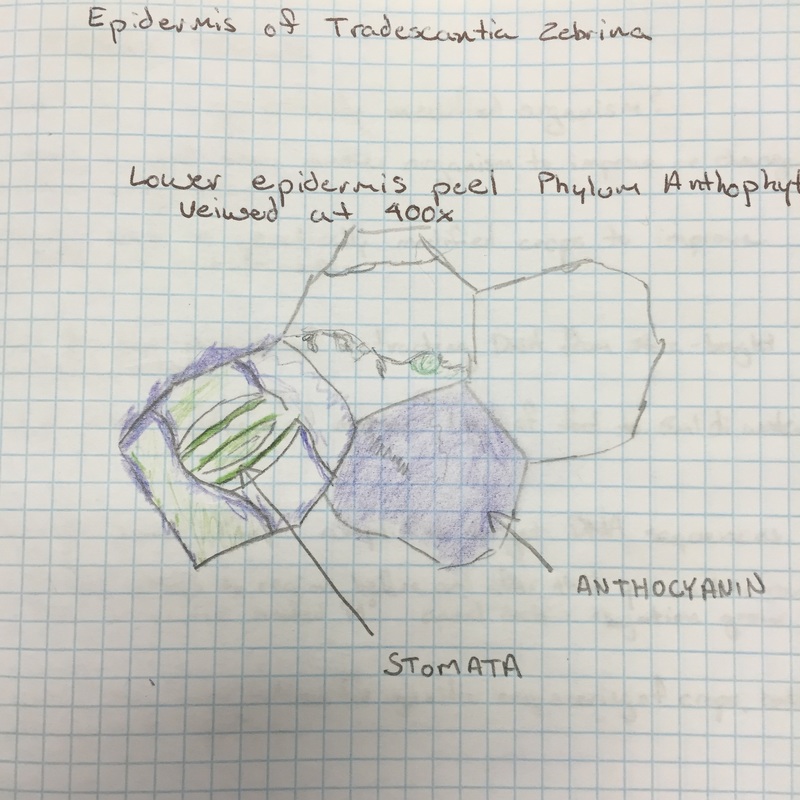
Epidermal peel of epidermis of inch plant (Tradescantia zebrina) viewed with
compound microscope at 400x. Drawn and Photograph by Kevin The two tissues that we photographed to the right, and contrasted with Toluidine Blue O, are collenchyma cells and parenchyma cells. The darkly stained areas are the collenchyma cells, stained because of pectins. The lightly, almost translucent cells are the parenchyma tissue, which are precursor cells that later undergo differentiation. |
Sclerenchyma of pear fruit (Pyrus communis) stained using Toluidine Blue O and viewed with compound microscope at 400x.
Photograph by Kevin |
Sclerenchyma of avocado fruit (Persea americana) stained with phloroglucinol-HCl and viewed with compound microscope at 400x.
Photograph by Loye |
|
This was my favorite part of the lab. I originally had a section of the snake plant that was not quite what we were looking for. After some confirmation and adjustments from Dr. L-P, we obtained the images seen here. -Loye |
Cross section of sclerenchyma fibers of snake plant (Sansevieria trifasciata), stained with Touidine Blue O and viewed with compound microscope at 100x.
Photograph by Loye |

Cross section of sclerenchyma fibers of snake plant (Sansevieria trifasciata), stained with Touidine Blue O and viewed with compound microscope at 400x.
Photograph by Loye |
Longitudinal-section of sclerenchyma fibers of snake plant (Sansevieria trifasciata),
stained with Touidine Blue O and viewed with compound microscope at 400x. Photograph by Kevin |
|


Epidermal peel of epidermis of inch plant (Tradescantia zebrina) viewed with
compound microscope at 400x. Photograph by Kevin |
In the image to the right of the epidermal peel of the inch plant (Tradescantia zebrina) there was an absence of chloroplasts through out the peel, with the exception of the guard cells of the stomata. Also, we observed the pigment to the right of the bottom-most stomata and identified it as anthocyanin. |
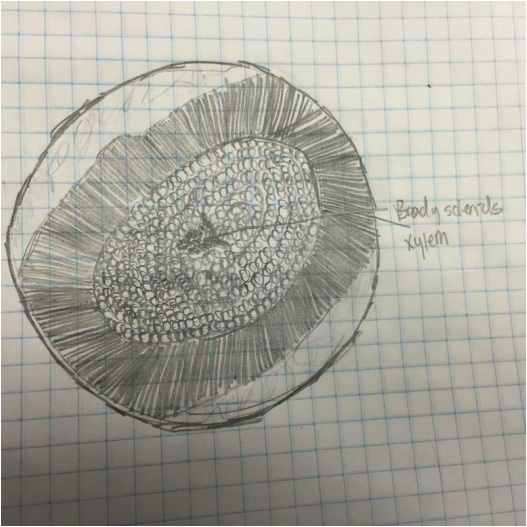
Cross-section of wax plant (Hoya carnosa) stem stained with Toluidine Blue O, viewed with compound microscope at 100X.
Photograph by Loye |
Cross-section of wax plant (Hoya carnosa) stem stained with Toluidine Blue O, viewed with compound microscope at 400X.
Photograph by Loye |
We observed brachysclereids in the pith, positioned directly in center of both images. The surrounding green, lignified ring is the xylem, which mostly transports water. Further out from that are the also green, lignified cells that make up the cortex as seen in the wider cross-section on the left. |
Week 5 : GMO Investigation, Part I
2/22/2016
Goals
This week we learned that organisms that have had particular genes introduced into their genomes are classified as genetically modified. To further understand this concept we went through the process of extracting DNA from common food items. We achieved this by grinding samples into slurry with deionized water to a specified concentration, then we added it to a screwcap tube containing InstaGene matrix. These negatively charged beads allow for the separation of positively charged minerals from the negatively charged DNA to allow it to run through PCR. The PCR achieves the amplification of target DNA sequences by using unique primers for those particular sequences, then it uses existing DNA replication machinery that are borrowed from thermophilic Archaea. Through submitting the samples to various temperatures it forces the DNA to undergo replication on an exponential scale. Also, watched a film in class that showed the massive economical, social, and environmental impact that genetically modified organisms have on our pale blue dot.
- Loye & Kevin (Team Beard)
|
We chose to use Cinnamon Toast Crunch (Innamoncay oastay-unchcray) cereal as our test food to determine if it contained any GMO ingredients. Through discussion with Dr. L-P we learned that genetically modified wheat has not been approved for use in the United States. As wheat is the main ingredient in this cereal we hypothesize that it will not show the presence of GMOs. The cereal does contain soy lecithin that is sourced from soybeans, of which a large percentage have been genetically modified.
|

Ingredients of Innamoncay oastay-unchcray.
|

1.0g sample of Cinnamon Toast Crunch
(Innamoncay oastay-unchcray) viewed with naked eye. Photograph by Loye |

1.0g sample of non-GMO raw rolled oats
(Avena sativa) viewed with naked eye. Photograph by Loye |
The purpose of using the non-GMO raw rolled oats was to provide a negative control to our experiment. When we later run look for the presence of GMOs in the sample containing this we should find none whatsoever, if GMO is present contamination of our samples has occurred. |
|
We created a slurry to mix with the InstaGene matrix that consisted of the food sample Innamoncay oastay-unchcray and deionized water. This allowed for disruption of the tissue allowing for a more complete separation of the DNA from other minerals that would interfere with PCR.
My favorite part about this lab was using the mortar and pedestal, because you really don't get that many opportunities to use them. Also, they were produced by Coors and historically helped them remain in operation during prohibition. - Loye |

Kevin putting the pedestal to the muddle.
Photograph by Loye |
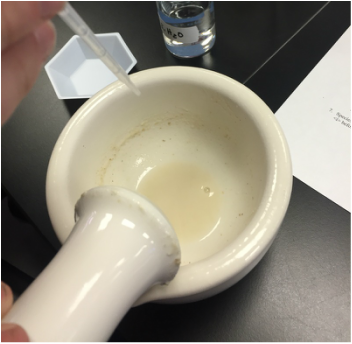
Slurry created with deionized water.
Photograph by Loye |
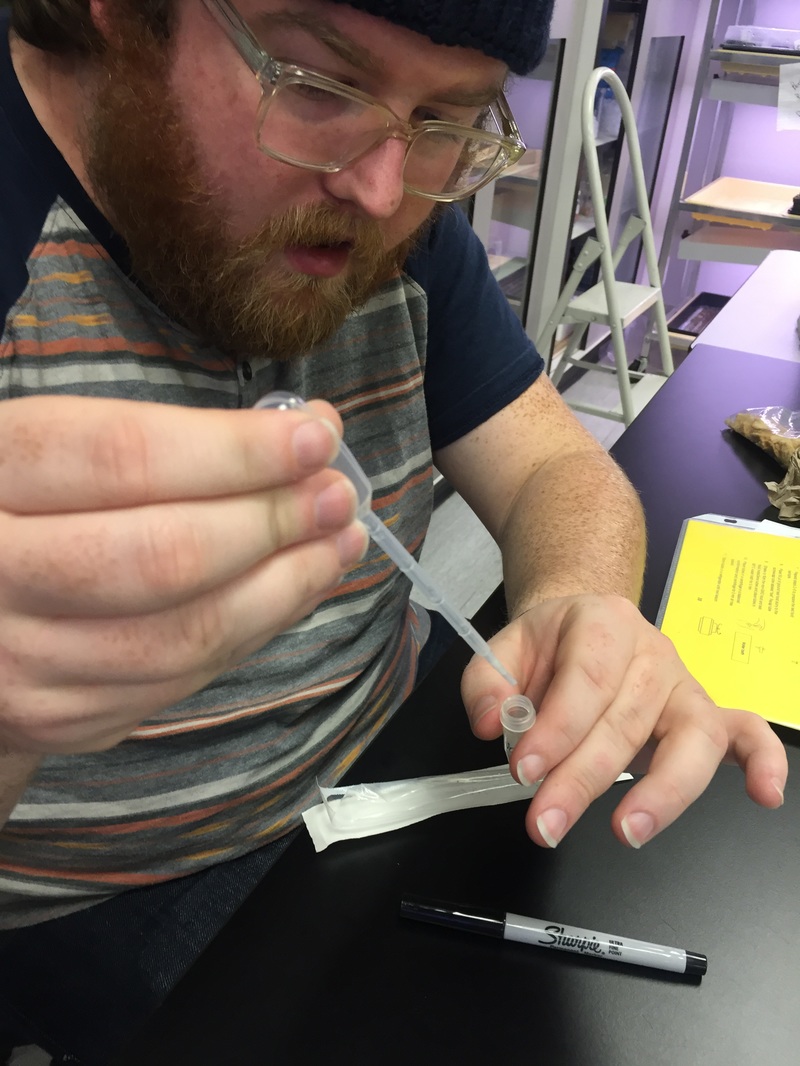
Extreme caution is used while
placing slurry in screw cap tube containing InstaGene matrix. - Photograph by Kevin |

Screw cap tube containing sample in
water bath. Exact position of sample is unknown. - Photograph by Kevin |
After creating the slurry it is then placed in a screw cap tube with InstaGene matrix. The sample is then placed in the water bath for 5 minutes. This allows for the aggregation of negatively charged InstaGene beads and positively charged minerals that could assist enzymes to degrade the DNA. The heat also destroys the enzymes. |
|
After the water bath the screw cap tubes containing the samples are placed in the centrifuge to remove the InstaGene matrix and debris, leaving intact extracted DNA. |

Kevin placing the screw cap tubes
in the centrifuge post water bath. - Photograph by Loye |

PCR tubes within capless tubes
awaiting samples resting on ice. - Photograph by Loye |
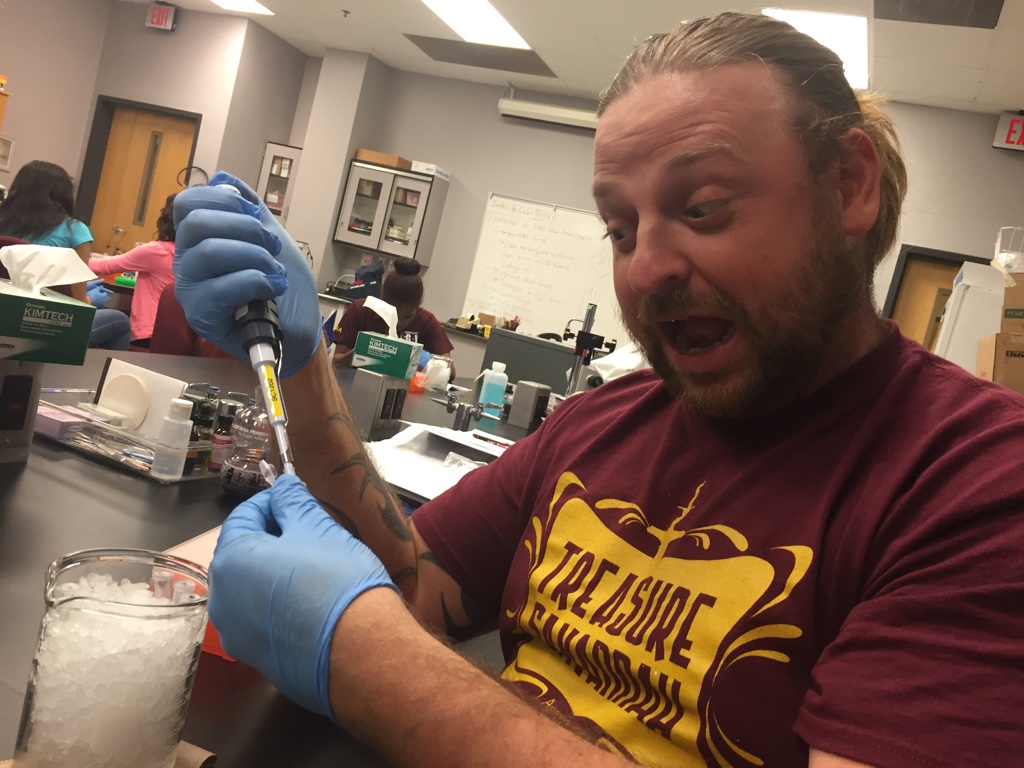
Intense concentration is required to
place samples in the PCR tubes. - Photograph by Kevin As you can tell from the excitement on my face...yes that is excitement....this is my favorite part of the lab by showing off my mad pipetting skills. - Kevin
|
At this stage we added green plant master mix and red GMO master mix to the PCR tubes. The master mixes allows for the amplification of genes that are specifically found in all plants and GMO, respectively. For the plant master mix it amplifies a section of a chloroplast gene used by photosystem II that should be ubiquitous in all plants. The GMO master mix amplifies DNA sequences that are found in approximately 85% of all GMO plants. The master mixes contain primers for the sequences we wish to amplify as well as Taq DNA polymerase, dNTPs, MgCl2, and buffers. We then added the samples (non-GMO, sample food, and provided GMO positive sample) to the PCR tubes and kept them on ice to prevent degradation.
|
|
The PCR reaction then requires a series of specific temperature fluctuations to allow for optimum replication of the DNA. The first step is to increase the temperature to allow for the denaturation of the DNA from a corkscrew shape to a more linear form. Then it quickly drops the temperature to allow for the annealing of primers to the target areas of the DNA. The last step is to bring the temperature back up, but not quite to the extreme of the first step, allowing for the Taq DNA polymerase to extend the complementary DNA to the template strands. This cycle then repeats 40 times. |

Placing the PCR tubes in centrifuge
pre-thermocycler. - Photograph by Kevin. |

PCR tubes placed in thermocycler
in unintentionally incorrect orientation. - Photograph by Kevin |

|
COMING SOON TO A LAB NEAR YOU!
THE CAPTIVATING CONCLUSION TO OUR GMO INVESTIGATION! SEE YA NEXT TIME! SAME PLANT BIO TIME SAME PLANT BIO STATION |

|
Week 6: GMO Part II The conclusion
2/29/2016
Goals
This week we concluded our GMO investigation by electrophoresis to analyze our samples for presence of GMO primers. We learned the basics of electrophoresis wherein the negatively charged DNA is pulled through the agarose gel to the positive side of the tray. We placed our samples in the wells of the gel slab with a molecular weight ruler to measure results. We then took the slab of gel and placed it in the ChemiDoc, which uses UV light to visualize the PCR products. Using the molecular weight ruler we were able to quantify the length of the primers amplified by the PCR. We were able to visually recognize the importance of the negative and positive controls used to ensure the accuracy of our data and eliminate any contamination. While the electrophoresis was running we watched a film that detailed the history and implications of genetically modified crops. The film illustrated how large of a reach Monsanto has on crop production and how they use the legal system to their advantage while hurting farmers.
- Loye & Kevin (Team Beard)

Pipetting is hard work, but someone has to do it.
- Photograph by Loye |

Kevin using his gentle touch pipetting
samples into the gel electrophoresis slab. - Photograph by Loye |
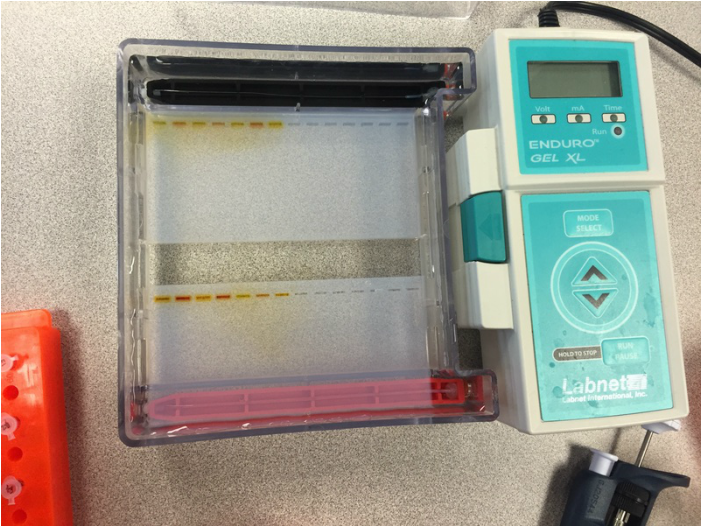
Our samples that underwent PCR in the bottom
row of the gel electrophoresis rig. - Photograph by Kevin |
The gel electrophoresis rig has two charged poles next to the samples. The black pole is negatively charged, while the red is positively charged. DNA molecules inherently have a negative charge, which allows them to be pulled through the gel to the positive end of the rig. With the help of a molecular weight marker we are able to analyze the size of the DNA molecules by measuring the amount of base pairs that compose them. |
|
To the right you can visualize the results of our samples after PCR and gel electrophoresis. In lane E1, which consisted of our Non-GMO food sample with our PMM showing a band at approximately 445bp, which acts as the positive control for the Non-GMO food sample. In lane E2, which consisted of our Non-GMO food sample with our GMO MM showing no band, which acts as the negative control for the Non-GMO food sample. In lane E3, which consisted of our food sample of Cinnamon Toast Crunch (Innamoncay oastay-unchcray) with our PMM showing a band at approximately 445bp, showing that we do have DNA extracted from a plant. In lane E4, which consisted of our food sample of Cinnamon Toast Crunch (Innamoncay oastay-unchcray) with our GMO MM showing no band, which infers that there was no genetically modified DNA in our food sample. In lane E5, which consisted of our GMO food sample with our PMM showing a band at approximately 445bp, which acts as the negative control for the GMO food sample. In lane E6, which consisted of our GMO food sample with our GMO MM showing a band at approximately 200bp, which acts as the positive control for the GMO food sample. Lastly, in lane seven, the furthest to the right, is our Molecular Weight Rule allowing us to quantify our data in units of base pairs.
|

Agarose gel slab post-electrophoresis.
- Photographed using ChemiDoc |
Results
Our experiments showed that our sample food, Cinnamon Toast Crunch (Innamoncay oastay-unchcray), did not contain genetically modified DNA due to the lack of any bands appearing in lane E4. By using our controls in lanes E1, 2, 5, and 6, we can state with confidence that our results were accurate and precise. However, our lab section did encounter an anomaly in lane E6, wherein we visualized a band at 445bp in the GMO food sample with GMO MM. This could be due to contamination from preparing samples or potentially a bad batch of master mix. If we were to repeat this procedure we would focus on ensuring absolutely no contamination during preparation of samples and use more skill with pipetting our samples in the gel electrophoresis slab wells.
Our experiments showed that our sample food, Cinnamon Toast Crunch (Innamoncay oastay-unchcray), did not contain genetically modified DNA due to the lack of any bands appearing in lane E4. By using our controls in lanes E1, 2, 5, and 6, we can state with confidence that our results were accurate and precise. However, our lab section did encounter an anomaly in lane E6, wherein we visualized a band at 445bp in the GMO food sample with GMO MM. This could be due to contamination from preparing samples or potentially a bad batch of master mix. If we were to repeat this procedure we would focus on ensuring absolutely no contamination during preparation of samples and use more skill with pipetting our samples in the gel electrophoresis slab wells.
Our heroes did not find the GMO baddies this week but kids stay ever vigilant on what you EAT

Week 7: Bryophytes & Ferns
Goals
This is our first lab back from Spring Break, so we had to get back into the swing of things. We examined members of the Phylums Bryophyta and Hepatiocphyta, which were represented by mosses and liverworts respectively. Also, we were able to use the nomenclature associate with the two nonvascular taxons. We then examined some Monilophytes taking notice of their macroscopic structural features as well as their microscopic features, such as lignified tracheids. We also expanded on our knowledge of Alterations of Generations by identifying the gametophyte and sporophyte generations and their predominance in the varying species.
This is our first lab back from Spring Break, so we had to get back into the swing of things. We examined members of the Phylums Bryophyta and Hepatiocphyta, which were represented by mosses and liverworts respectively. Also, we were able to use the nomenclature associate with the two nonvascular taxons. We then examined some Monilophytes taking notice of their macroscopic structural features as well as their microscopic features, such as lignified tracheids. We also expanded on our knowledge of Alterations of Generations by identifying the gametophyte and sporophyte generations and their predominance in the varying species.

-Polytrichum sp.spores which are produced in the sporangium which grow
into Gametophytes viewed compound microscope at 400x - Prepared by Dr. L-P and Photographed by Loye |

Bryophyta protonema where we can see a "bud" which will
grow into a moss plant, viewed compound microscope at 400x - Prepared and Photograph by Kevin |

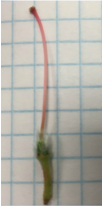
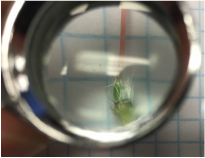
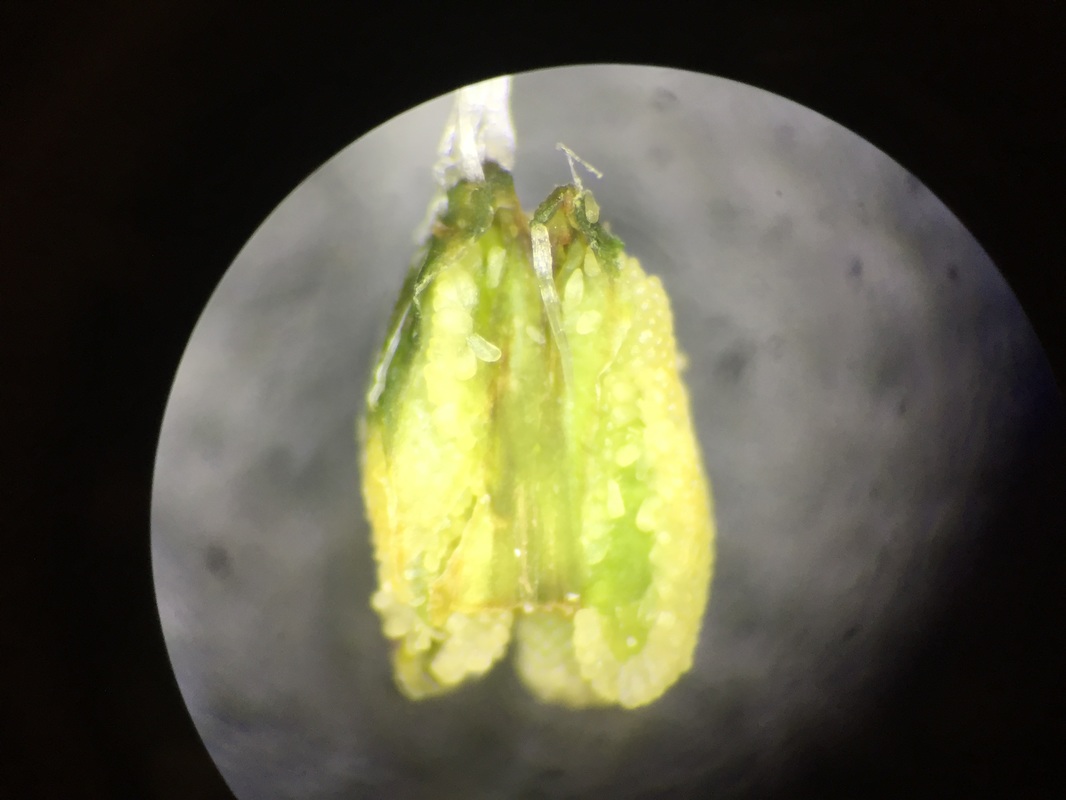
-Polytrichum sp.Living specimens. The upper section is the sporophyte consisting of a stalk and sporangium. The gametophyte is where it is extending from.
- Prepared and Photograph by Loye
- Prepared and Photograph by Loye
Whole mount of Sphagnum gametophyte viewed with
compound microscope at 100x. - Slide prepared and photographed by Loye |
The image to the right of the Sphagnum gametophyte shows no change from the image of the same specimen on the left. The image on the right has been stained with Phloroglucinol HCl, which would only stain to pectin and lignin, of which there is none in this plant. Therefore we have verified that our plant has no lignin. |
Whole mount of Sphagnum gametophyte stained with Phloroglucinol HCl
and viewed with compound microscope at 100x. - Slide prepared and photographed by Loye |
|
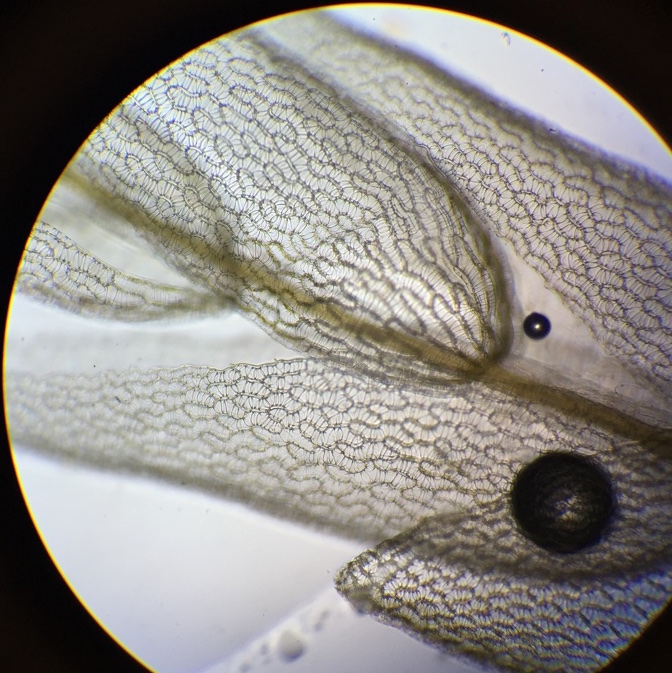
In the image to the right you can view the pores of the Liverwort thallus. These allow for gas exchange, since Liverworts lack stomata. |
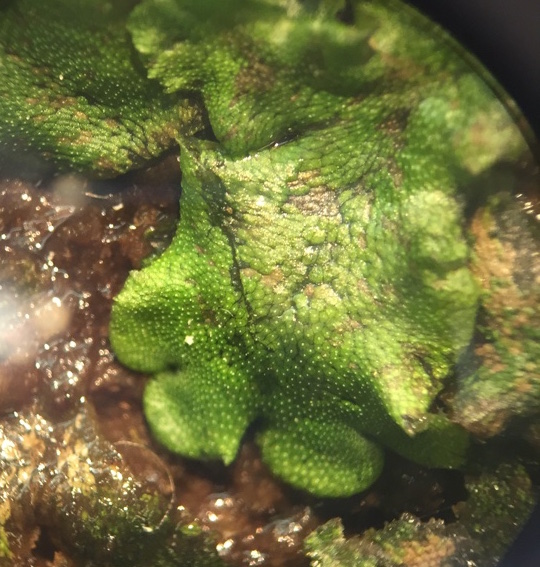
Whole mount of Liverwort thallus viewed with dissecting scope at 10x.
– Photograph by Loye |
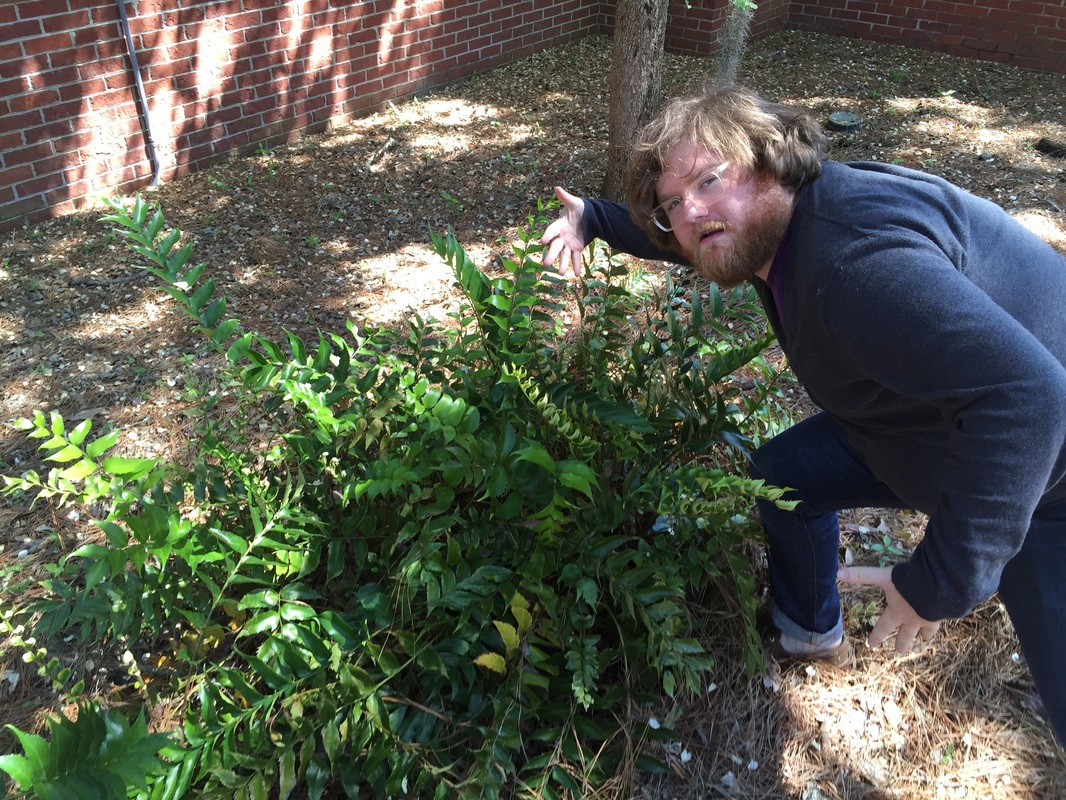
Loye giving a fern-tastic intro to our fern
- Photograph by Kevin
- Photograph by Kevin
This was my favorite activity of lab this week. I really enjoy going out and getting plants to look at in lab that are found on campus. - Kevin

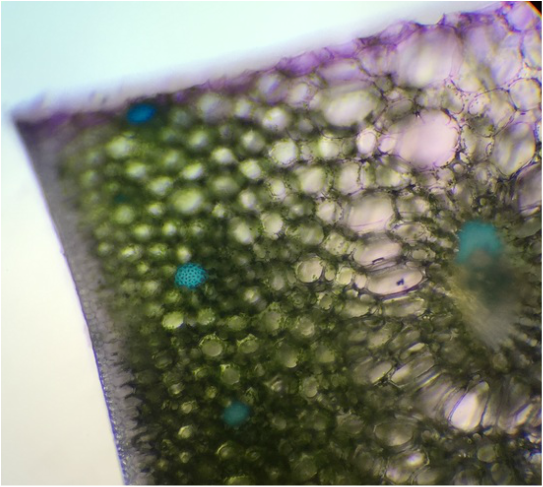
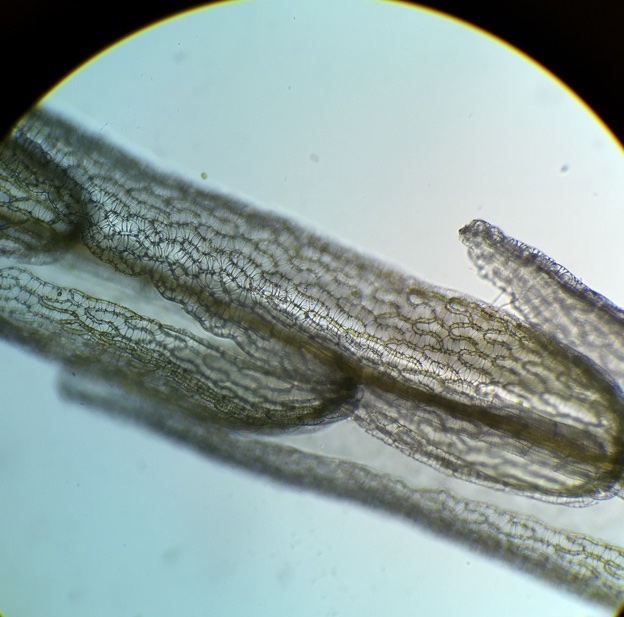
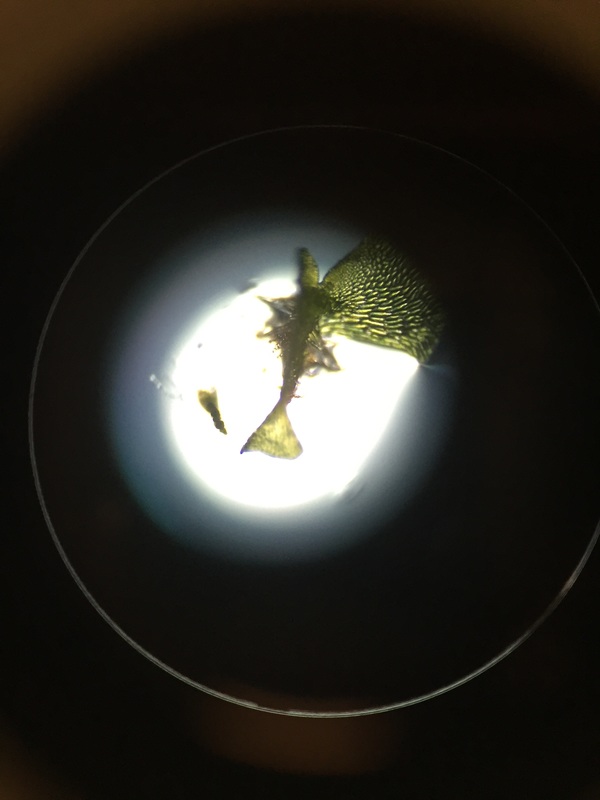
Abaxial surface of fern viewed with dissecting scope at 10x.
- Photograph by Loye |
In the photo to the left you can see yellow dots on the abaxial surface of a fern frond, which are called sori. They are clusters of sporangia covered by indusim that provide protection until the spores mature. Within the sporangia spores are produced via meiosis, which when released are hermaphroditic in nature. The spores then give rise to the gametophytes. |
|
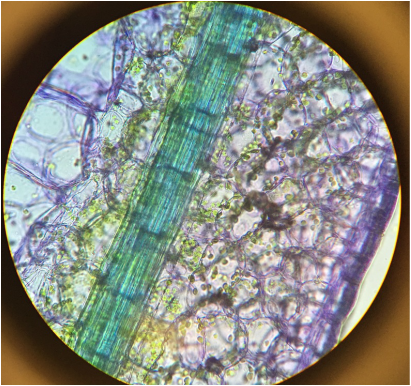
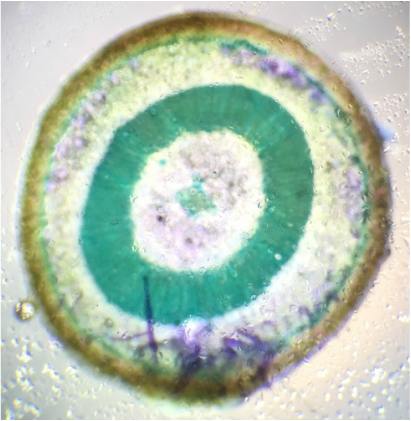
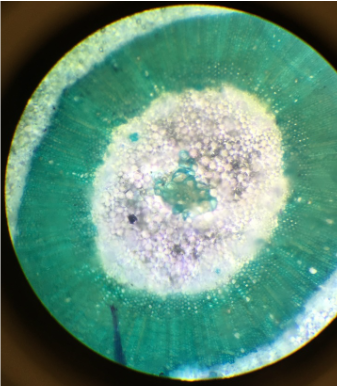
In the image to the right you can see the red stained, lignified tracheary elements of the Psilotum. There is also a hint of lignin to the far right of the image as well, however when preparing the slide, I cut my cross-section with a slight angle. |
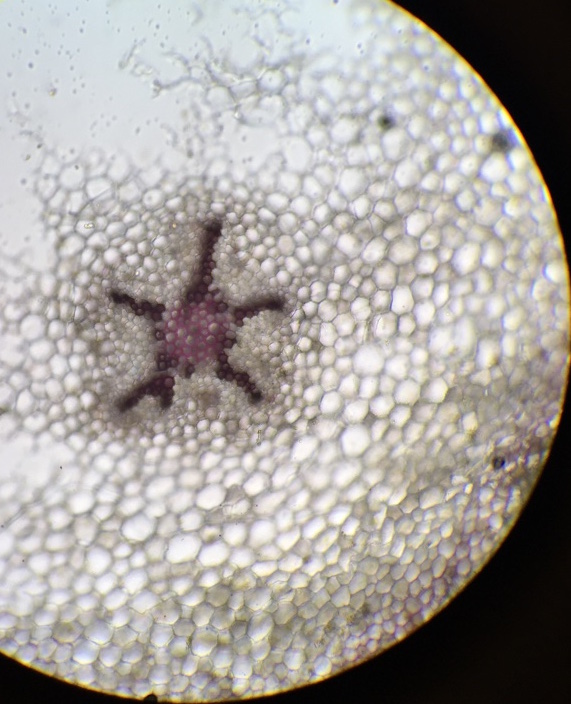
Cross-section of Psilotum stained with Phloroglucinol HCl
and viewed at 400x with compound microscope. - Photograph and slide prepared by Loye |
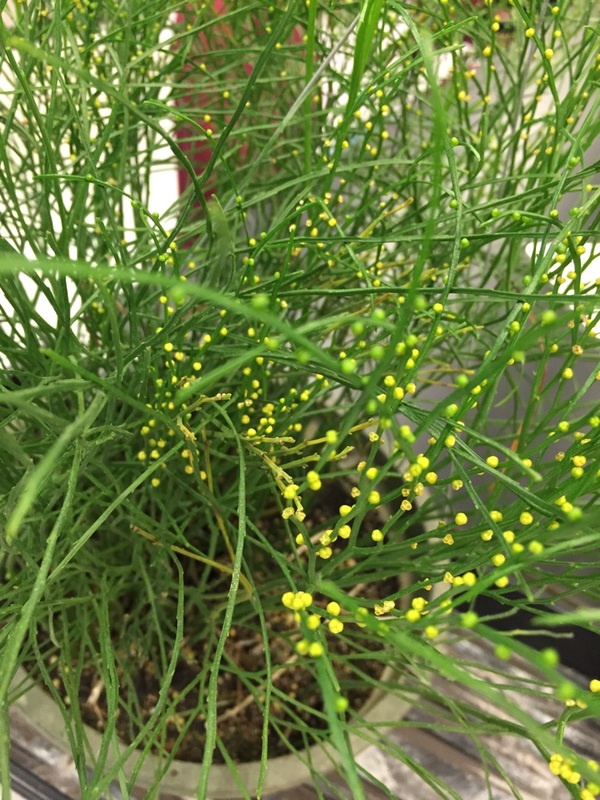
Whole specimen of Psilotum viewed with naked eye.
- Photograph by Loye |

Whole specimen of Equisetum viewed with naked eye.
- Photograph by Loye |
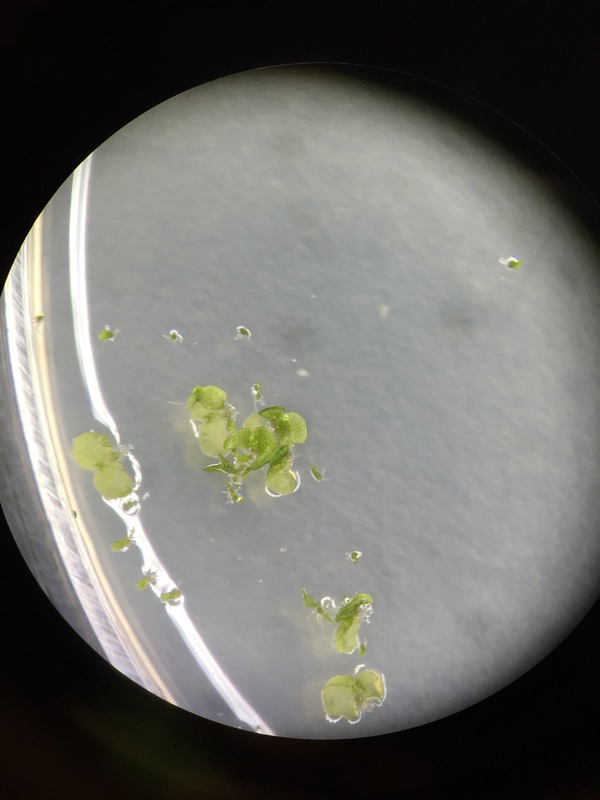
C-Fern gametophytes veiwed under dissection scope
- the heart shaped are the hermaphrodites and the smaller are the males - Prepared and Photograph by Kevin |
I wanted a closer look, C-Fern gametophytes veiwed under compound scope 100x unstained
- Prepared and Photograph by Kevin |

GIF of C-fern sperm viewed at 400x with a compound microscope.
- Video by Loye |
This was my favorite part of the lab, just watching the sperm swim around and collide with one another. - Loye That would be your favorite part I shouldn't say this I might be sori. - Kevin 
Obligatory fern humor - By Kevin
|
Week 8: Gymnosperms & Angiosperms
Seed Plants
Goals
This week we move forward in the evolution of plants with the introduction of the Seed Plants: Gymnosperms and Angiosperms. By the end of lab we should be able to recognize plants from both taxon, as well as describe the different sequences of events for the gametophyte and sporophyte generations. In addition we will beobserving flowers and describing their functions using the terms ovary position, presence/absence of floral organs, and floral symmetry. We will follow up our trip around campus with a floral dissection of a specimen that chose in the wilderness that is Armstrong State University.
This week we move forward in the evolution of plants with the introduction of the Seed Plants: Gymnosperms and Angiosperms. By the end of lab we should be able to recognize plants from both taxon, as well as describe the different sequences of events for the gametophyte and sporophyte generations. In addition we will beobserving flowers and describing their functions using the terms ovary position, presence/absence of floral organs, and floral symmetry. We will follow up our trip around campus with a floral dissection of a specimen that chose in the wilderness that is Armstrong State University.
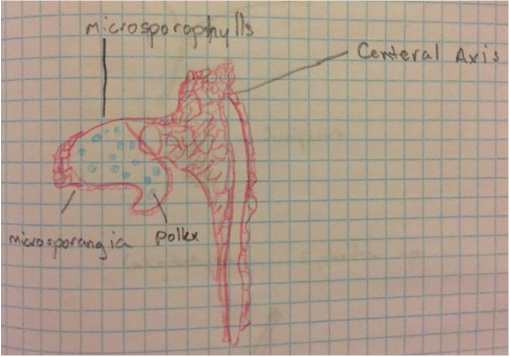
Pinus mature male cone veiwed with compound scope at 40x
- Drawing and Photograph by Kevin
- Drawing and Photograph by Kevin
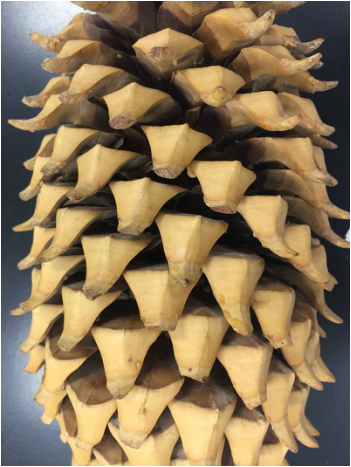
Female cone viewed with naked eye. The seeds form between the scales of the cone.
- Photograph by Kevin 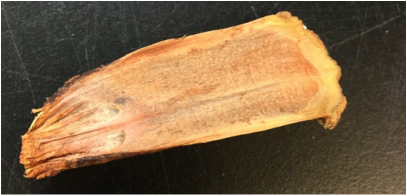
Female cone scale removed. Here we can see where the seed grows at the left inner edge.
- Photograph by Kevin |

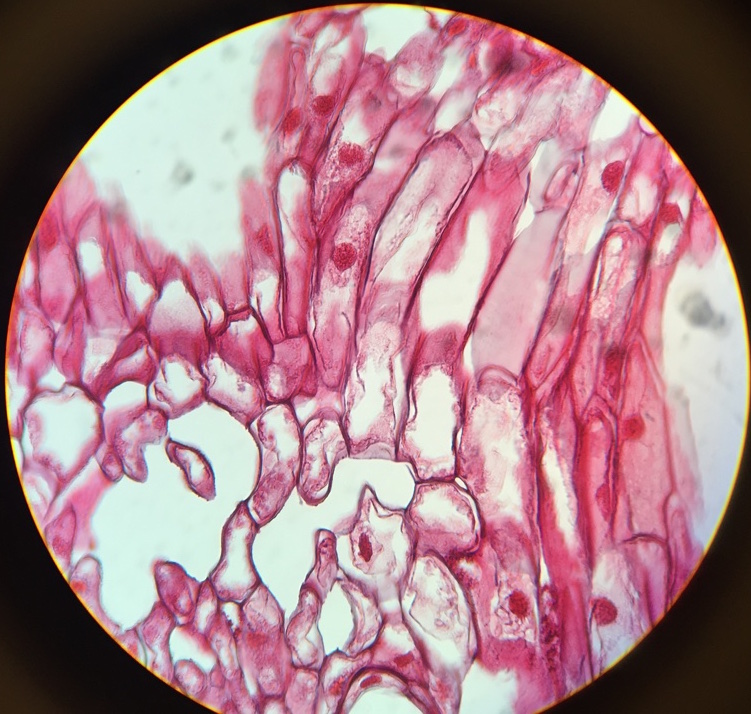
Prepared slide of longitudinal section of a mature Pine
embryo viewed with compound microscope at 100x. –Photograph by Kevin Seeds are formed on the upper side of the cone scale in female cones, towards the center of the cone. |
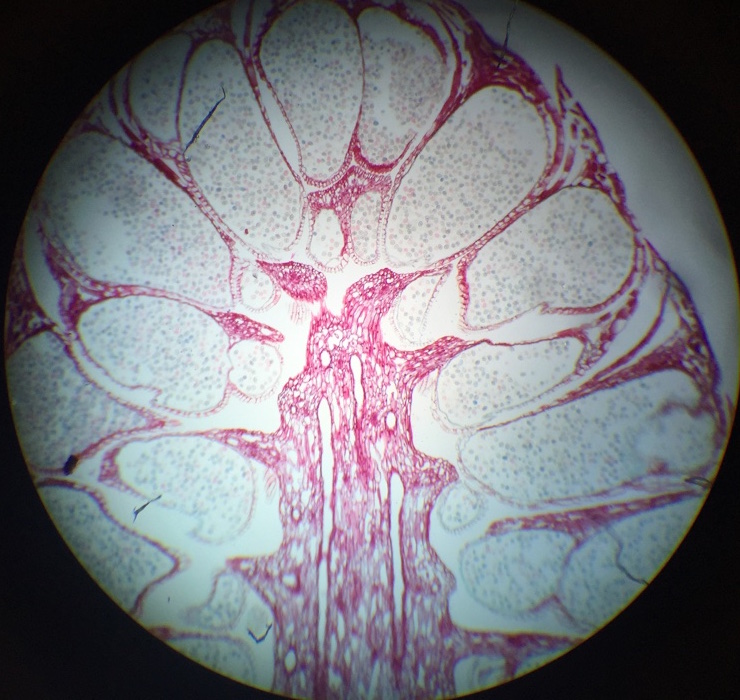
Longitudinal section of a mature Pine male cone viewed
with compound microscope at 40x. –Photograph by Kevin |
Whole mount of mature pine pollen viewed with
compound microscope at 400x. –Photograph by Kevin |
|
During this lab we went around campus on a walkabout to examine on-campus representatives of Gymnosperms. To the right is a photo of Kevin taking the first steps on campus. |
|

Representative of Cycadophyta found on the southern side
of the Science Center. Loye is jealous of its ability to photosynthesize and is about to pounce. –Photograph by Kevin |

Female cone of the Cycadophyta representative
viewed with naked eye. –Dr. L-P retrieved and bagged, photograph by Kevin |

Male cone of the Cycadophyta representative
viewed with naked eye. -Photograph by Kevin |
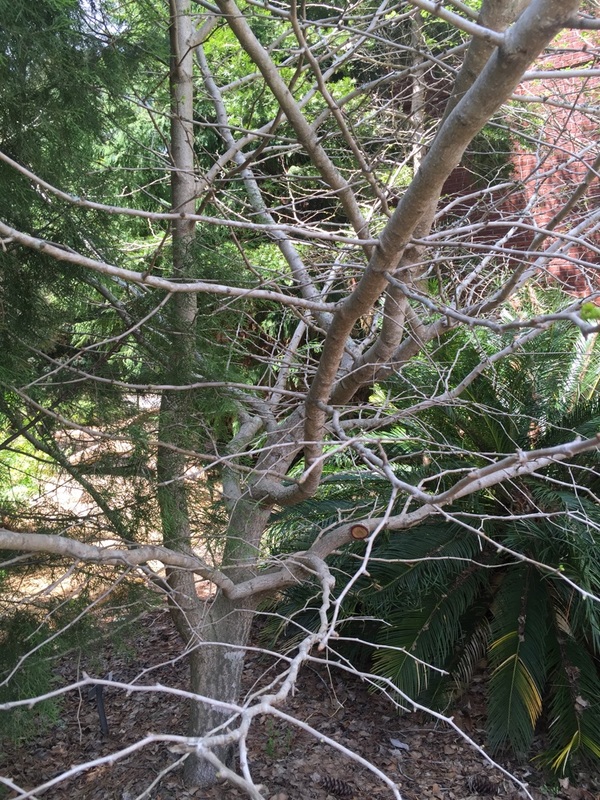
Whole specimen of Ginkgo biloba on campus
found on the southern side of Jenkins Hall. –Photograph by Kevin |
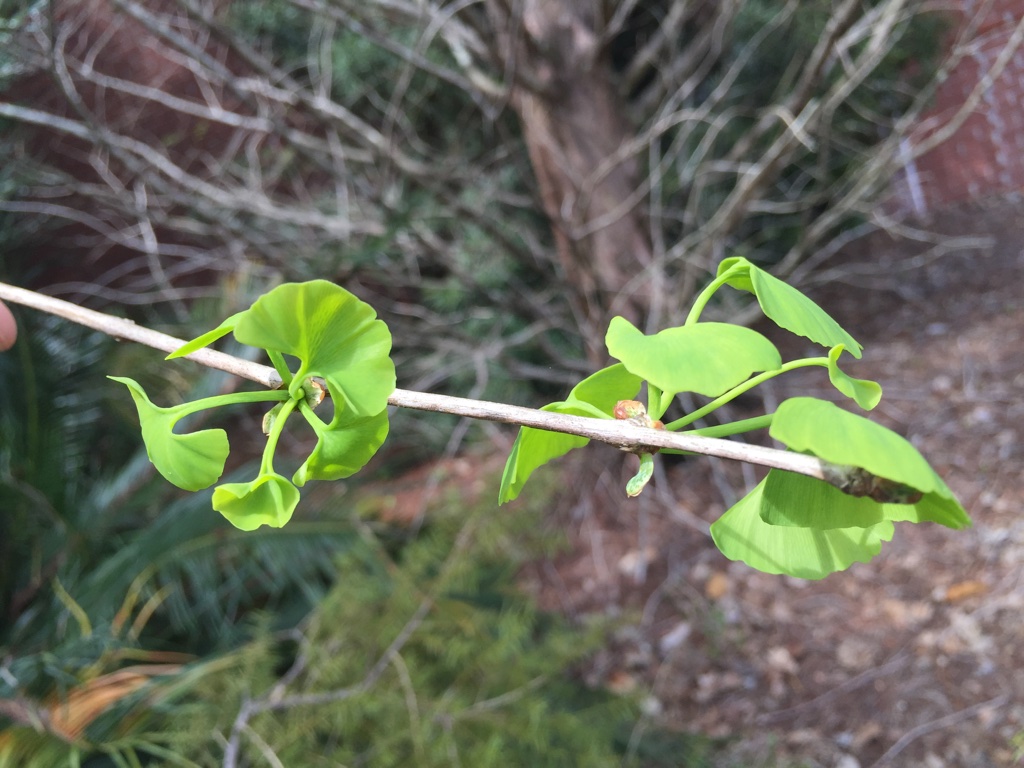
Leaves of Ginkgo biloba viewed with naked eye.
-Photograph by Kevin This Ginkgo biloba specimen is a male, because the seeds produced by the female plants have a “rancid butter” smell, therefore they are not popular to have around where people walk. Also, the leaves of this tree are deciduous, meaning that they change color and drop once a year. |
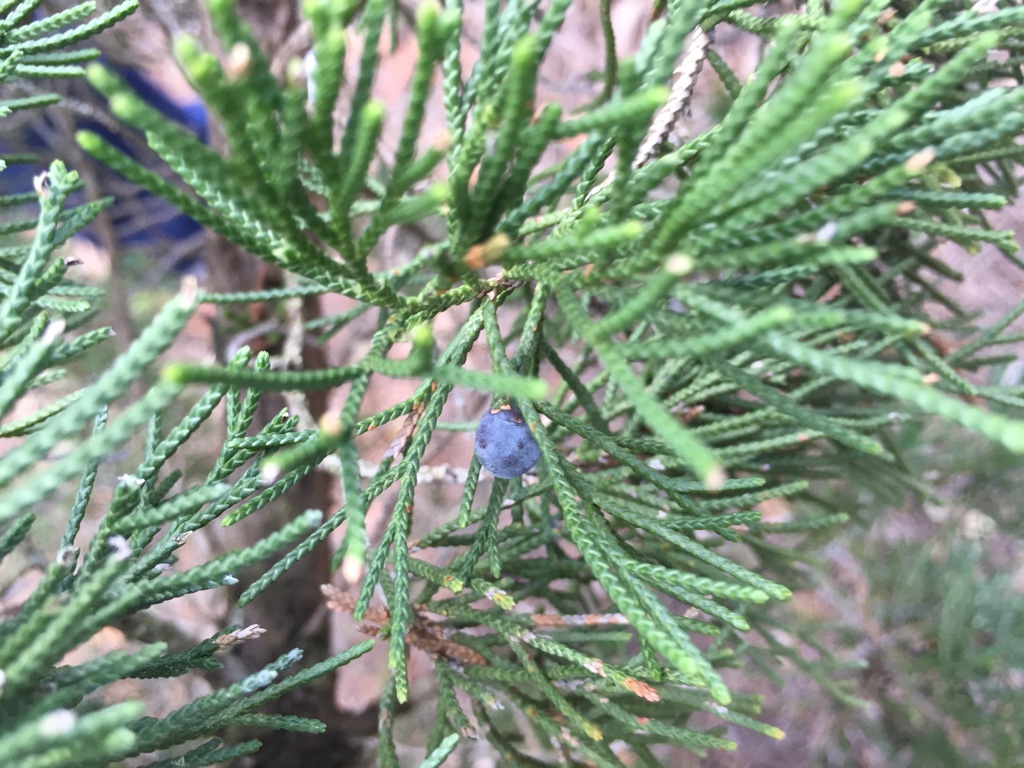
Whole specimen of berry from Juniperus plant, used in the production of Gin.
-Photograph by Kevin |
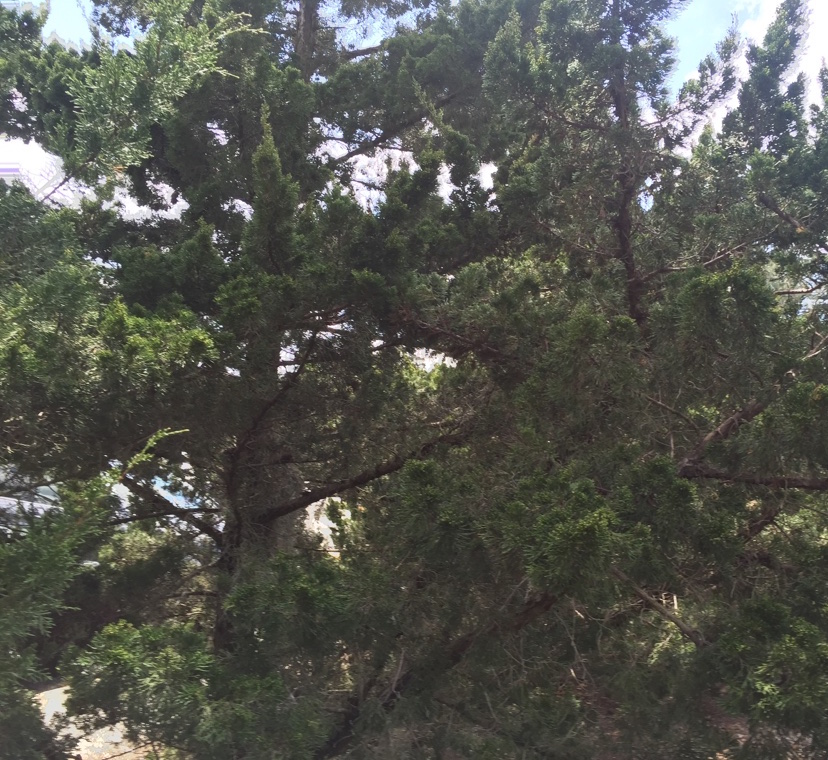
Whole specimen of the genus Juniperus found on campus
near the northern side of the Sport Center parking lot. -Photograph by Kevin |
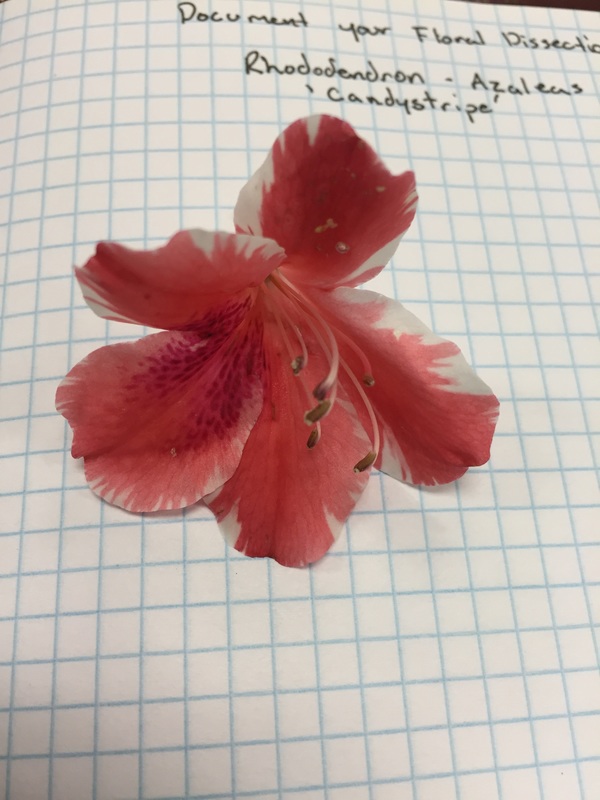
Loye's Flower Dissection


|


|
Kevin's Flower Dissection
This was a hard choice this week I have to say that I had two favorites this dissection and the walk around campus. It was great seeing all the trees and flowers that I have walked by over the years up close. -Kevin
|

Removal of the sepal and petals leaving the anther and carpal remaining.
Next I ripped off those male parts like a mistreated prom date's father. Leaving a good view of the stigma and the style. The ovary is covered in these hairs that made it hard to dissect any further.
|
Having a closer look helped me get this longitudinal section taken care of.
Here is the longitudinal section of my flower showing the inside of the ovary where we can see multiple ovules.
|
Week 9: Getting to the Root of Roots
4/11/16
Goals
We observed the different methods of root grow between the monocots and dicots, wherein the dicot's primary root is the taproot and the monocots create short-lived primary roots, eventually developing into a fibrous root system. To better understand the three regions of morphology for roots, we observed the Region of Cell Division where the root produces new growth via mitosis. We were also able to observe parts of the Region of Elongation, wherein the cells elongate, creating longitudinal growth of the root. Lastly, we observed the Region of Cell Maturation, which differs between dicots and monocots. The monocot root has a central area that spreads the xylem in a circular pattern around it, whereas the dicots lack this allowing the xylem to remain central in the root. We then took our C-Fern cultures, that we started on 3/7/16, and observed the roots, the formation of the sporophyte generation, and finally transplanted our cultures to soil!
We observed the different methods of root grow between the monocots and dicots, wherein the dicot's primary root is the taproot and the monocots create short-lived primary roots, eventually developing into a fibrous root system. To better understand the three regions of morphology for roots, we observed the Region of Cell Division where the root produces new growth via mitosis. We were also able to observe parts of the Region of Elongation, wherein the cells elongate, creating longitudinal growth of the root. Lastly, we observed the Region of Cell Maturation, which differs between dicots and monocots. The monocot root has a central area that spreads the xylem in a circular pattern around it, whereas the dicots lack this allowing the xylem to remain central in the root. We then took our C-Fern cultures, that we started on 3/7/16, and observed the roots, the formation of the sporophyte generation, and finally transplanted our cultures to soil!
|
In the image to the right you can see the fine root hairs extending out from the root from the Region of Maturation. At the end of the root you can see the root cap, which provides protection to the apical meristem and is part of the Region of Division. |

Whole mount view of C-fern culture roots,
viewed at 400x with compound microscope. –Photograph by Loye |

Squash mount of apical meristem of Allium cepa root tip,
viewed at 400x with compound microscope. -Photograph by Loye |
In the image to the left we have used the eyepiece pointer to identify a cell undergoing mitosis. The cell is currently undergoing the anaphase stage, wherein the chromatids are being pulled to opposite ends of the cell. Also, to the left of the eyepiece pointer and circled in red, we identified another cell undergoing the same phase of mitosis. |
