What can you see under the scope?
The dissecting scope is used to observe 3-D specimens under different magnifications. The specimens can be viewed at 7x magnification or as high as 50x magnification. Both specimens were found in front of Jenkins Hall on the Armstrong State University Campus. The bud in particular when viewed under the scope showed a different texture than shown with the naked eye an almost satin look to the petal with white hair like structures coming off. The leaf off the Loblolly Bay tree showed a significant color difference from the top and underside of the leaf.
- Edited by Evan and Chris
- Edited by Evan and Chris

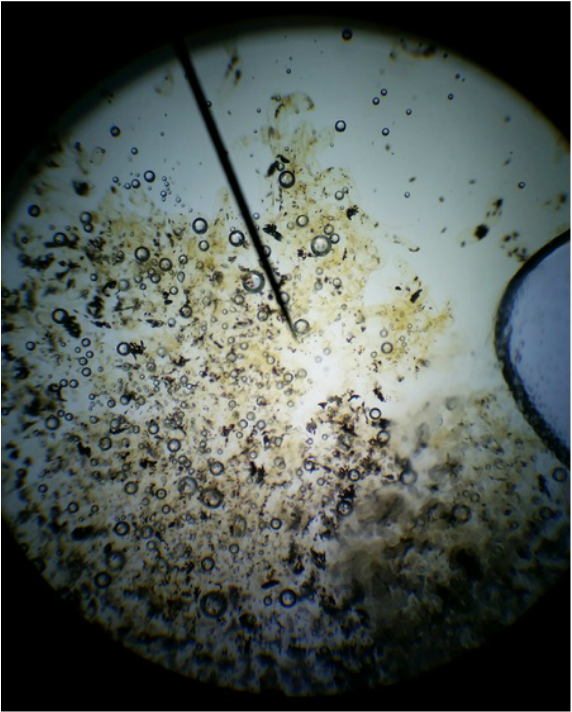
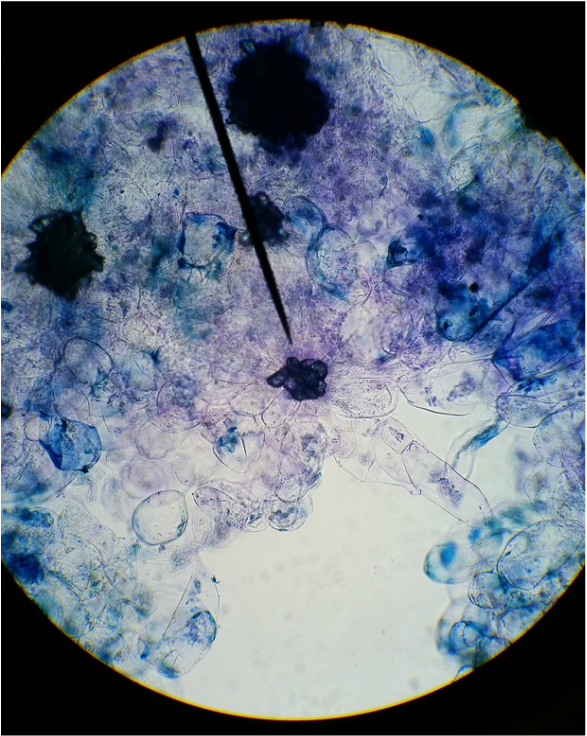
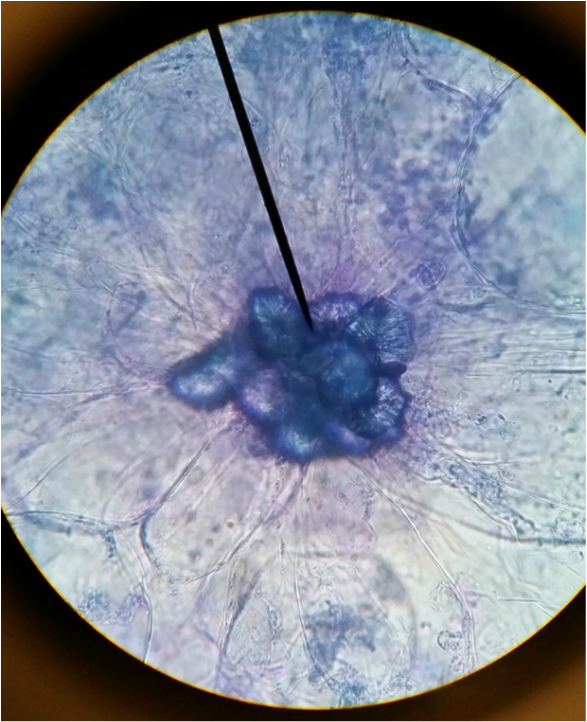
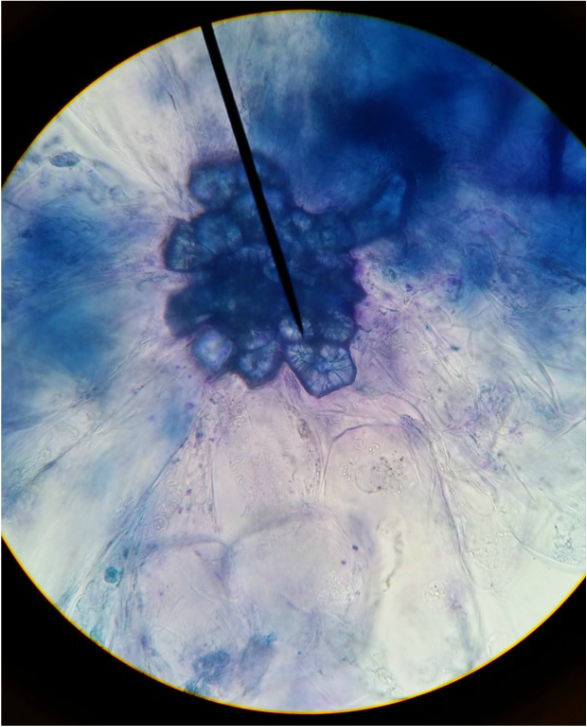
This is the bud of a Camellia chekiangoleosa. Photo taken by Evan
|

This is the bud of a Camellia chekiangoleosa. The picture is taken at 7x magnification. Photo taken by Evan.
|
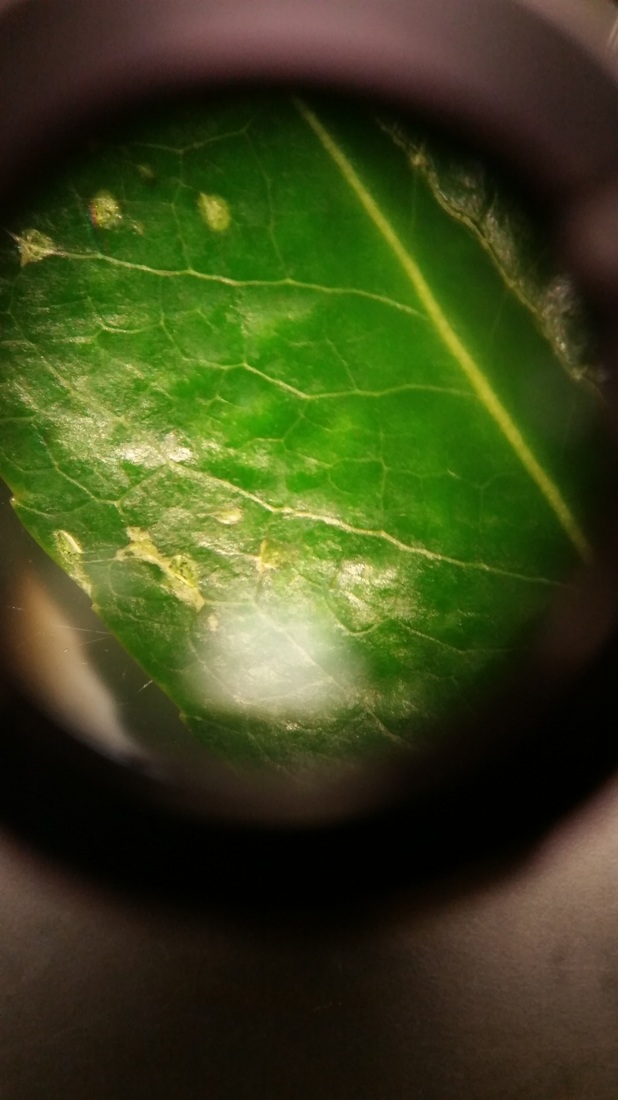
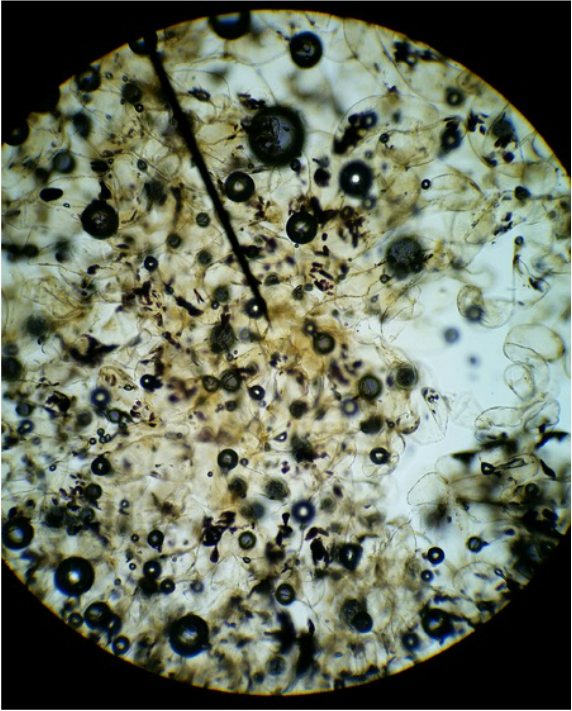
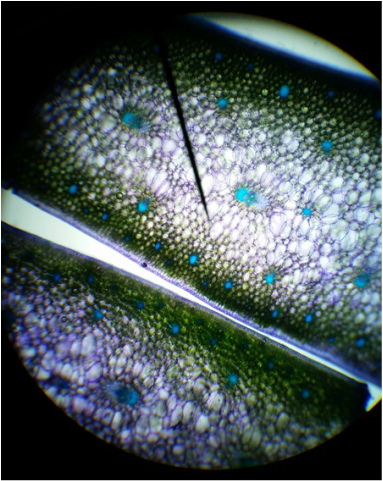
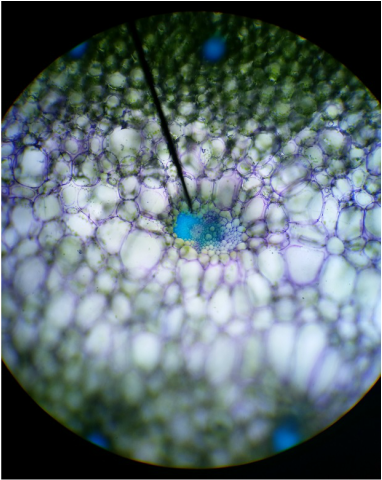
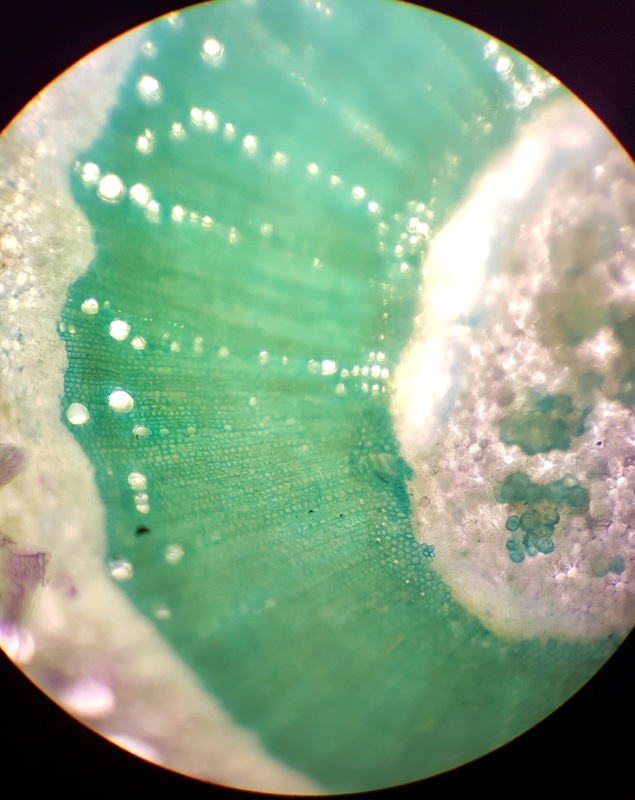
This is the top of a leaf from a Loblolly Bay (Gordonia lasianthus) at a magnification of 7X. Picture and description by Chris.
|

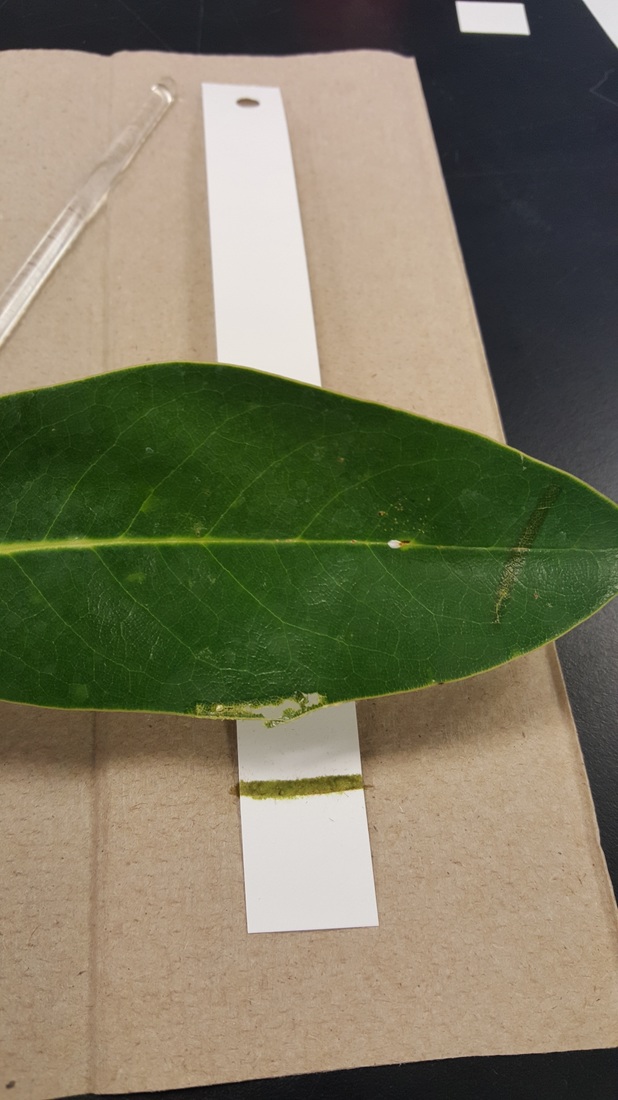
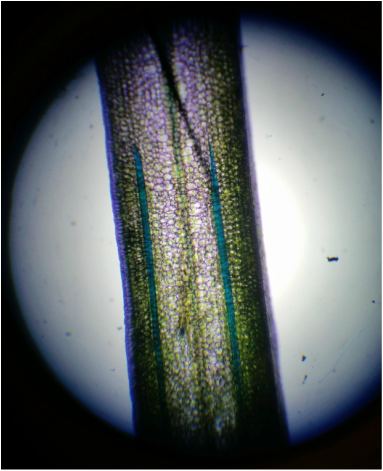
This is the leaf from a Loblolly Bay (Gordonia lasianthus) at no magnification. Picture and description by Chris.
|
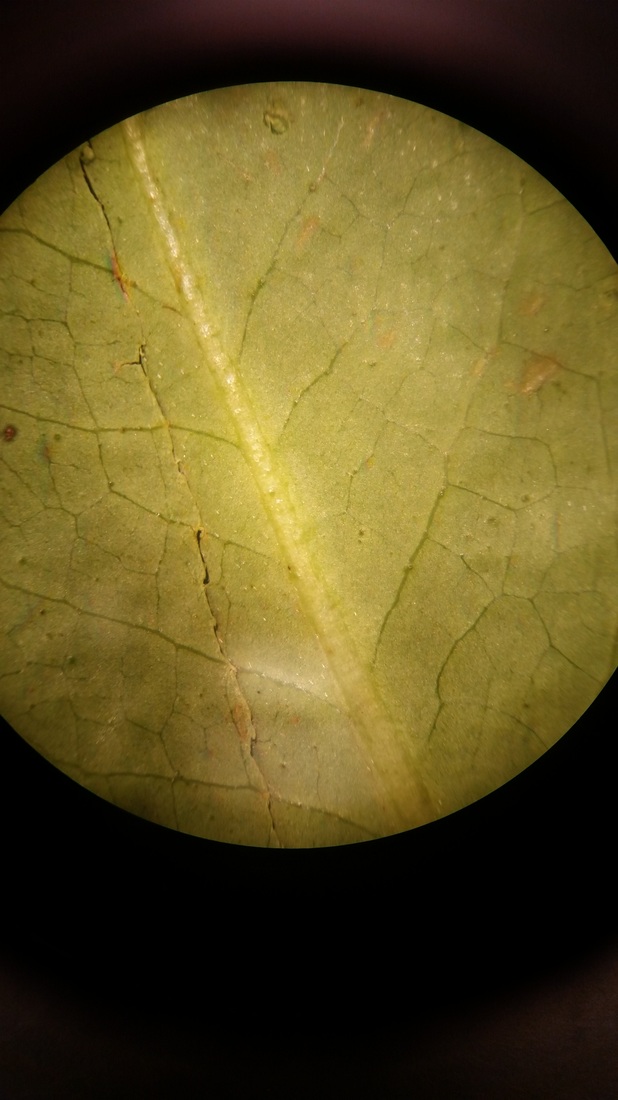
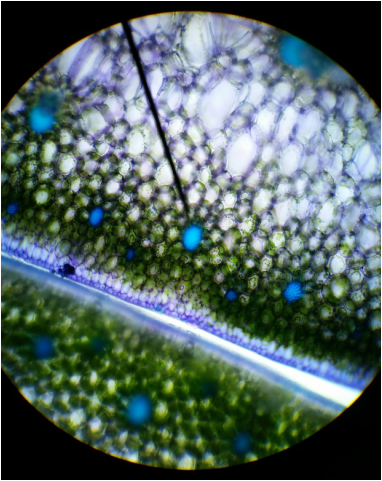
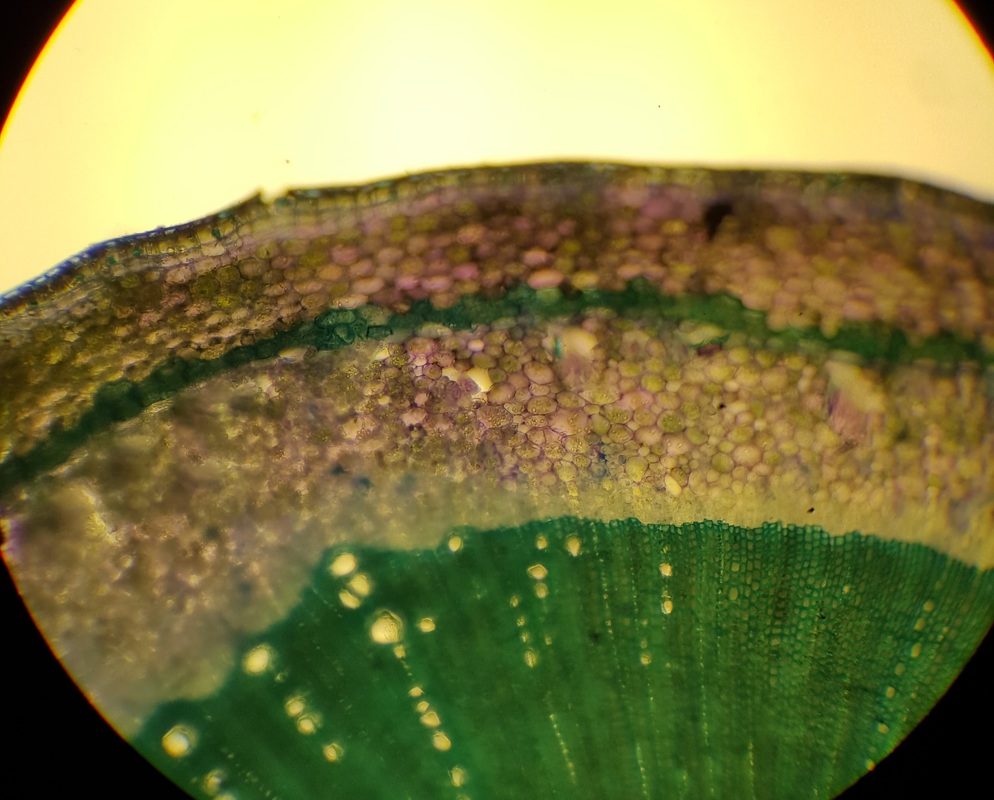
This is the bottom of a leaf from a Loblolly Bay (Gordonia lasianthus) at a magnification of 7X. Picture and description by Chris.
|
Plant Cells and Scientific Drawings
This lab is designed to practice skills and techniques needed for upcoming labs and likely in any scientific field of study. These skills included creating and viewing a wet mount slide under a compound scope, recognizing different slide preparation techniques, identifying visible features of plant cells, using stains to bring out certain features of plant cells, and creating scientific diagrams.
Scientific Drawings
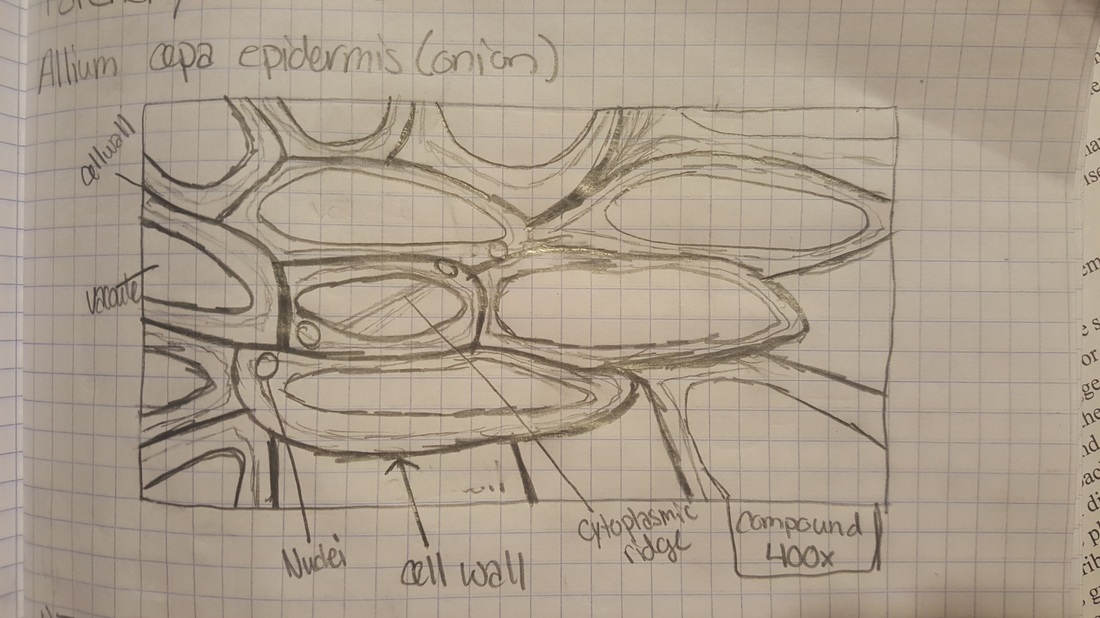
This scientific drawing is of the epidermis of Allium cepa, or onion. The drawing is done from viewing the whole mount section of the onion at 400x total magnification. The slide was stained with toluidine blue. -Photo and caption by Evan
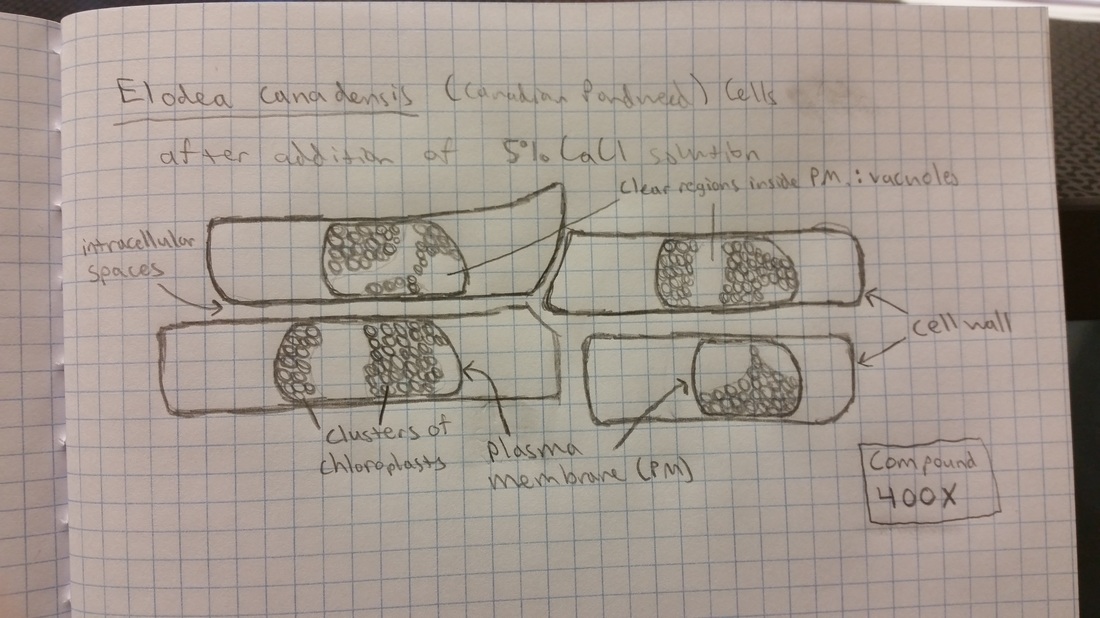
This scientific drawing is of a few neighboring cells of the Elodea canadensis (Canadian Pondweed). The drawing is done from viewing a whole mount section of a leaf at 400X total magnification, with no stains and after the addition of the 5% CaCl solution.
-Drawing, photo, and caption by Chris
Epidermis of Allium cepa or the onion
This video is of a whole mount section from the epidermis of Allium cepa, or onion. The slide was stained with toluidine blue and viewed at 400x. The video shows cytoplasmic streaming within the vacuoles of the cells. Before adding the stain all you could noticeably see were the vacuoles of the cell, however after the stain was added you could clearly see the vacuole, cell wall, nucleus, and the cytoplasmic steaming within the cell. -Video and summary by Evan
Leaf Cells of Elodea canadensis (Canadian Pondweed)
This is a photo of a Elodea canadensis leaf cell at 400X total magnification with no stain and before a 5% CaCl solution was added. Noticeable structures of the cells include: chloroplast (green, spherical), majority of vacuole (clear areas), cell wall and plasma membrane region (dark lines surrounding the prior two structures), and intercellular spaces (spaces between neighboring cell walls). Cytoplasmic streaming of the chloroplasts was observed in a majority of the cells.
-Photo and caption by Chris
|
This is a photo of a Elodea canadensis leaf cell at 400X total magnification with no stain and after a 5% CaCl solution was added. Noticeable structures of the cells include: chloroplast (green, spherical), majority of vacuole (clear areas inside the plasma membrane), plasma membrane (sphere-like, dark lines encasing prior structures), the cell wall (dark lines surrounding all prior structures), and intercellular spaces (spaces between neighboring cell walls). The addition of the hypertonic solution caused most of the water to leave the vacuoles via osmosis, and this caused the plasma membrane to shrink due to lack of turgor pressure. This is why the plasma membrane is not completely against the cell wall, thus making it constrict its contents to a finer space within the cell, as well as making it more distinguishable from the cell wall. Cytoplasmic streaming was not observed in any of the cells.
-Photo and caption by Chris
|
This is a completely unedited video of the first photo above: a Elodea canadensis leaf cell at 400X total magnification with no stain and before a 5% CaCl solution was added. It also has all the same noticeable structures as the photo. Since the pictures do not do it justice, this unedited video was included because it shows the natural cytoplasmic streaming within a living Elodea canadensis leaf cell. The cytoplasmic steaming is plainly apparent due to the orderly movement of the relatively large, green chloroplasts within the cells.
Overall this was my favorite specimen of the day because I had the opportunity to experience many of the fundamental topics (streaming, osmosis, etc.) discussed in this lecture and prior lectures.
-Caption and video taken by Chris
-Video uploaded by Evan
Overall this was my favorite specimen of the day because I had the opportunity to experience many of the fundamental topics (streaming, osmosis, etc.) discussed in this lecture and prior lectures.
-Caption and video taken by Chris
-Video uploaded by Evan
Bell Pepper Sections

This is a photo of a section of a red bell pepper Capsicum annuum fruit. The image was taken at 100x total magnification with no stain. You can clearly see the chromoplasts within the cells and see the bright red color.
- Photo and Caption by Evan
|
This is a photo of a section of a yellow bell pepper Capsicum annuum fruit. This image was taken at 100x total magnification with no stain. The plastids in yellow bell peppers are actually still chromoplasts. Although hard to see the chromoplasts and are the bright yellow dots within the cells.
- Photo and Caption by Evan
|
This is a photo of a section of a green bell pepper Capsicum annuum fruit. The image was taken at 100x total magnification with no stain. You can see the green chloroplasts within each cell. - Photo and Caption by Evan
|
The bell peppers are a good example to see the transition a plastid can perform. The red pepper shows the plastid as a chromoplast, yellow pepper as a chromoplast, and lastly the green pepper as a chloroplast. When viewed under the compound microscope the red pepper had larger and a greater number of chromoplast. One unique thing I noticed was that in the green pepper the chloroplasts were in greater number in the cells near the outer skin of the fruit. -Photos and summary by Evan
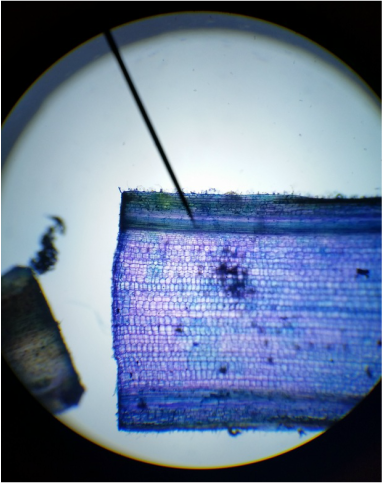
Stem cross-section of Tradescantia (Spiderwort)

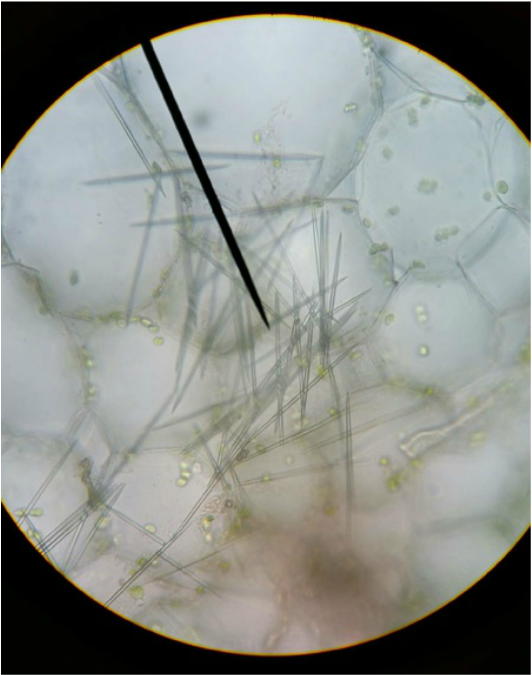
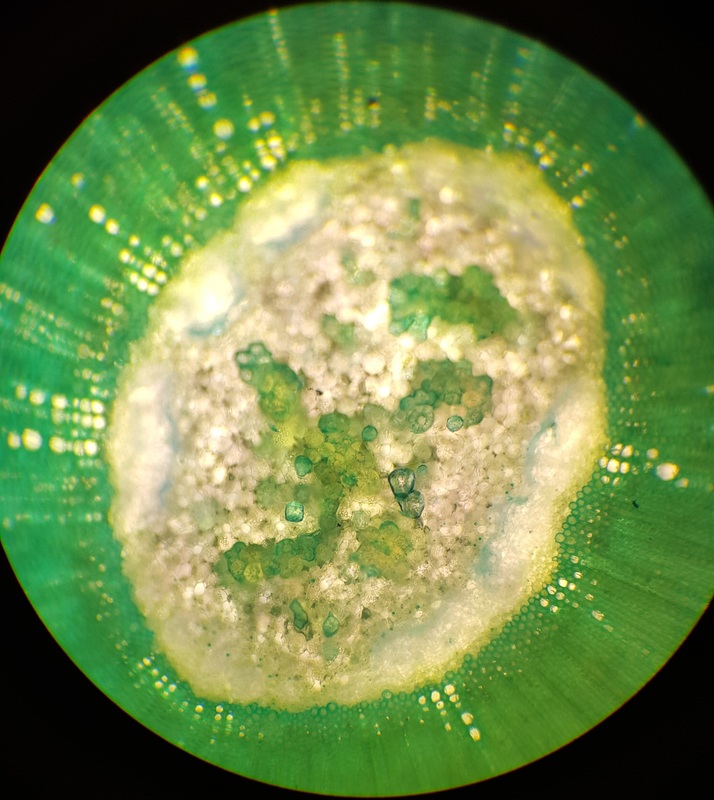
This is a stem cross-section of Tradescantia (Spiderwort) with no stain at a magnification of 100X. At the very tip of the microscope's eyepiece pointer are a grouping of raphides (needle-like crystals made of calcium oxalate) that were exposed due to the rupturing of the vacuoles. Also, there are anthocyanin pigments (lavender) within the vacuoles of the epidermal cells.
-Photo and caption by Chris
|
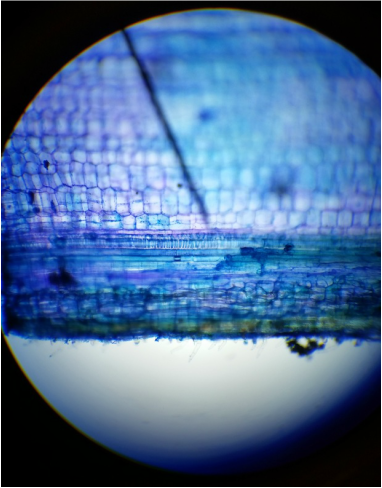
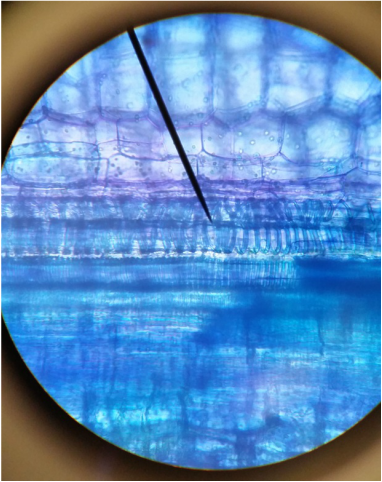
This is a stem cross-section of Tradescantia (Spiderwort) with no stain at a magnification of 400X. At the very tip of the microscope's eyepiece pointer are a grouping of raphides (needle-like crystals made of calcium oxalate) that were exposed due to the rupturing of the vacuoles.
-Photo and caption by Chris
|
Section of Solanum tuberosum otherwise known as the potato
This image is a section of a potato, Solanum tuberosum. The image was taken at 400x with an iodine stain. The image shows the amyloplasts stained purple.
-Photo and caption by Evan
|
The photo to the left is of a section of a potato, Solanum tuberosum. The amyloplasts are stained with iodine which in the presence of starch show up purple. -by Evan
|
Section of Unripe and Ripe Parenchyma of the Musa Fruit (Banana)
This is a section of the unripe Musa fruit after iodine was added, dropwise, to the cells at a total magnification of 40X. The iodine stained the starch in the amyloplasts, making the amyloplasts appear purple.
-Photo and caption by Chris
|
This is a section of the unripe Musa fruit after iodine was added, dropwise, to the cells at a total magnification of 100X. The iodine stained the starch in the amyloplasts, making the amyloplasts appear purple.
-Photo and caption by Chris
|
This is a section of the ripe Musa fruit after iodine was added, dropwise, to the cells at a total magnification of 40X. The iodine should have stained any starch in the amyloplasts, making the amyloplasts appear purple. However, since there is very little starch, there is practically no purple amyloplasts to be seen. (Note: The very uneven surface of the sample caused tiny air bubbles to be trapped under the cover slide, which could not be seen until the sample was viewed under the microscope. These air bubbles are the clear spherical objects with the thick, dark outlines.)
-Photo and caption by Chris
|
This is a section of the ripe Musa fruit after iodine was added, dropwise, to the cells at a total magnification of 100X. The iodine should have stained any starch in the amyloplasts, making the amyloplasts appear purple. However, since there is very little starch, there is practically no purple amyloplasts to be seen. (Note: The very uneven surface of the sample caused tiny air bubbles to be trapped under the cover slide, which could not be seen until the sample was viewed under the microscope. These air bubbles are the clear spherical objects with the thick, dark outlines.)
-Photo and caption by Chris
|
Photosynthesis: Pigments, Starch, and CO2
This lab was designed to better understand the process of photosynthesis. The first goal of the lab was to separate and identify the various pigments within photosynthetic tissue and understand why having multiple pigments is beneficial to a plant. The second goal of the lab was to observe how carbon fixation, that occurs during synthesis reactions, and how it is dependent on the products of the photo reactions. The third and final goal of this lab was to use a starch test and observe the effect of carbon-starvation on the starch reserves created from the synthesis reactions of photosynthesis. -By Evan
Plant Pigments
With the under-surface side down, we crushed Magnolia grandiflora leaf cells onto the chromatography paper using a glass stirring rod. This released the pigments within the photosynthetic tissue onto the paper, allowing them to be effected by the solvent mixture of petroleum ether and methylene chloride (2:1 mixture). These are the developing solvents for the chromatogram, which is the final product (the dried chromatography paper, after the pigments have been separated) that will then be divided and put into the spectrophotometer (a machine that measures the absorbency of each pigment, in a specific solution, and then prints out the absorbency of light at each wavelength on a graph.) -Photo by Evan -Caption by Evan and Chris

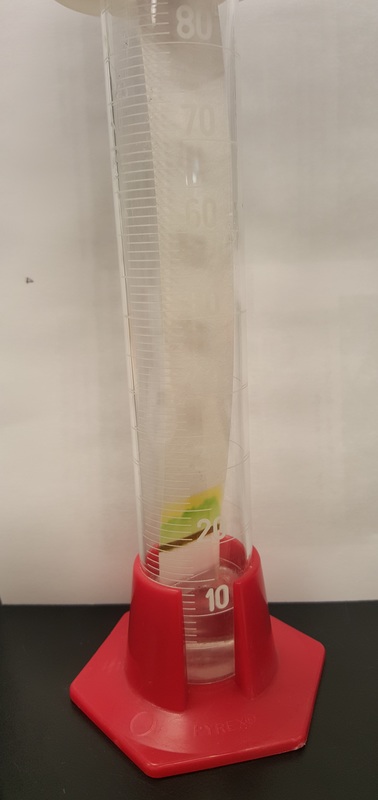
This is the specially prepared graduated cylinder. Inside the graduated cylinder is the solvent mixture of petroleum ether and methylene chloride (2:1 mixture), and the chromatography paper (with the crushed Magnolia grandiflora leaf cells on it). -Photo by Evan -Caption by Chris
|
This is a closer viewing of the specially prepared graduated cylinder. Inside the graduated cylinder is the solvent mixture of petroleum ether and methylene chloride (2:1 mixture), and the chromatography paper (with the crushed Magnolia grandiflora leaf cells on it). Note that this picture was taken after the prior picture, so the movement of the pigments across the chromatography paper (due to the introduction of the aforementioned solvent mixture) was vastly more noticeable than before. -Photo by Evan -Caption by Chris
|
This is the final chromatogram with the four separated pigments of the Magnolia grandiflora. These are the pigments:
Carotene (orange line at the top), Xanthophylls (yellow section), Chlorophyll A (the thin blue-green line above Chlorophyll B and below Xanthophylls), and Chlorophyll B (the yellow-green section above the brown line of crushed cells). Overall, this was my favorite experiment because watching the pigments move across the chromatography paper to get to this final product was really cool and interesting to me. I also enjoyed comparing our paper and the papers of other groups to see the differing formations of the pigments on the paper.
-Photo by Evan -Caption by Chris
|
Each pigment's molecular structure has a different affinity for binding or absorbing to a substance, in this case the chromatography paper. The different affinities result in each pigment moving through the chromatography paper at different speeds/rates in the presence of the solvent solution. This allows us to differentiate between the four pigments of the Magnolia leaf because they are separated, by their molecular structures, on the final chromatogram (picture to the left). Now that the pigments are separated we can test each pigment's absorbency spectrum.
Carotene- orange line at the top Xanthophylls- yellow section Chlorophyll A- the thin blue-green line above Chlorophyll B Chlorophyll B- the yellow-green section above the line of crushed cells -By Evan and Chris |
Light Absorption of Chromatography of Four Pigments
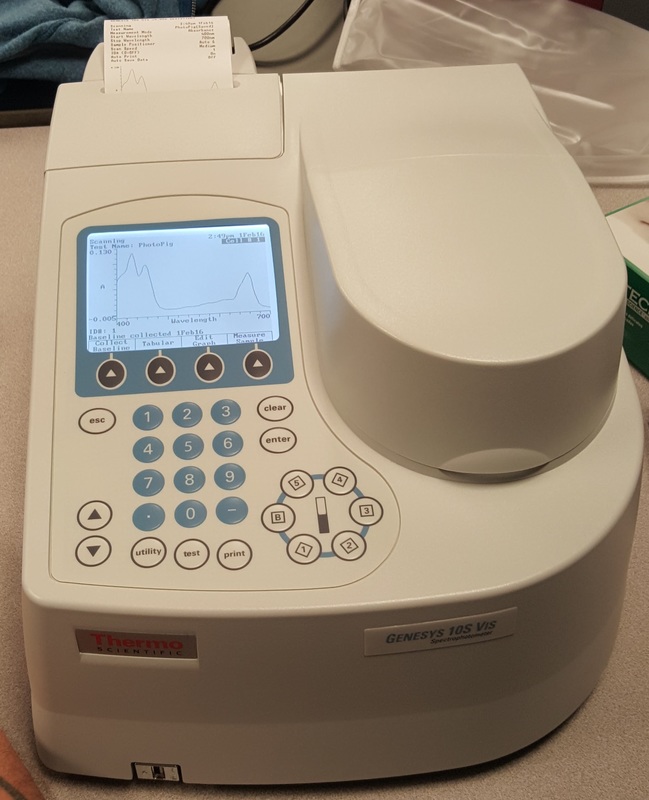
This is a device called a spectrophotometer. A spectrophotometer measures the absorbency of each pigment solution and prints out the absorbency of light at each wavelength on a graph. This data tells you the wavelengths of light each pigment can absorb and reach the excited state to pass the electrons during the photo reactions. -Photo and Caption by Evan
|
The pigment solutions are made by the following process:
-Obtain the final chromatogram after it has dried -Cut-out the specific sections of the four aforementioned pigments -Place each section in a different solution of acetone to elute (remove) all of the pigment from the sections of paper -Finally, place the resulting liquid solution into the cuvettes (special test tubes for the spectrophotometer) so we can measure the light absorption at specified wavelengths using the spectrophotometer -By Chris |
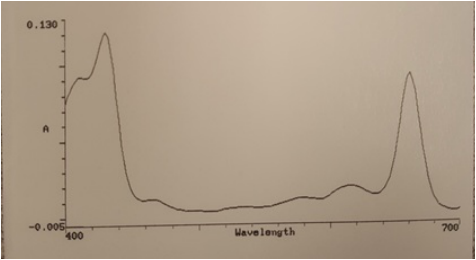
Absorbance graph (absorption spectrum) directly from the spectrophotometer for Chlorophyll B.
-Caption by Chris
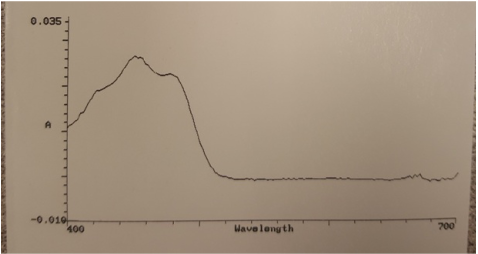
Absorbance graph (absorption spectrum) directly from the spectrophotometer for Xanthopyll.
-Caption by Chris
|
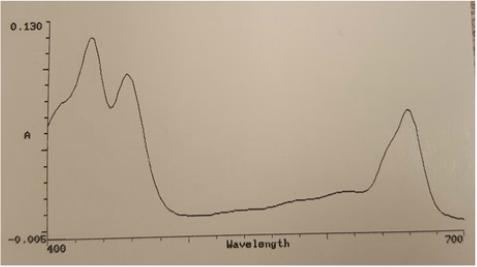
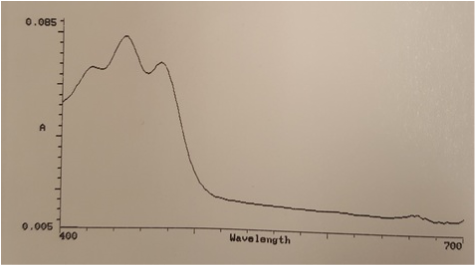
Absorbance graph (absorption spectrum) directly from the spectrophotometer for Chlorophyll A.
-Caption by Chris
Absorbance graph (absorption spectrum) directly from the spectrophotometer for Carotene.
-Caption by Chris
|
CO2 Consumption in Photosynthesis with Elodea
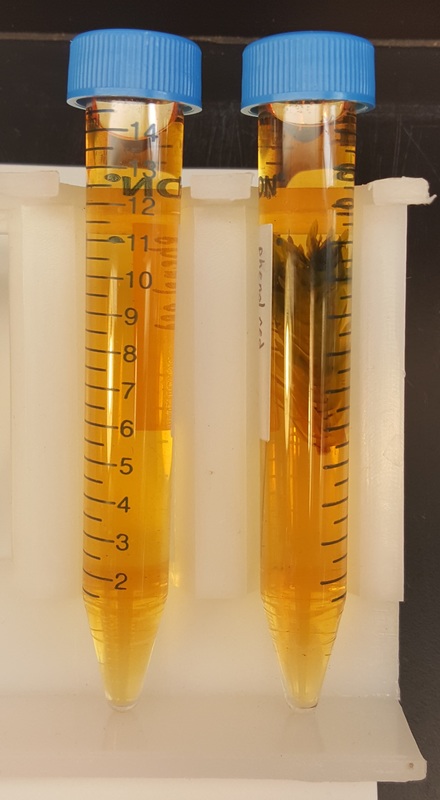
light- before
|

light- after
|
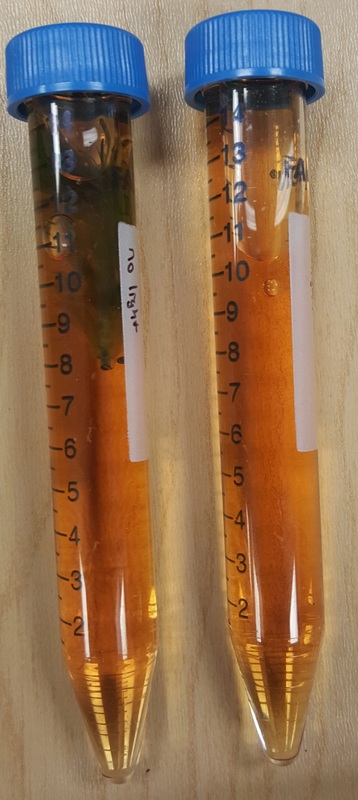
dark- before
|
dark- after
|
dark- after 1 week
-Photo by Chris
|
Starch Test Using Coleus (Plectranthus scutellarioides) Leaf

Original Coleus (Plectranthus scutellarioides) Leaf -Photo by Evan -Caption by Chris
Coleus (Plectranthus scutellarioides) leaf while being soaked in boiling water. -Photo by Evan -Caption by Chris
|
Coleus (Plectranthus scutellarioides) leaf after it was soaked in boiling water. -Photo by Evan -Caption by Chris
|
Next Steps...
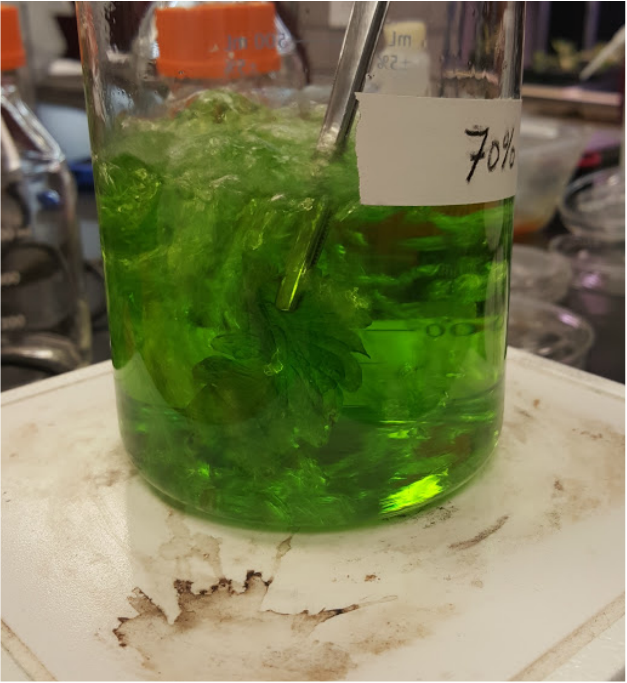
Coleus (Plectranthus scutellarioides) leaf while being soaked in boiling 70% ethanol solution. -Photo by Evan -Caption by Chris
|
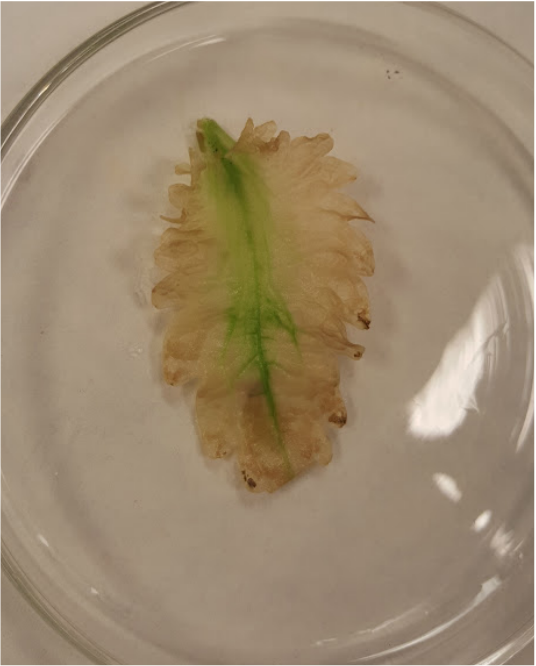
Coleus (Plectranthus scutellarioides) leaf after being soaked in boiling 70% ethanol solution. -Photo by Evan -Caption by Chris
|

Coleus (Plectranthus scutellarioides) leaf after treated with iodine to determine presence of starch. The dark color in the leaf tells us that starch is present. -Photo by Evan -Caption by Chris and Evan
The starch experiment was my favorite and most interesting because it showed how the plant changes and prepares/effected for different conditions within its environment. -Evan
Simple and Complex Tissues
The goal of this lab was to be able to compare and contrast the different types of cells and tissues of the ground tissue system. These cells include parenchyma, collenchyma, and sclerenchyma. After the lab is completed you should be able to recognize the three tissue systems within a plant body. This lab will also show you how to identify water conducting cells within the vascular tissue system and be able to describe their structural features and function. Lastly, the lab will demonstrate the characteristics of the epidermis layer of plants.
Parenchyma and Collenchyma Cells (Ground Tissues)
Sections of Celery

This is a section of celery, Apium graveolens. The cross-sectioned was stained with Toluidine Blue and viewed at 100x magnification. This stain shows collenchyma bundles, which have stained purple/blue thick cell walls. The parenchyma cells have thin cell walls, which you can see have stained slightly purple. -Photo and Caption by Evan
|
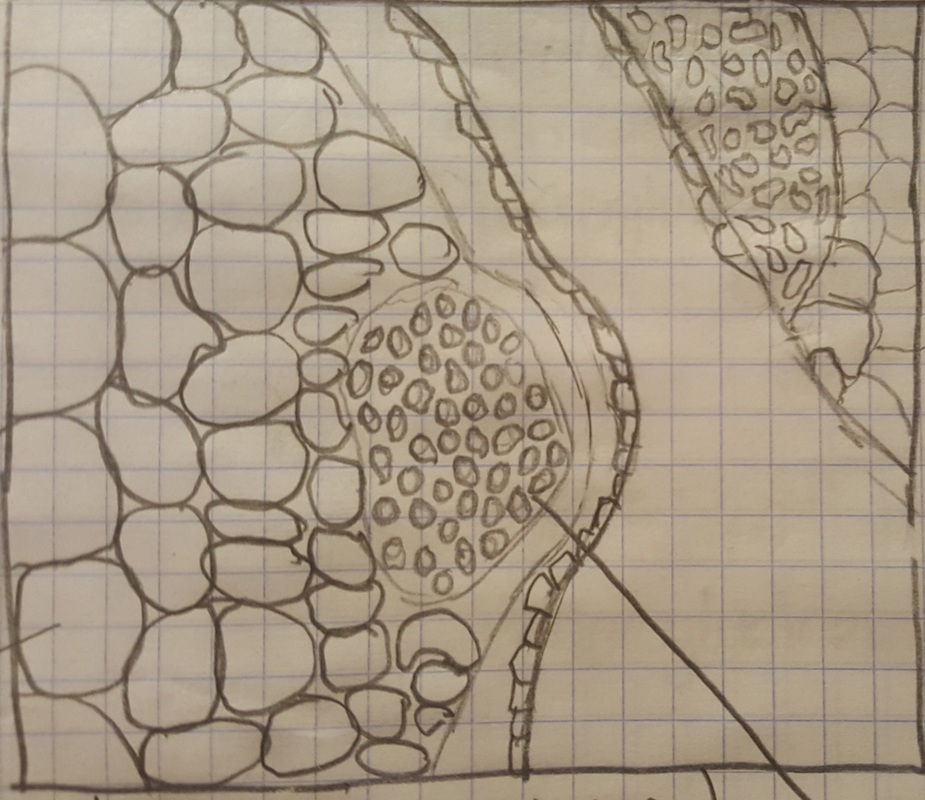
This is a scientific drawing of a cross section of celery, Apium graveolens. The drawing was made by viewing the cross sectioned stained with Toluidine Blue and at 100x magnification. -Photo and Caption by Evan
|
Sclerenchyma Cells (Ground Tissues) in Different Species
Sclerenchyma of Pear fruit
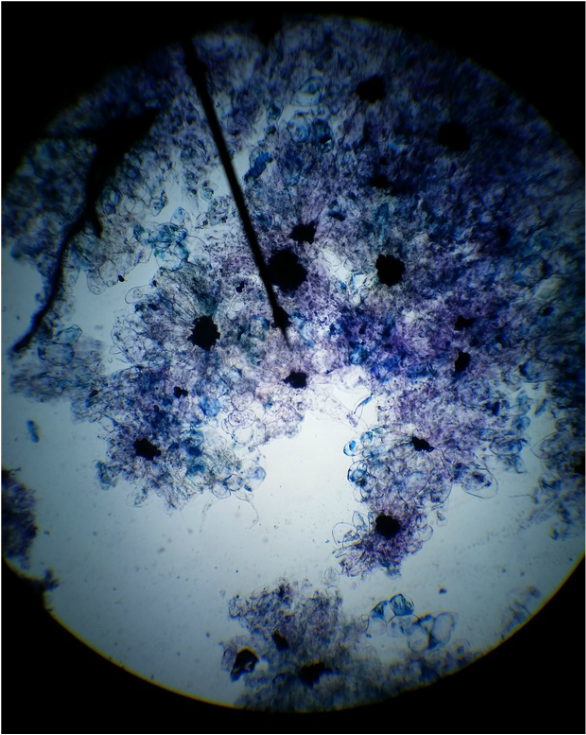
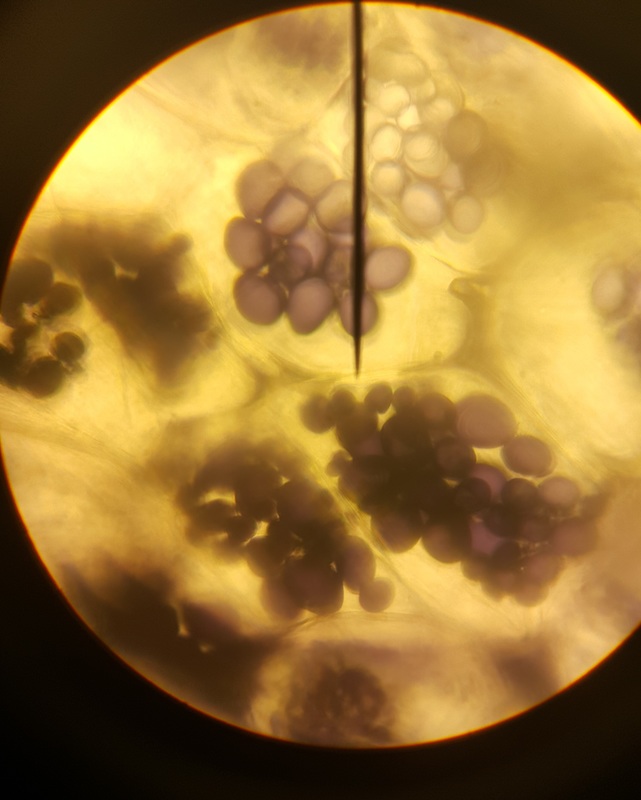
This is sclerenchyma of a pear fruit (Pyrus communis) that was stained with Touidine Blue O (TBO) and viewed at a magnification of 40X. The very dark clusters are the thick walled, lignified brachysclereids. -Photo and Caption by Chris
|
This is sclerenchyma of a pear fruit (Pyrus communis) that was stained with Touidine Blue O (TBO) and viewed at a magnification of 100X. The very dark clusters are the thick walled, lignified brachysclereids. -Photo and Caption by Chris
|
This is sclerenchyma of a pear fruit (Pyrus communis) that was stained with Touidine Blue O (TBO) and viewed at a magnification of 400X. The very dark cluster is the thick walled, lignified brachysclereids with pit canals evident. -Photo and Caption by Chris
|
This is a different section but of the same pear fruit (Pyrus communis) specimen that was stained with Touidine Blue O (TBO) and viewed at a magnification of 400X. The very dark cluster is the thick walled, lignified brachysclereids with pit canals evident. -Photo and Caption by Chris
|
Avocado Fruit
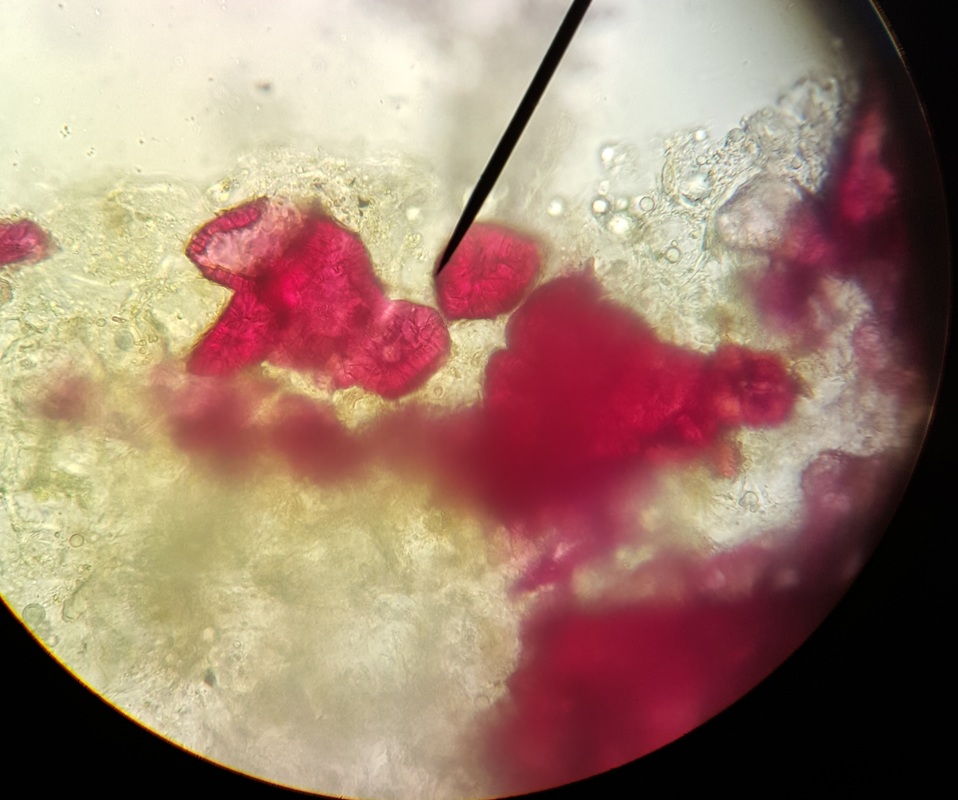
This is a picture of a tissue scraping from the peel of a section of an avocado, Persea americana. The cells were stained with Phloroglucinol-HCl and viewed at 400x. The stain showed brachysclereids or stone cells within the tissue and stained red. They are stained red due to Phloroglucinol-HCl staining lignin within the cell walls red. -Photo and Caption by Evan
Sclerenchyma Fibers of Snake Plant: Cross-Section
This is a cross-section of sclerenchyma fibers of snake plant (Sansevieria trifasciata) stained with TBO at a magnification of 40X. -Photo and Caption by Chris
|
This is a cross-section of sclerenchyma fibers of snake plant (Sansevieria trifasciata) stained with TBO at a magnification of 100X. -Photo and Caption by Chris
|
This is a cross-section of sclerenchyma fibers of snake plant (Sansevieria trifasciata) stained with TBO at a magnification of 400X. -Photo and Caption by Chris
|
Sclerenchyma Fibers of Snake Plant: Longitudinal-Section
This is a longitudinal-section of sclerenchyma fibers of snake plant (Sansevieria trifasciata) stained with TBO at a magnification of 40X. -Photo and Caption by Chris
|
This is a longitudinal-section of sclerenchyma fibers of snake plant (Sansevieria trifasciata) stained with TBO at a magnification of 40X. -Photo and Caption by Chris
|
This is a longitudinal-section of sclerenchyma fibers of snake plant (Sansevieria trifasciata) stained with TBO at a magnification of 40X. -Photo and Caption by Chris
|
Dermal Tissues
Upper and Lower Dermal Tissues of the Inch Plant
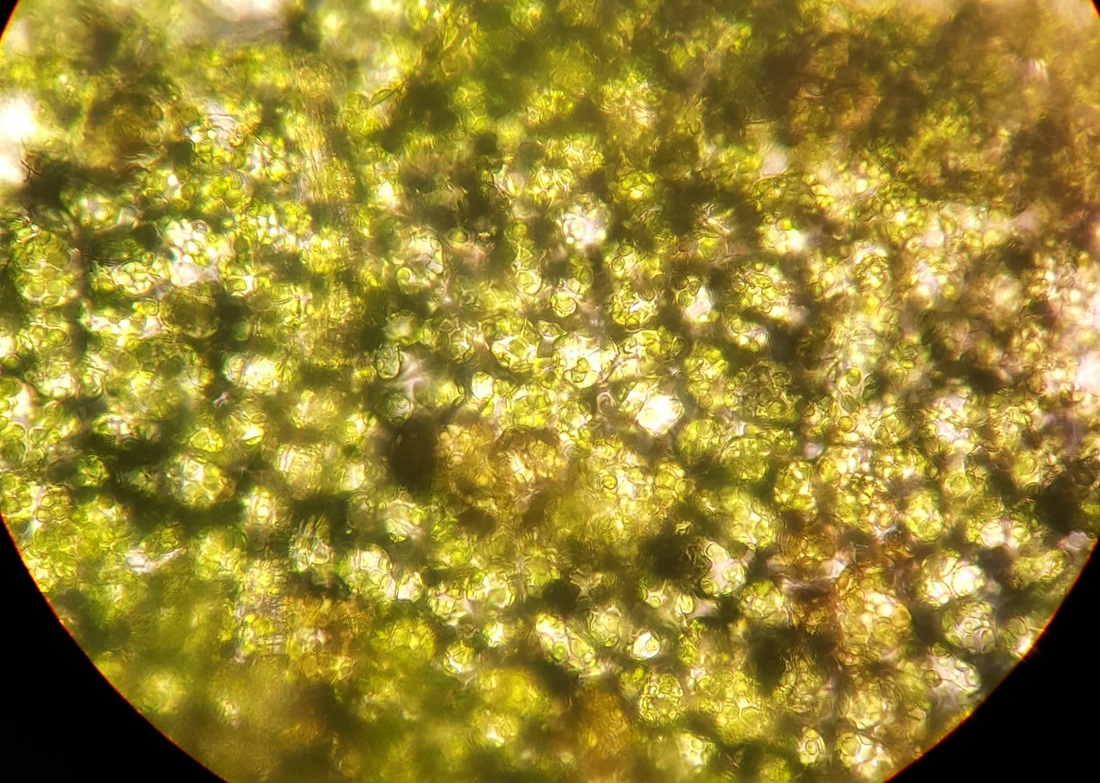
These are Collenchyma cells of the upper epidermis of an Tradescantia zebrina, inch plant. Within the cells you can see the great amount of chloroplasts within each cell. The photo was taken at 400x magnification. -Photo and Caption by Evan
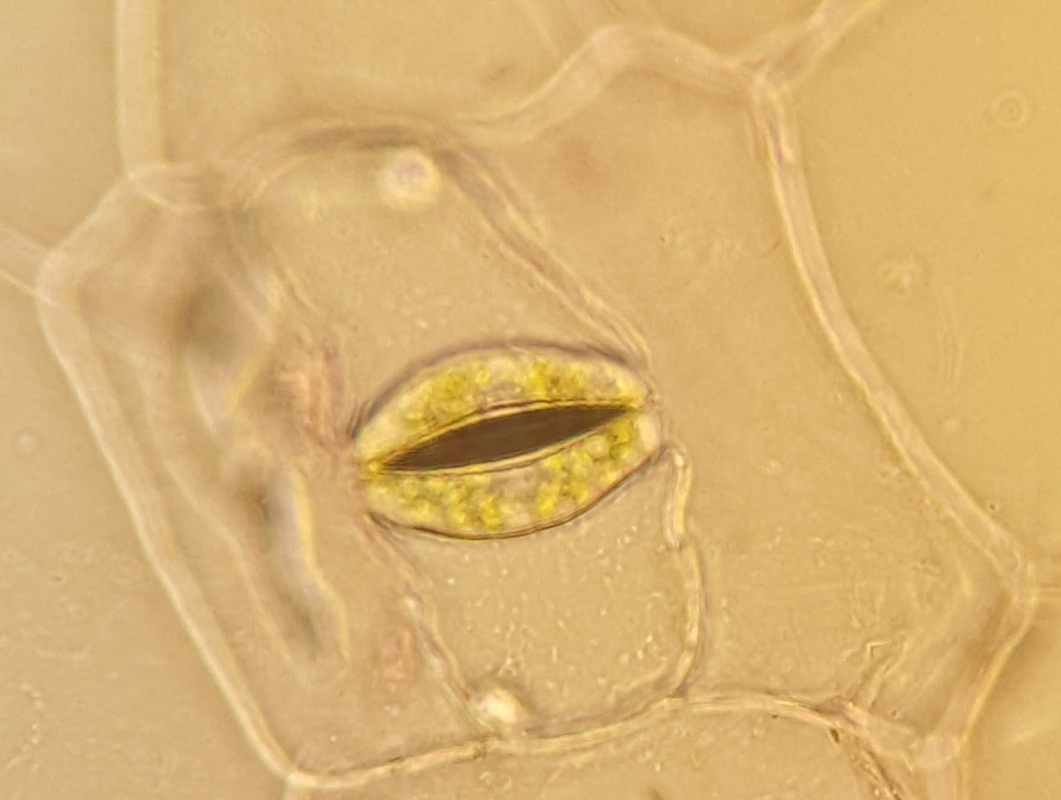
This is a photo of a guard cell within the lower epidermis, by performing an epidermal peel of a leaf of an inch plant, Tradescantia zebrina. You can see the chloroplasts within the guard cell, which just look like green blobs. The cells were viewed at 400x. -Photo and Caption by Evan
The epidermis peel were my favorite cells to view because it showed the vast difference the cells take in each layer of tissue to perform the functions necessary for the plant to survive. -Evan
Vascular Tissues
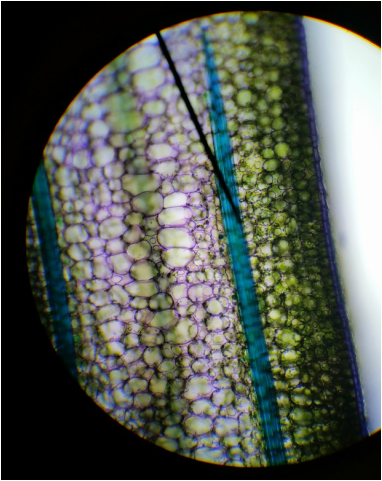
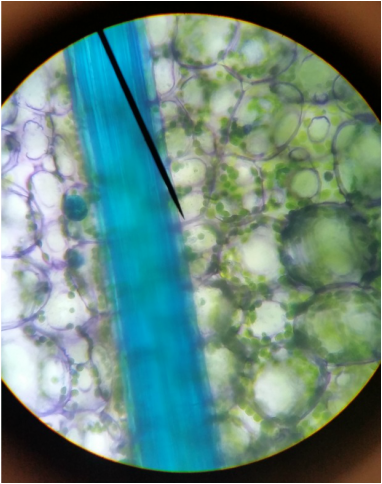
Longitudinal-Section of Coleus (Plectranthus scutellarioides)
This is a longitudinal-section of coleus (Plectranthus scutellarioides) stained with TBO at a magnification of 40X. -Photo and Caption by Chris
|
This is a longitudinal-section of coleus (Plectranthus scutellarioides) stained with TBO at a magnification of 100X. -Photo and Caption by Chris
|
This is a longitudinal-section of coleus (Plectranthus scutellarioides) stained with TBO at a magnification of 400X. -Photo and Caption by Chris
|
Tracheary Elements, Sclerids, and Parenchyma Tissue in Hoya
Cross-Sections of a Wax plant stem
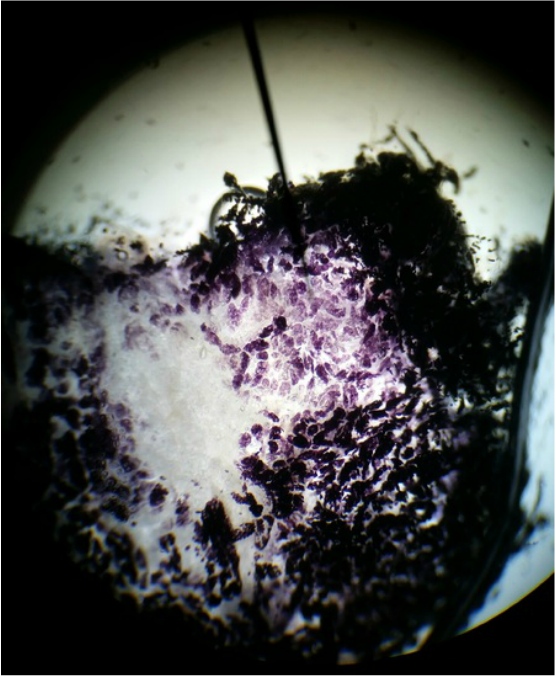
This is the pith of the wax plant, Hoya carnosa stem. The tissue was prepared by taking a cross section of the stem and staining it with Toluidone Blue and viewed at 100x. The cells within the cortex are Parenchyma cells. The cells stained a blue/green are Brachysclereids.
-Photo and Caption by Evan
|
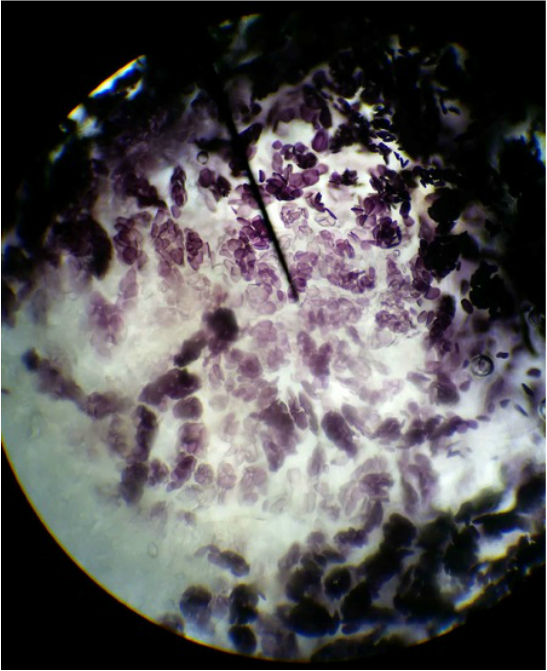
This photo is of a the ring of ground tissue inside the vascular tissue of a wax plant, Hoya carnosa stem. The cross section was stained with Toluidone Blue and viewed at 100x. -Photo and Caption by Evan
|
This is the a photo of the cortex of a cross section of the wax plant, Hoya carnosa stem. The blue/green stained cells are brachysclereids, which are found in both the pith and cortex. The stain used is Toluidone Blue and viewed at 100x. -Photo and Caption by Evan
|
Genetically Modified Organism Investigation: Part 1
This lab was used to determine and understand the growing trend of genetically modified organisms in agriculture today. The goals of this lab were to be able to explain what a genetically modified organism is, how to extract DNA from a plant food product, know why and how a polymerase chain reaction amplifies a target DNA sequence, and lastly understand some of the implications that genetic engineering of agriculture crops in reference to biodiveristy, ecosystems, co-evolution of plants and their pests, human health, and economics. -by Evan and Chris

This photo is of the test food for genetic modification. -Photo and Caption by Evan
|

This photo is of the nutritional information and ingredients of the girl scout cookies.
-Photo and Caption by Evan
|
The test food we chose for genetic modification were girl scout cookies called do-si-dos. We predict that the cookies will be genetically modified. -by Evan
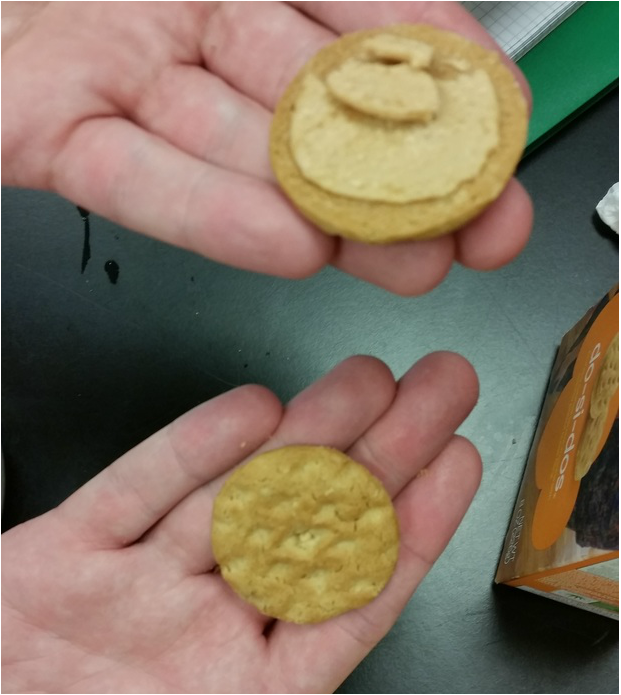
This is a photo of the cookie we used as our test food for genetic modification
(we only tested the cookie part, not the inside part). -Photo and Caption by Chris
|
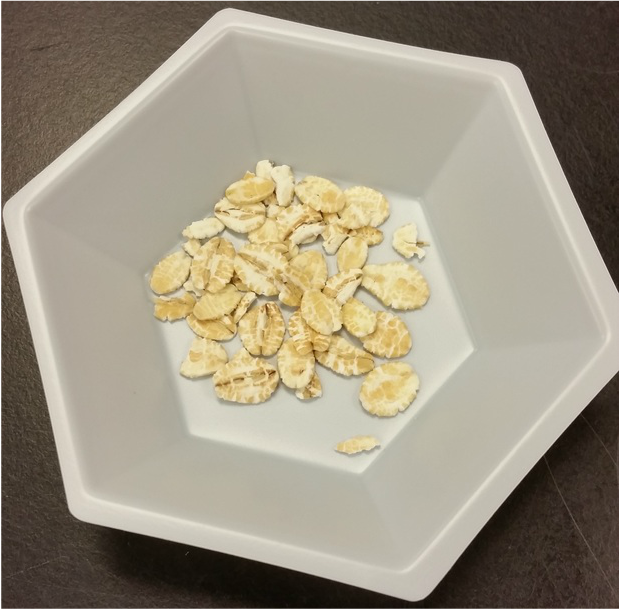
This is a photo of the non-genetically modified food (oats). This is included in the testing because it acts as a control. -Photo by Chris caption by Evan and Chris
|
This is the ground-up test food and water slurry that we put in the screwcap tubes containing InstaGene matrix. -Photo and Caption by Chris
|
These are our screwcap tubes containing the InstaGene matrix and our slurry that we placed in the water bath to be heated at 95 degrees Celcius for 5 minutes. -Photo and Caption by Chris
|
The cellular contents we are releasing from the ground-up sample contain enzymes (DNases) that can degrade the DNA we are are attempting to extract. The InstaGene matrix is made of negatively charged microscopic beads that "chelate" or grab metal ions out of solution. It chelates metal ions such as Mg2+, which is required as a cofactor in enzymatic reactions. When the DNA is released from the sample in the presence of the InstaGene matrix, the charged beads grab the Mg2+ and make it unavailable to the enzymes that would degrade the DNA we are trying to extract. This allows us to extract DNA without degradation. Boiling the samples destroys these enzymes. -By Chris
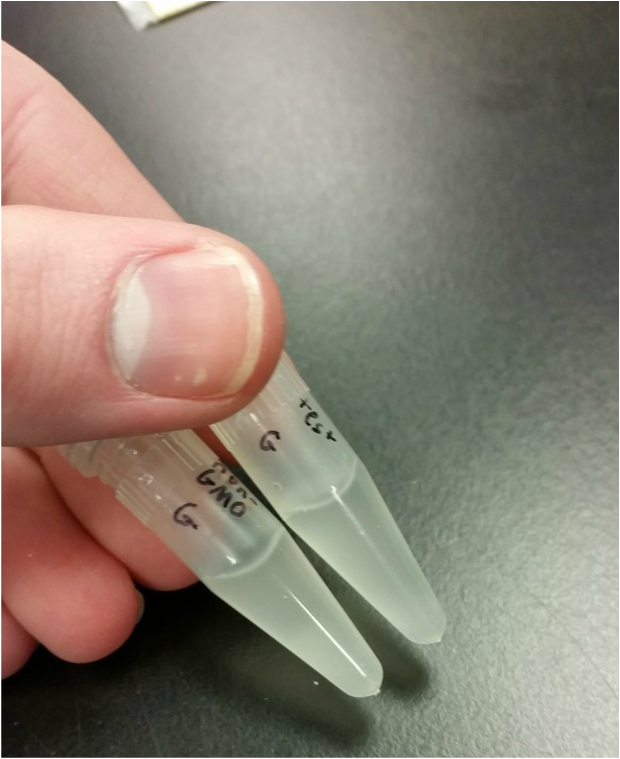
This photo is of us placing the master mix with the GMO primers into extracted DNA. The importance of GMO primers is for the PCR to recognize genetically modified sequence and make multiple copies within the PCR. -Photo and Caption by Evan
|
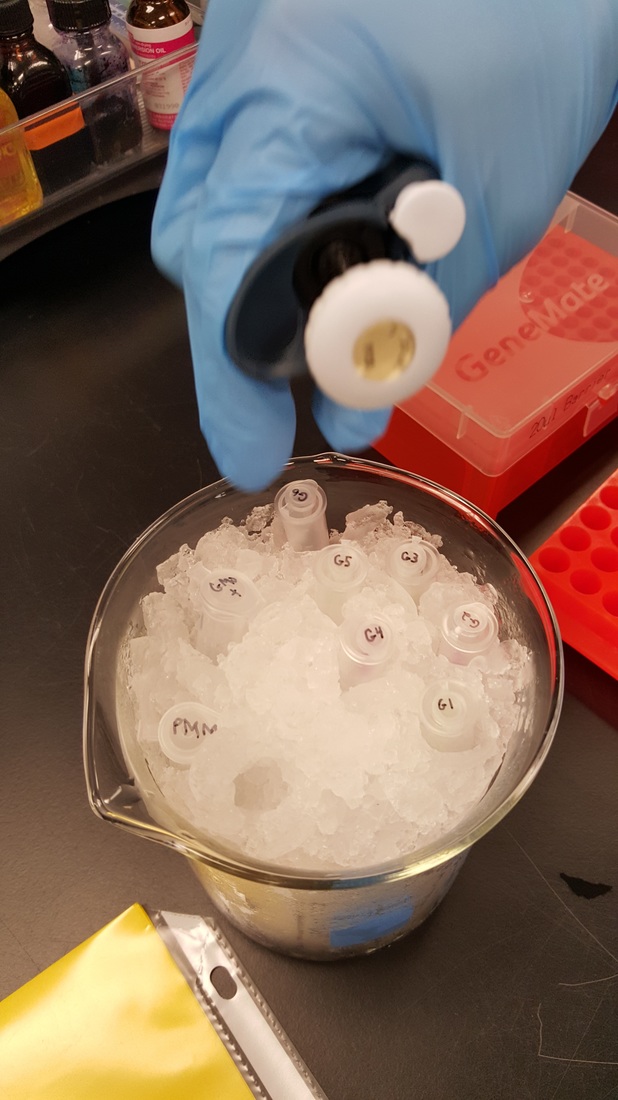
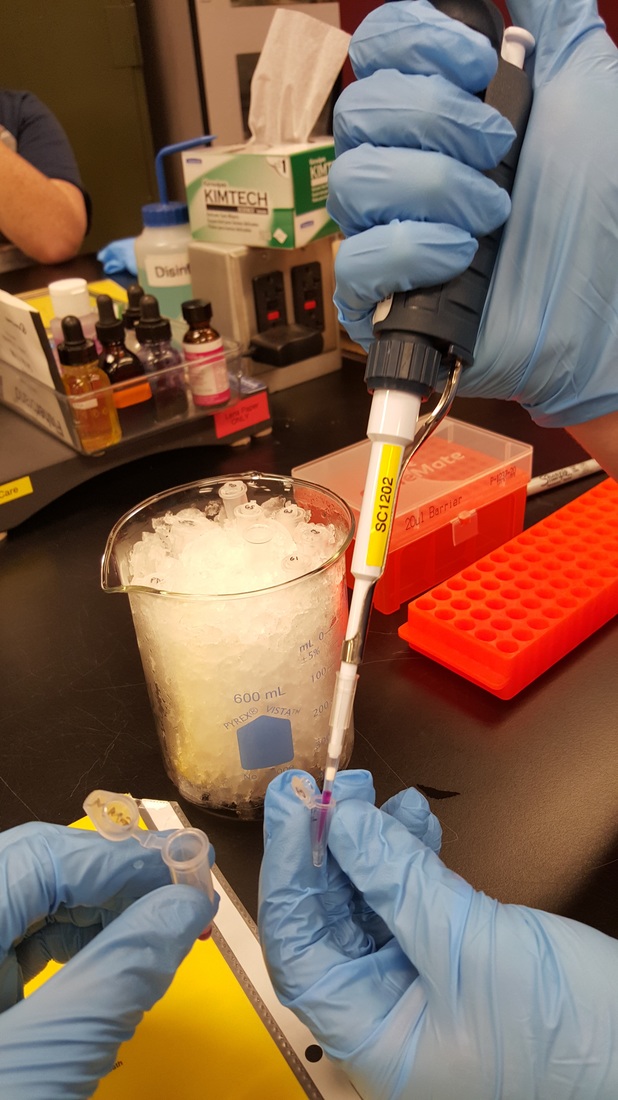
This ice bath holds both forms of master mix and extracted DNA samples. The multiple forms of master mix are used since each have different primers in each, which allows for different sequences to be copied in the PCR. -Photo and Caption by Evan
|
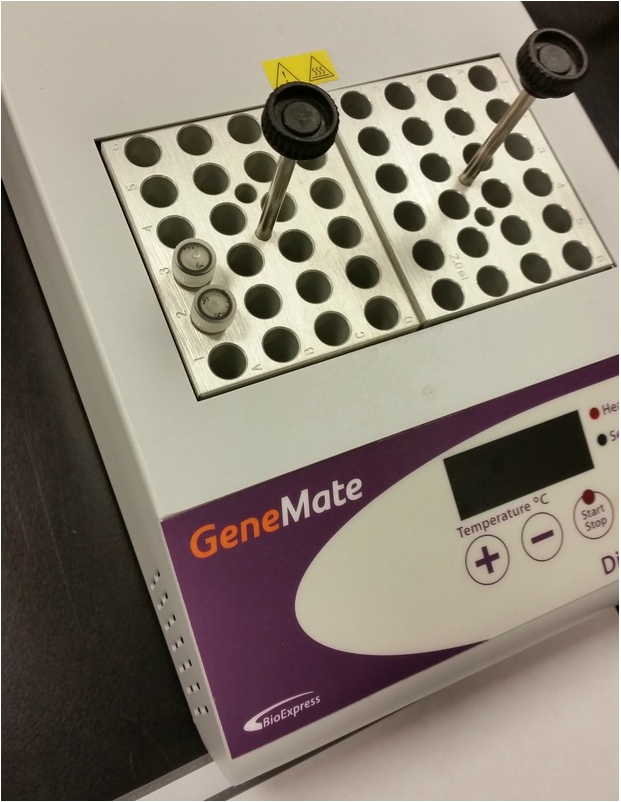
This is a photo of the thermocycler with our, and other group's, samples. The thermocycler is a machine that contains an aluminium block that can be rapidly heated and cooled. The rapid heating and cooling of this block is known as thermal cycling. -Photo and Caption by Chris
PCR has three steps, a denaturing step, an annealing step, and an elongation step. During thermal cycling, the denaturing step of PCR, the DNA template is heated to 94 degrees Celsius to separate (or denature) the double-stranded DNA molecule into two single strands. The DNA is then cooled to 59 degrees Celsius to allow the primers to locate and anneal (bind) to the DNA. Because the primers are so much shorter than the template DNA, they will anneal much more quickly than the long template DNA strands at his temperature. The final step is to increase the temperature of the PCR reaction to 72 degrees Celsius, which is the optimal temperature for the DNA polymerase to function. In this step the DNA polymerase adds nucleotides one at a time at the 3' end of the primer to create a complementary copy of the original DNA template. These three steps form one cycle of PCR. A complete PCR amplification undergoes multiple cycles of PCR, in this case 40 cycles. -By Chris
The results of this experiment will be obtained next week after the PCR is completed and gel electrophoresis is performed.
Genetically Modified Organisms: Part 2
The purpose of this lab was to determine results on wether our test food was genetically modified by using gel electrophoresis. The goals of the lab were to be able to explain the process and interpret the results of gel electrophoresis using the PCR samples from last week. Understand why positive and negative controls were neccesary to validate the results. The last goal of the lab was to discuss the implications of GMOs on the environment, biodiversity, co-evolution of plants and their pests, human health, and economics. -By Evan
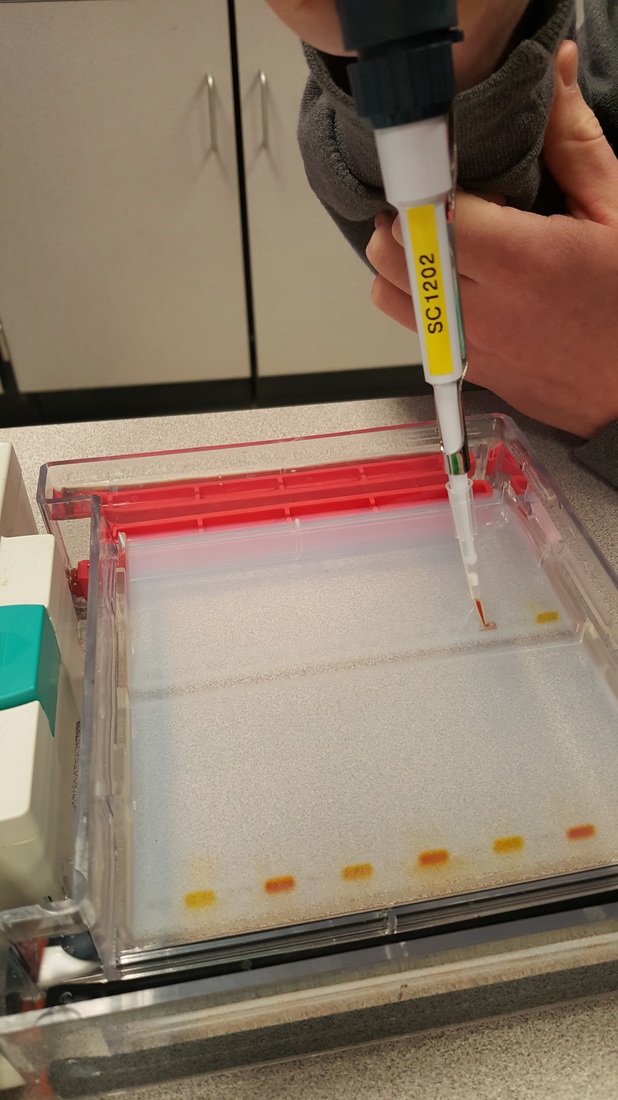
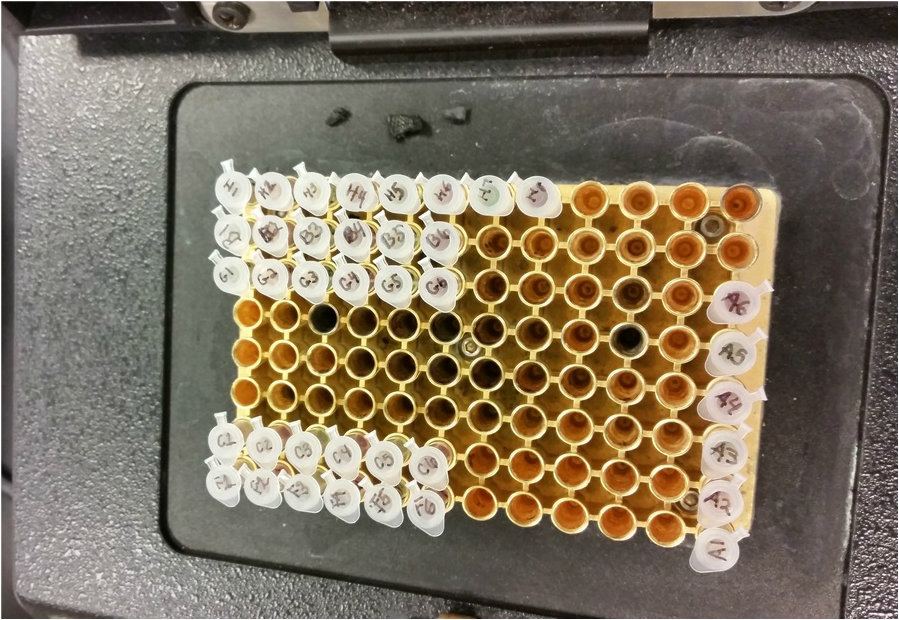
This is a picture showing us putting in the PCR product into the gel. -Photo and caption by Evan
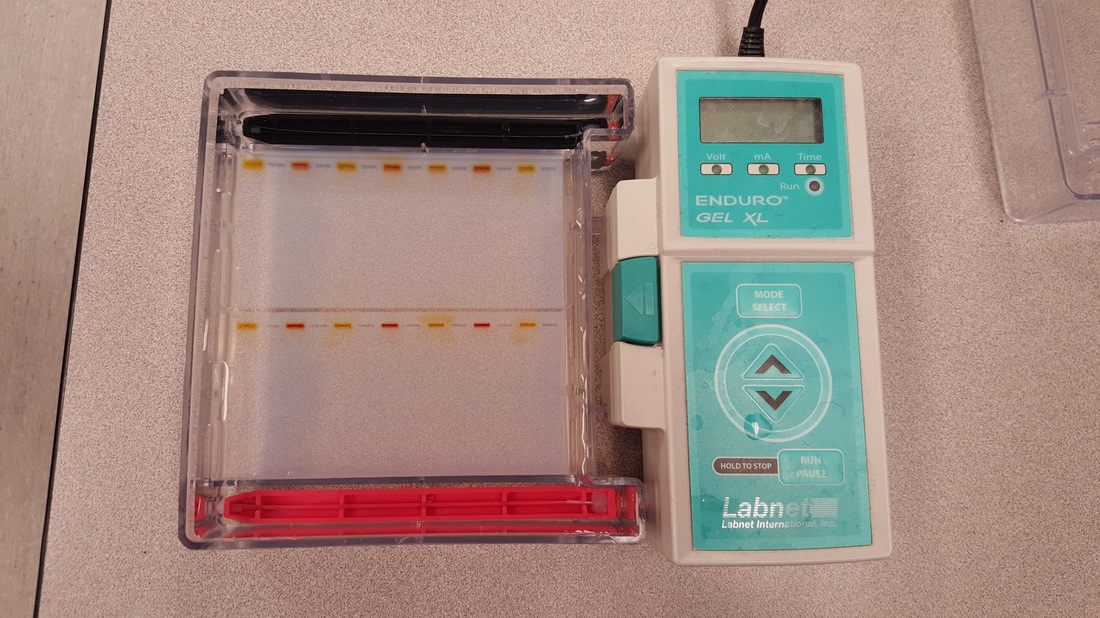
This is a picture of the gel electrophoresis device with all the PCR extractions in the gel. -Caption and Photo by Evan
Gel electrophoresis uses electrical current to move different weighted DNA extractions through a gel. The different sized sample, or amount of base pairs, move through the gel at different speed and are measured by a comparison of the molecular weight ruler which moves at a known rate. The DNA moves through the gel because of the charge created by the device. DNA has an overall negative charge this means that the negative charged DNA will be pulled down toward the positive node. Under a UV light the gels will show bands, which are the different sized DNA that have moved through the gel. -By Evan and Chris
Results of Gel Electrophoresis

Our test food was do-si-dos, a girl scout cookie. The results show that in lane four our PCR product with a GMO primer did have a band at the 200 base pair line. The fact that the sample indicated the GMO primer means that do-si-dos tested positive for genetically modified DNA sequences (i.e. the have genetically modified DNA). The other samples were needed as controls and to test for any contamination of the PCR product.
If we were to repeat this procedure we would use a different known GMO sample since the results show something went wrong and we have multiple bands in lane six we would also repeat the experiment and use multiple samples to verify out results. - By Evan and Chris
- Lane one held a sample with a non-GMO food with plant primers. This is a positive control to test for the presence of plant DNA in the non-GMO organism.
- Lane two held a sample with a non-GMO food with GMO primers. This is a negative control to indicate that the non-GMO does not contain genetically modified DNA as well as to check for any contamination, either from the grinding of the non-GMO sample or from pipetting the different mixes into the PCR.
- Lane three held a sample of our test food with plant primers. This indicates weather or not we have successfully extracted plant DNA from our food sample, verifying the quality of the DNA.
- Lane four held a sample of our test food with GMO primers. This is to test whether our food was genetically modified or not.
- Lane five held a sample of a known GMO with plant primers. This is a positive control to indicate whether or not the plant primer is working.
- Lane six held a sample of a known GMO sample with GMO primers. This positive control indicates whether or not the GMO primer is working.
- Lane seven is holds the molecular weight ruler which is used as a reference to determine our product bands' sizes.
If we were to repeat this procedure we would use a different known GMO sample since the results show something went wrong and we have multiple bands in lane six we would also repeat the experiment and use multiple samples to verify out results. - By Evan and Chris
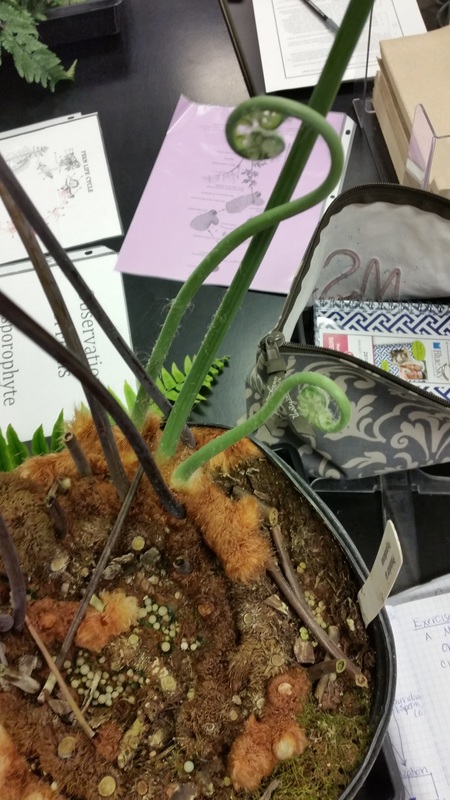
Bryophytes (non-vascular plants) and
Ferns (seed-free vascular plants)
Non-Vascular Plants: The Mosses
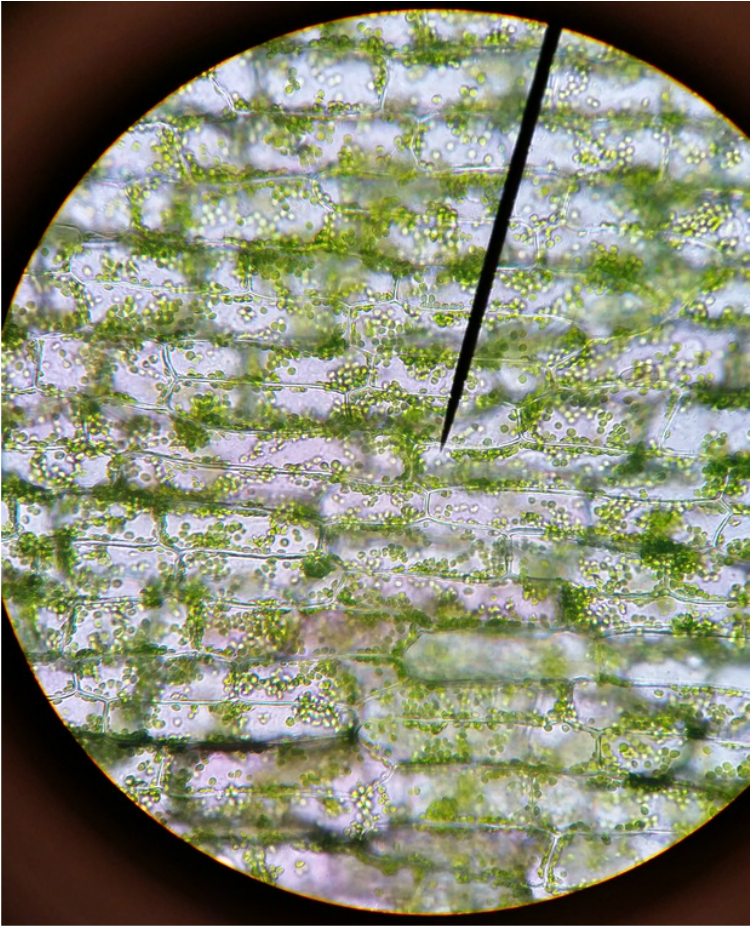
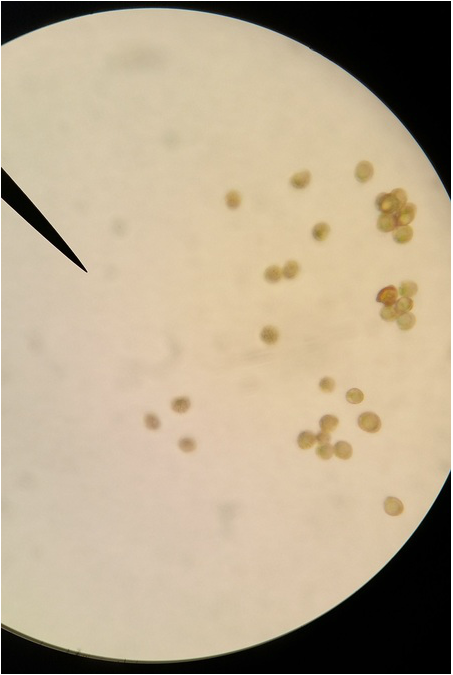
Moss Spores (Polytrichum sp.)
Living Moss Protonema (Phylum: Bryophyta)
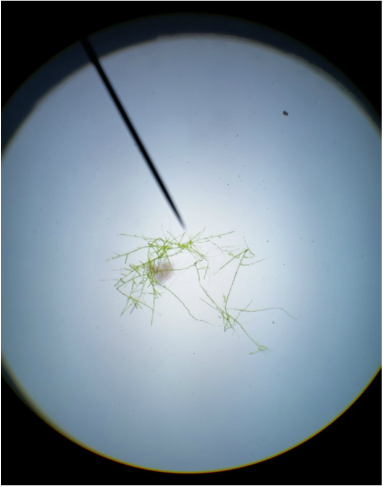
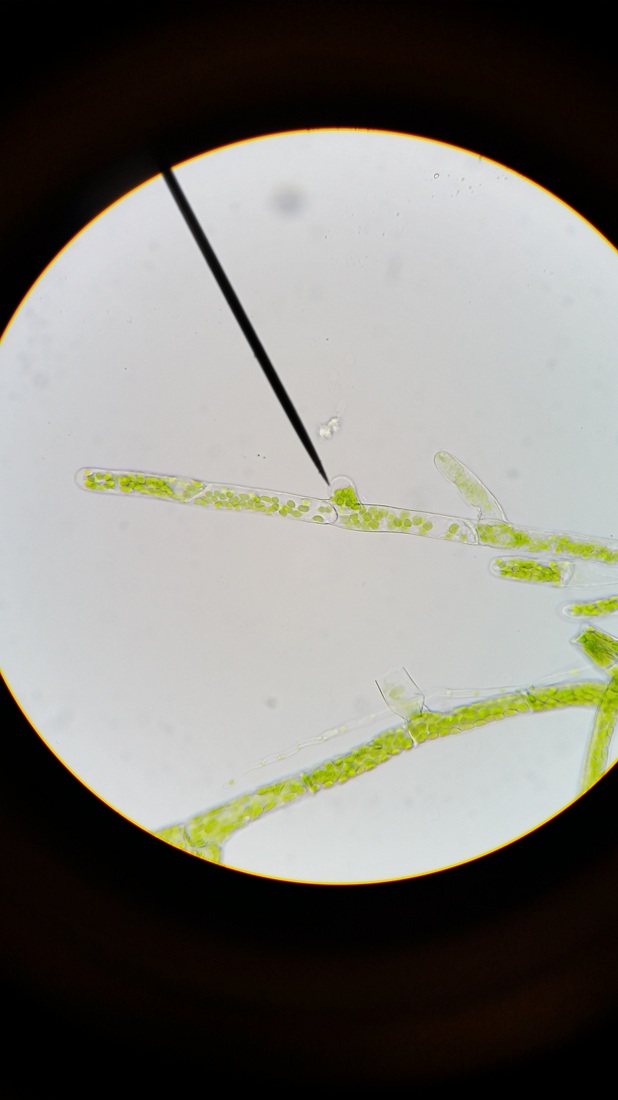
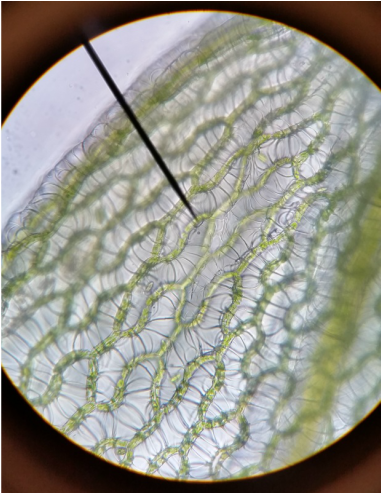
This is a moss protonema (Phylum: Bryophyta) at a magnification of 40x. -Photo and Caption by Chris
|
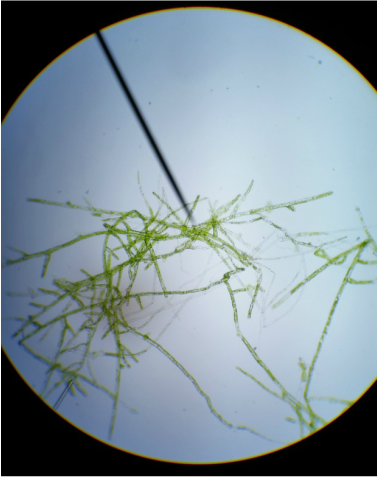
This is a moss protonema (Phylum: Bryophyta) at a magnification of 100x. -Photo and Caption by Chris
|
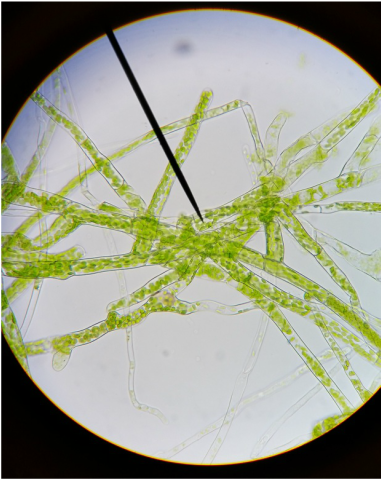
This is a moss protonema (Phylum: Bryophyta) at a magnification of 400x. -Photo and Caption by Chris
|
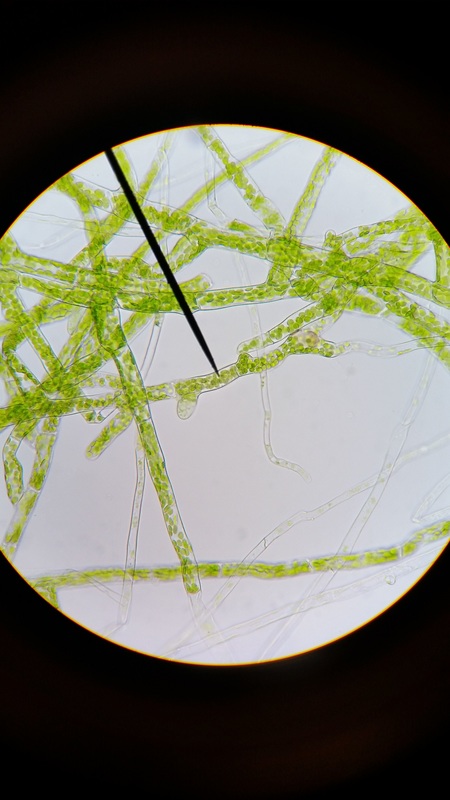
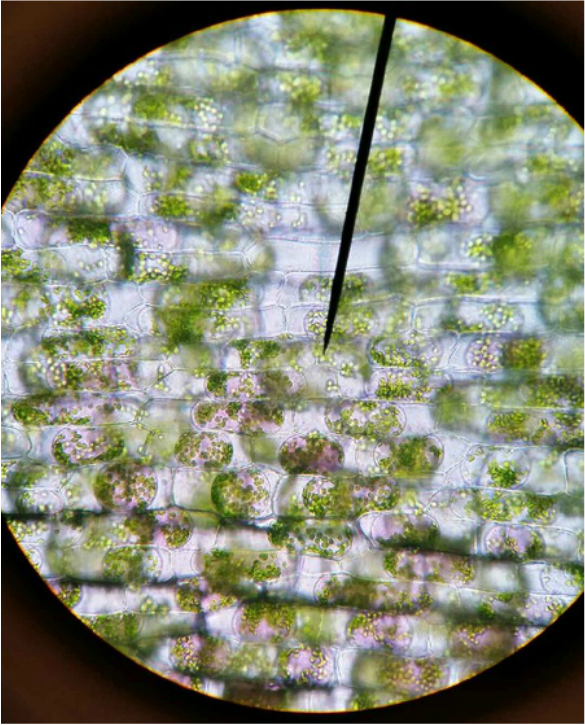
This is a moss protonema (Phylum: Bryophyta) at a magnification of 400x. This was included because the buds growing on the protonema were easier to visualize. -Photo and Caption by Chris
|
This is a moss protonema (Phylum: Bryophyta) at a magnification of 400x. This was included because the buds growing on the protonema were easier to visualize. -Photo and Caption by Chris
|
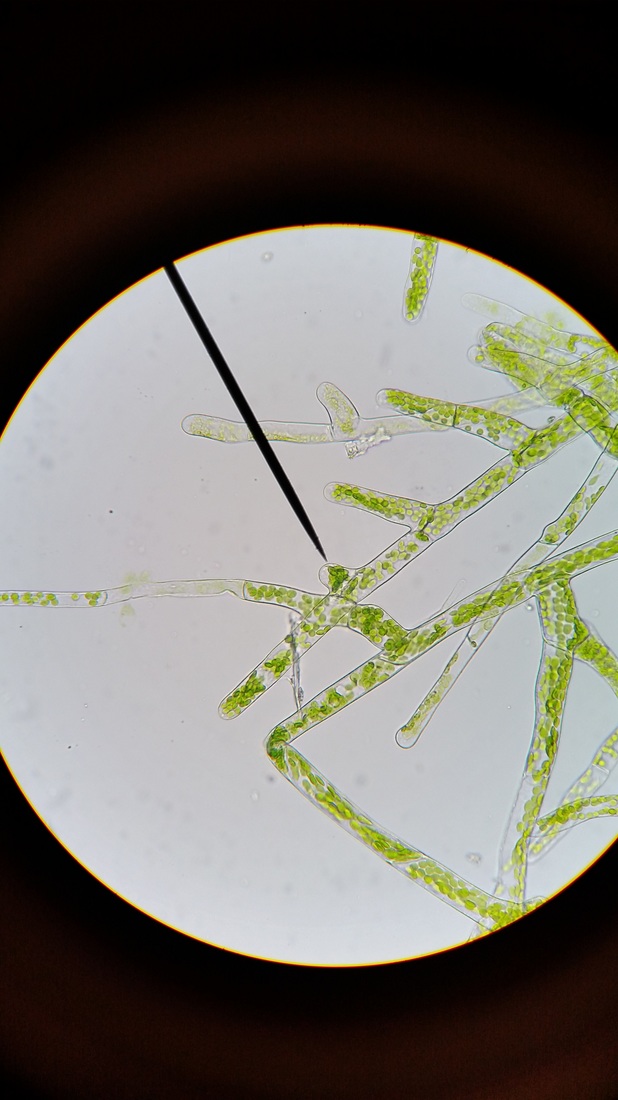
This is a moss protonema (Phylum: Bryophyta) at a magnification of 400x. This was included because the buds growing on the protonema were easier to visualize. -Photo and Caption by Chris
|
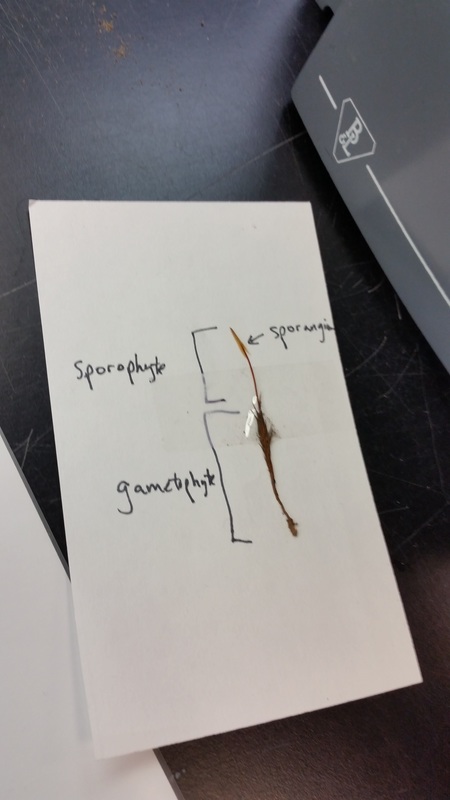
Haircap Moss (Polytrichum sp.) Gametophytes with Sporophytes Attached
This is a haircap moss (Polytrichum sp.) showing the differing parts of the moss (gametophytes, sporophytes and sporangia). -Photo and Caption by Chris
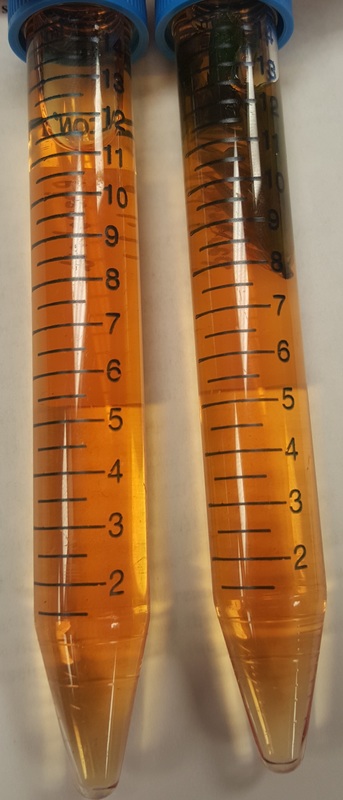
Peat Moss (Sphagnum sp.) Gametophyte Tissue
Stained with Phloroglucinol-HCl
-Photo by Chris
|

-Photo by Chris
|
-Photo by Chris
|
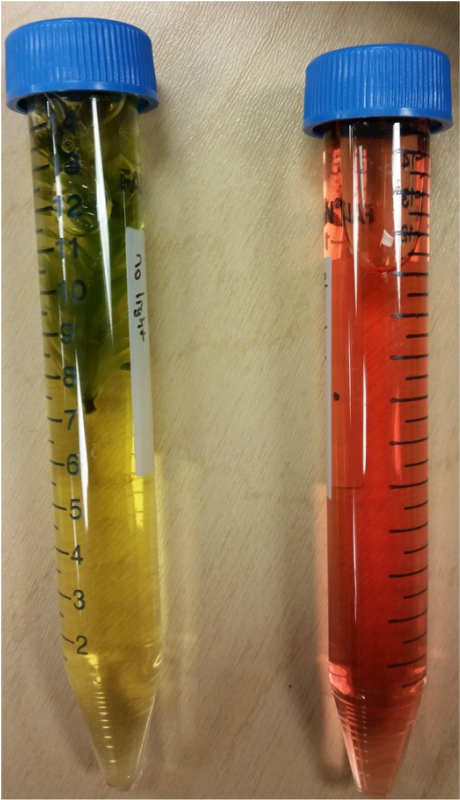
Non-Vascular Plants: The Liverworts
(Phylum: Hepaticophyta)
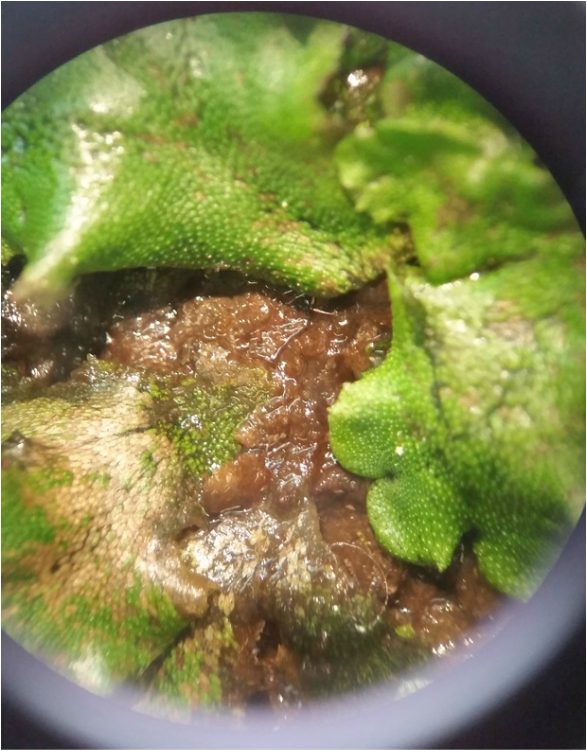
Liverwort (Marchantia sp.) Thallus (Gametophyte)
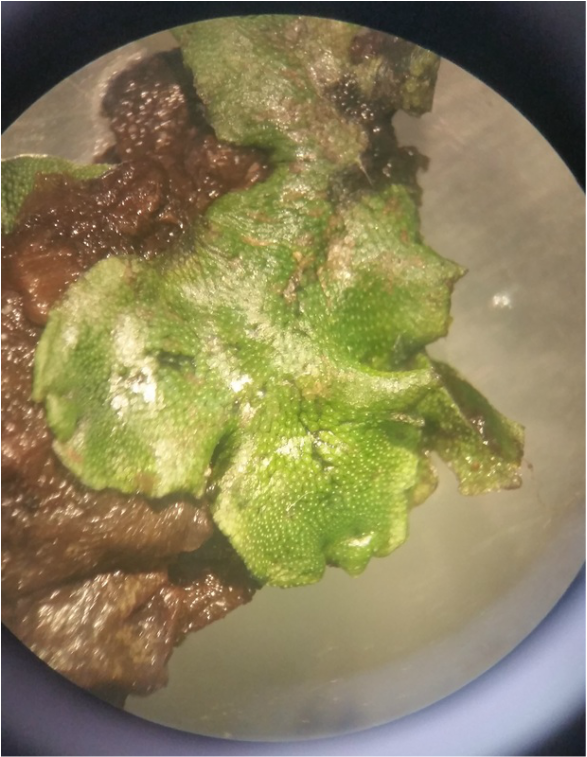
-Photo by Chris
|
-Photo by Chris
|
Seed-Free Vascular Plants
Fern Sporophytes
(Phlebodium sp. - Family: Polypodiaceae)
-Photo by Chris
|
-Photo by Chris
|
-Photo by Chris
|
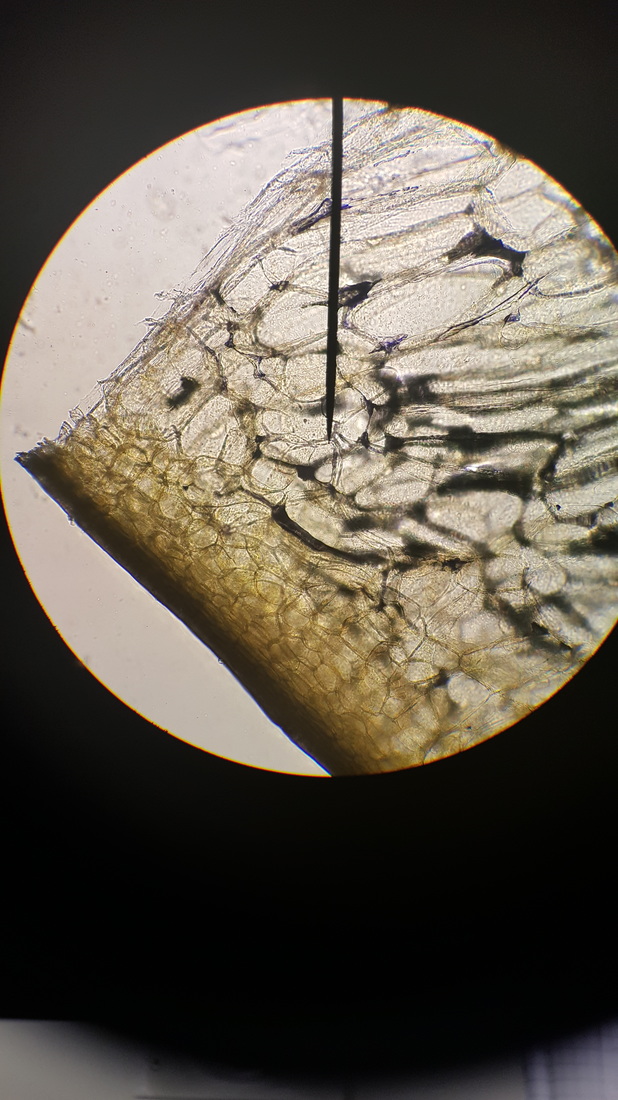
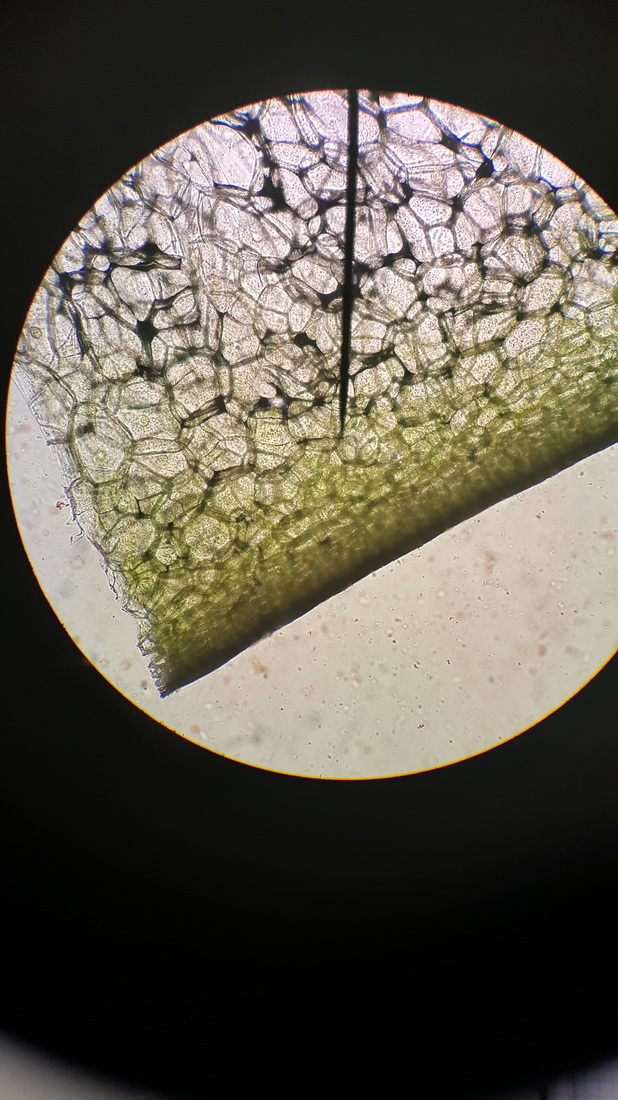
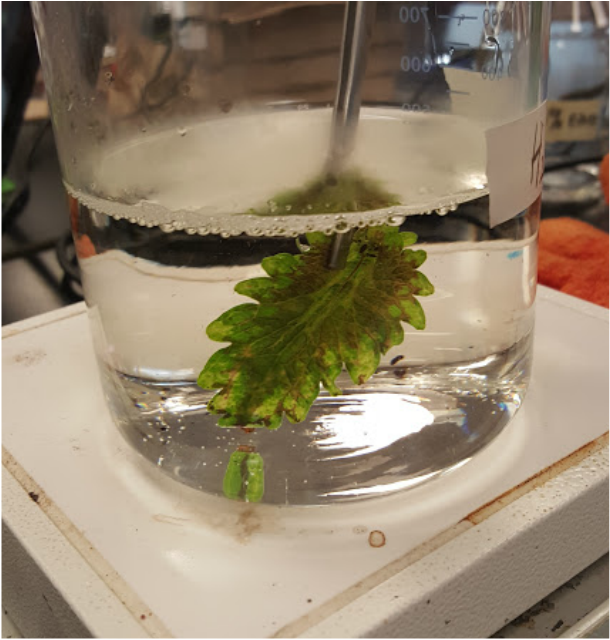
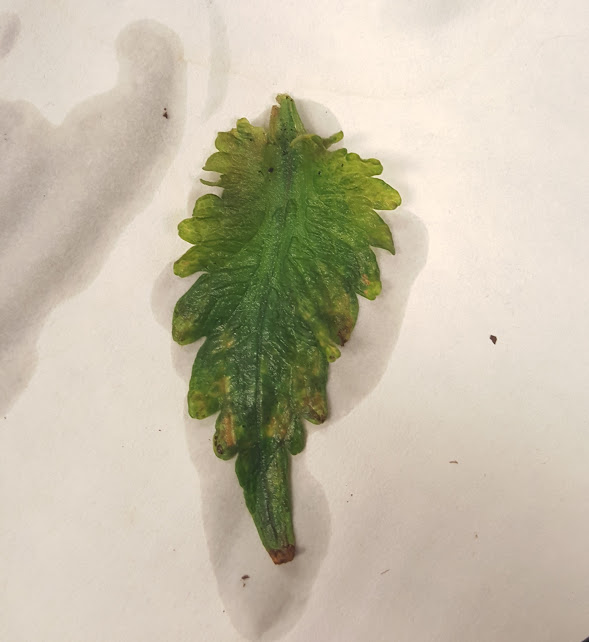
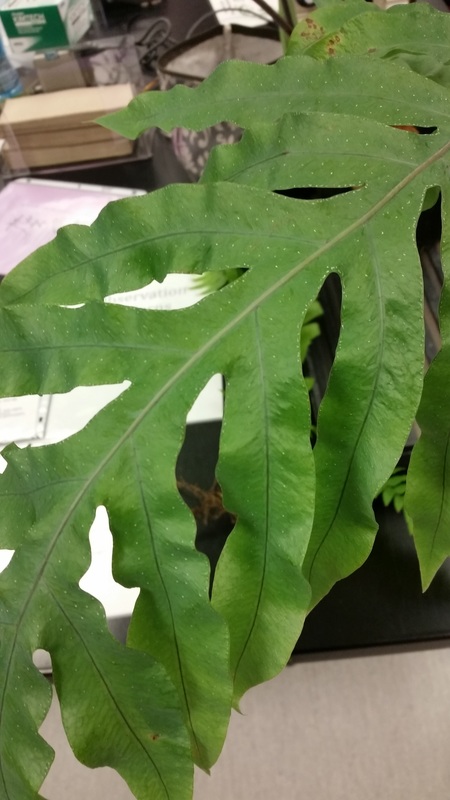
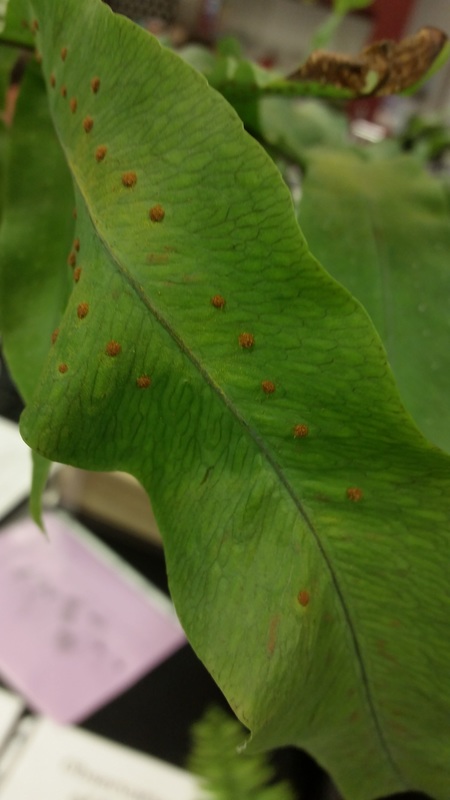
Holly Fern (Cyrtomium falcatum) Frond with Sori
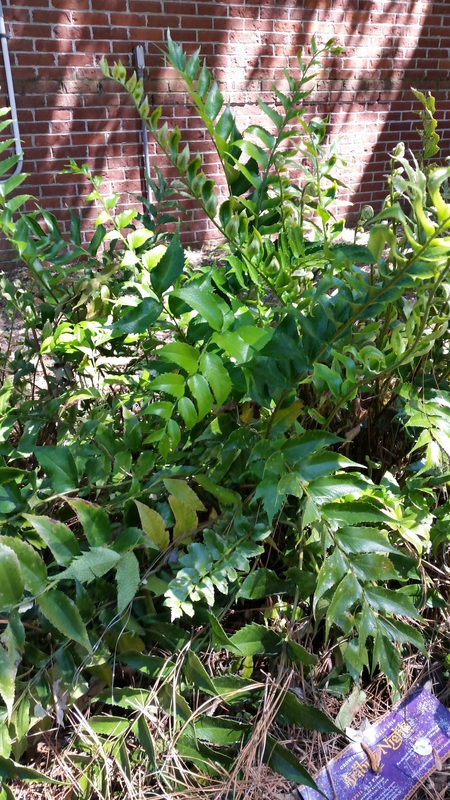
Holly Fern (Cyrtomium falcatum) in front of Jenkins Hall on Armstrong's campus. -Photo and Caption by Chris
|
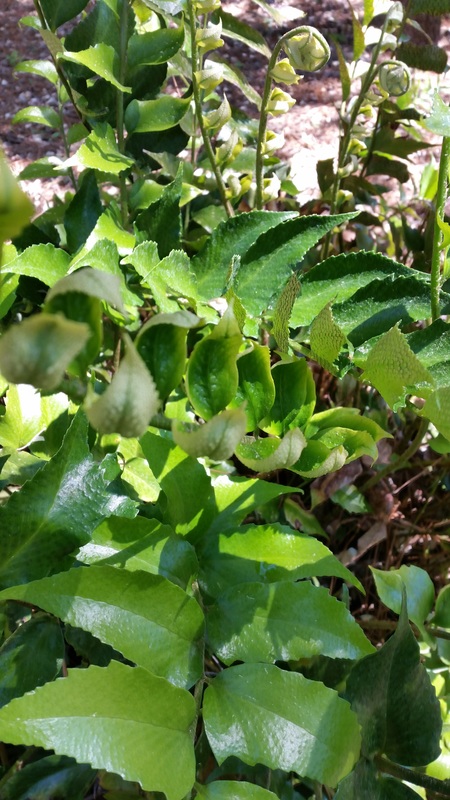
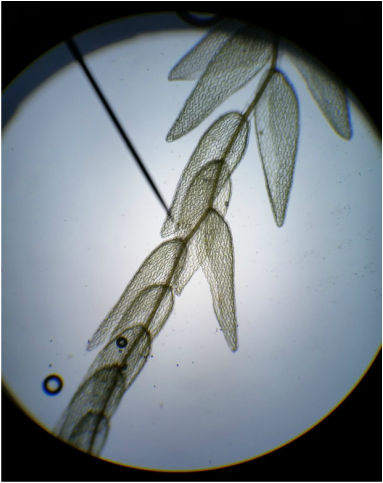
A closer look at the fronds of the same Holly Fern (Cyrtomium falcatum) in front of Jenkins Hall on Armstrong's campus. -Photo and Caption by Chris
|
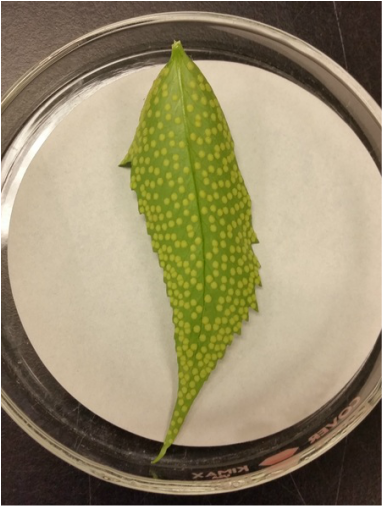
Abaxial surface of Holly Fern (Cyrtomium falcatum) frond with sori (clusters of sporangia) with no magnification. -Photo and Caption by Chris
|
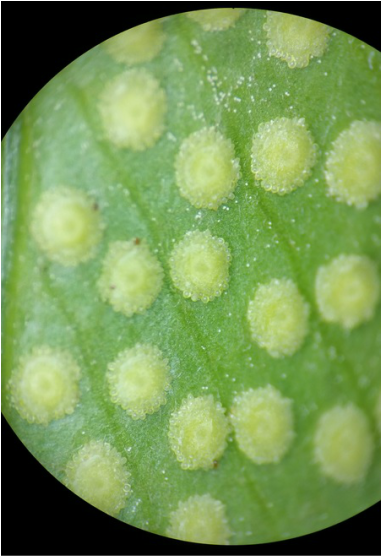
Abaxial surface of Holly Fern (Cyrtomium falcatum) frond with sori (clusters of sporangia) at 20X magnification under a dissecting scope. -Photo and Caption by Chris
|
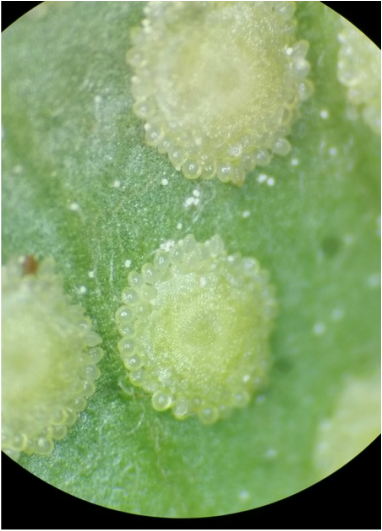
Abaxial surface of Holly Fern (Cyrtomium falcatum) frond with sori (clusters of sporangia) at 50X magnification under a dissecting scope. -Photo and Caption by Chris
|
Fern (Psilotum) Stem Cross-Section
Stained with Phloroglucinol-HCl
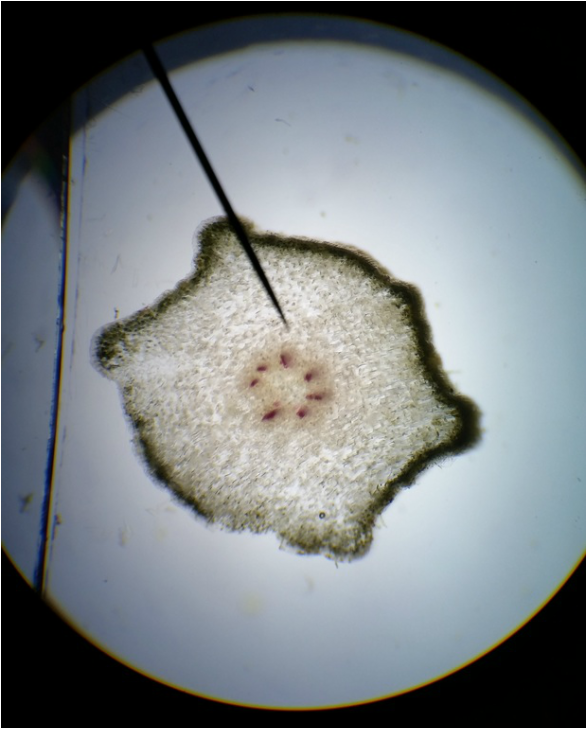
Fern (Psilotum) stem cross-section at 40X magnification that was stained with Phloroglucinol-HCl for lignin detection. -Photo and Caption by Chris
|
Fern (Psilotum) stem cross-section at 100X magnification that was stained with Phloroglucinol-HCl for lignin detection. -Photo and Caption by Chris
|
Other Fern Sporophytes (Phylum: Monilophyta)

C-Fern (Phylum: Monilophyta) Observations
C-Fern Gametophytes in Culture Plates
C-Fern Sperm
The Seed Plants: Gymnosperms and Angiosperms
This week we studied and observed the seed plants, angiosperms and gymnosperms. The goals of this weeks lab were to recognize gymnosperms and angiosperms, understand their life cycle, and recognize the gametophyte and sporophyte generations. Other goals were to identify parts of flowers and understand their function, understand terms relating to ovary position, floral organs, and floral symmetry. The last goal was to prepare diagrams and record important features revealed during a floral dissection. -By Evan
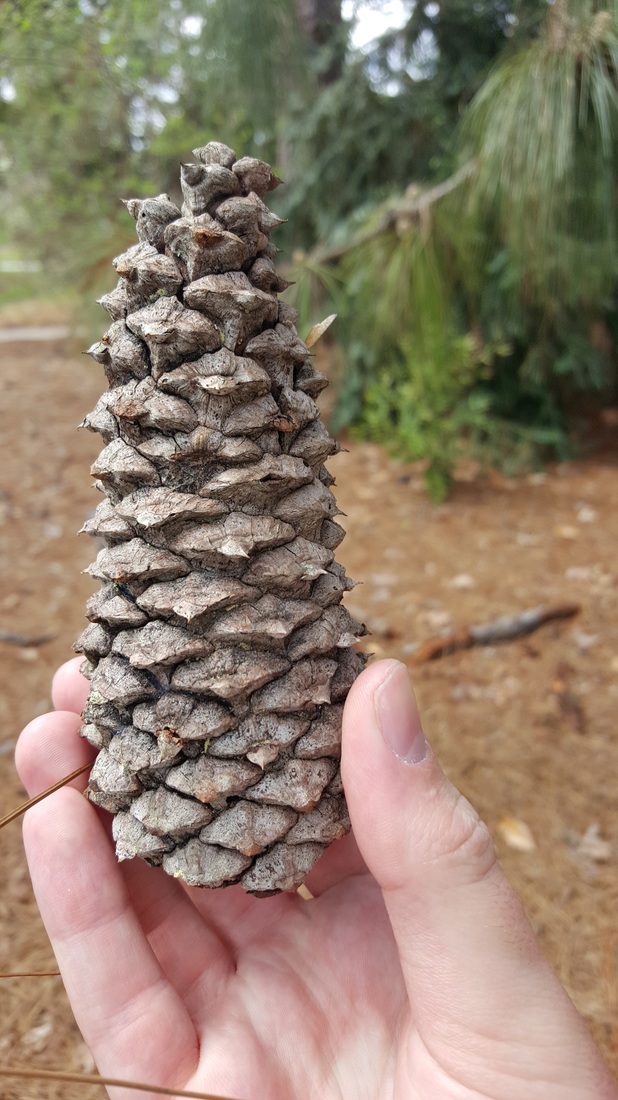
The Cones
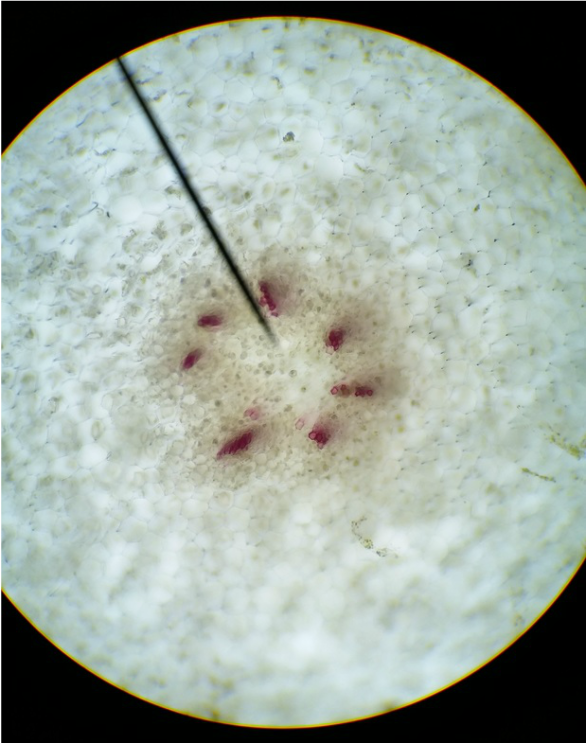
This is a female cone of a pine tree species. Although it is hard to see in this picture on each woody scale their are two indentions at the base of each scale where ovules are located. -Photo and Caption by Evan
|
This is a slide showing a longitudinal section of a mature Pine embryo viewed under a dissecting scope. This embryo would be found within the ovule that is found at the base of each woody scale. -Photo and Caption by Evan
|
Ginkophyta
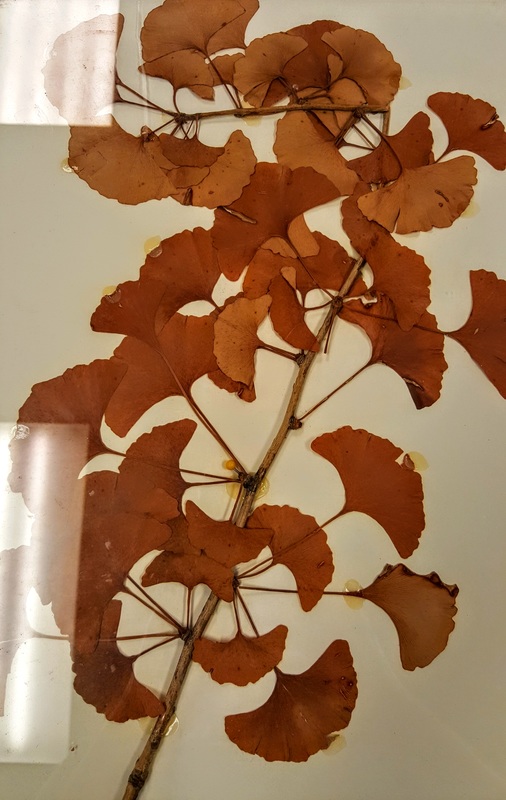
This is a branch from Ginkgo biloba tree a member of Ginkophyta. -Photo and Caption by Evan
|
The Ginkgo biloba is the last species of its family. One unique fact of this species is the fact it is deciduous and sheds its leaves in a matter of a few hours. -by Evan
|
Coniferaphyta
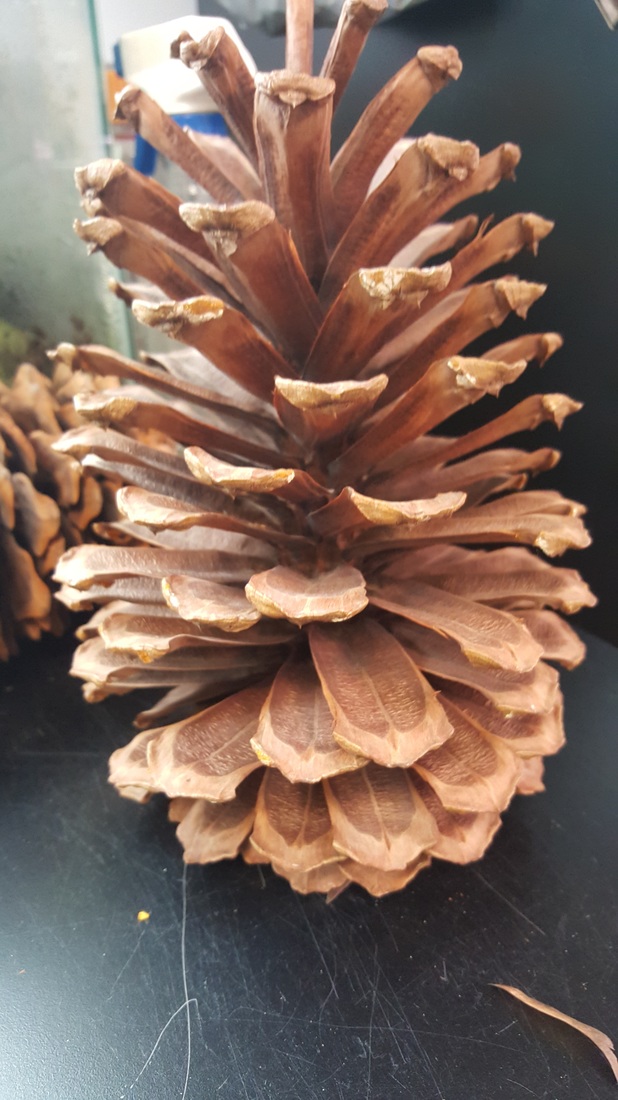
This is a female cone from a long needle pine tree, Pinus palustris. -Photo and caption by Evan
|
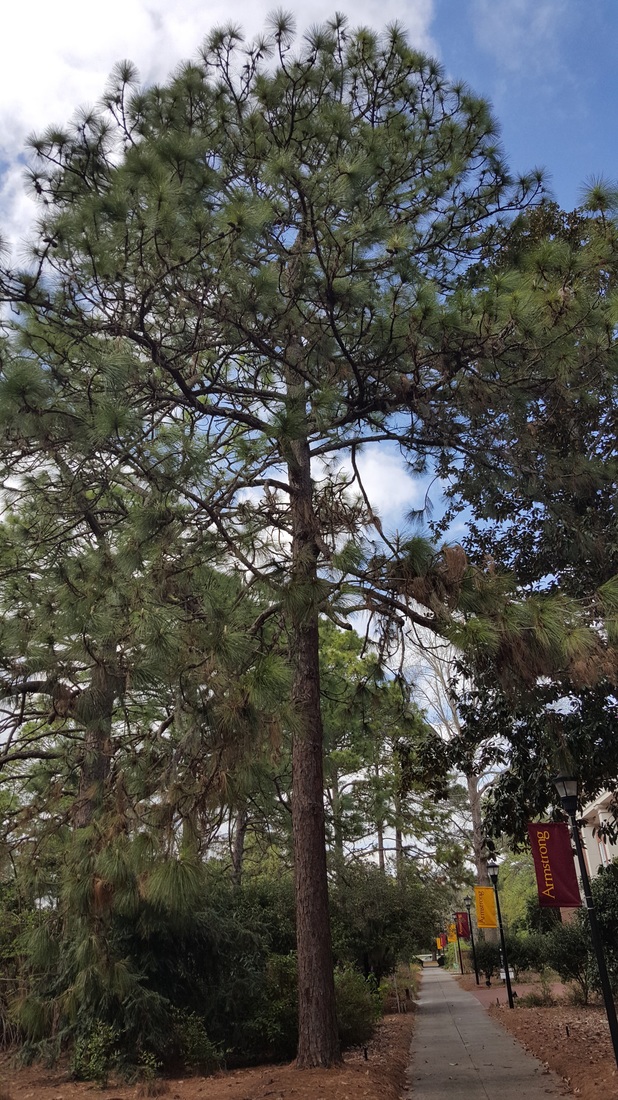
This is a long needle pine tree, Pinus palustris. -Photo and caption by Evan
|
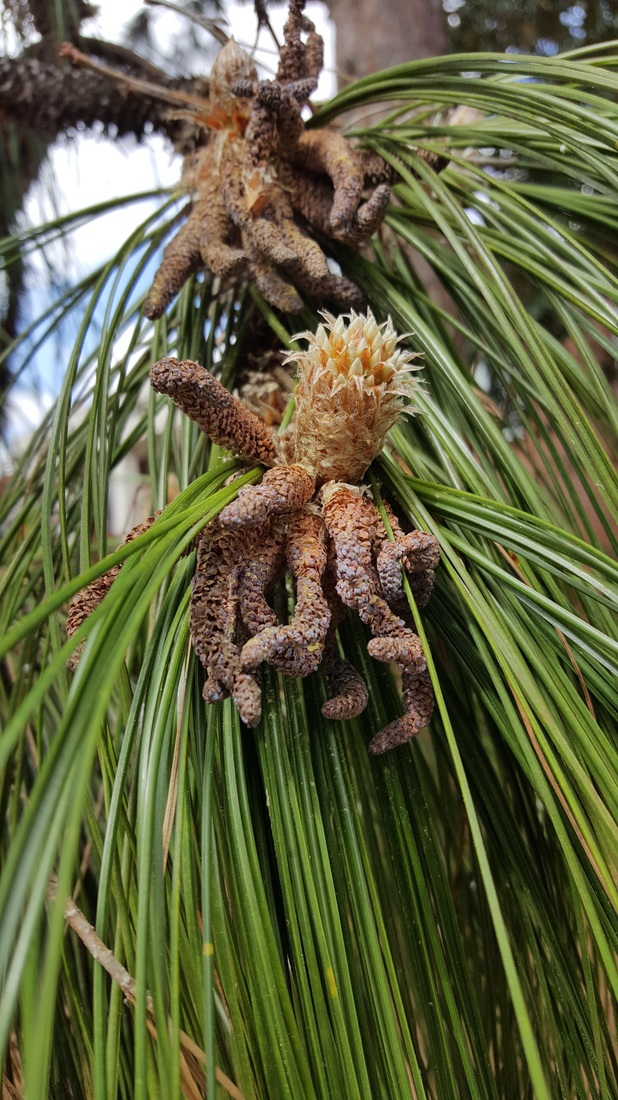
These are the male cones of a long needle pine tree, Pinus palustris. -Photo and caption by Evan
|
The long needle pine showed an excellent example of how a plant adapted to decrease its chance for self-fertilization. This tree develops its female cones toward the top of the tree, while the male cones develop toward the bottom this prevents pollen falling from above onto female cones below. -By Evan
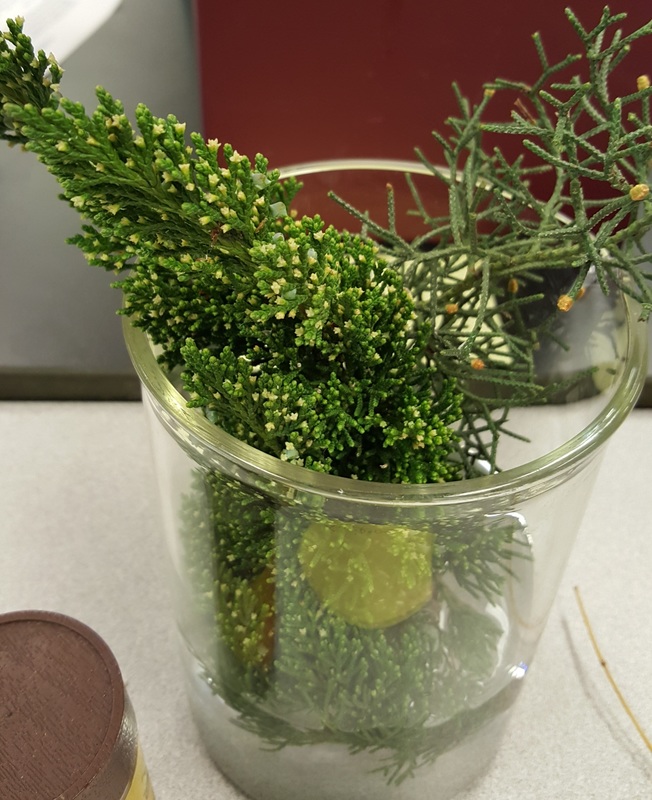
This is a sample taken from a Juniperus species. Walking on campus we got to see a juniperus species that was dioecious, meaning that the tree was either male or female not both. Interestingly though Junipers can also be monoecious, meaning the organism is hermaphroditic. -Photo and caption by Evan
Flower Dissections
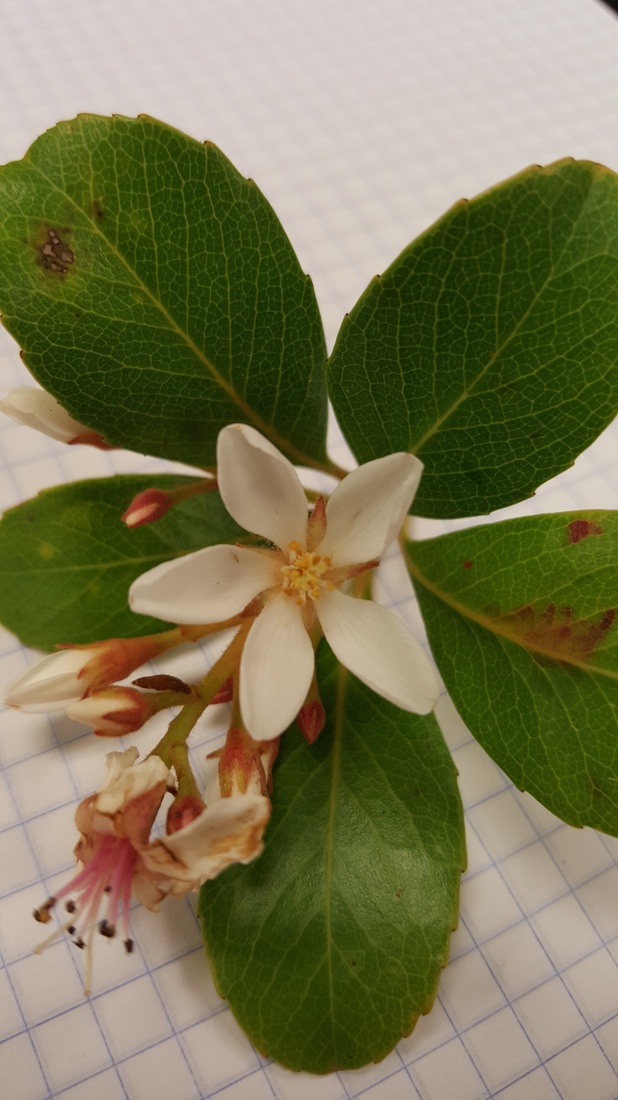
This flower is from the species Raphiolepis indica. This is the complete flower before dissection. -Photo and caption by Evan
|
This picture shows the flower, from Raphiolepis indica, after the first step of flower dissection where we remove both the sepals and petals. -Photo and caption by Evan
|
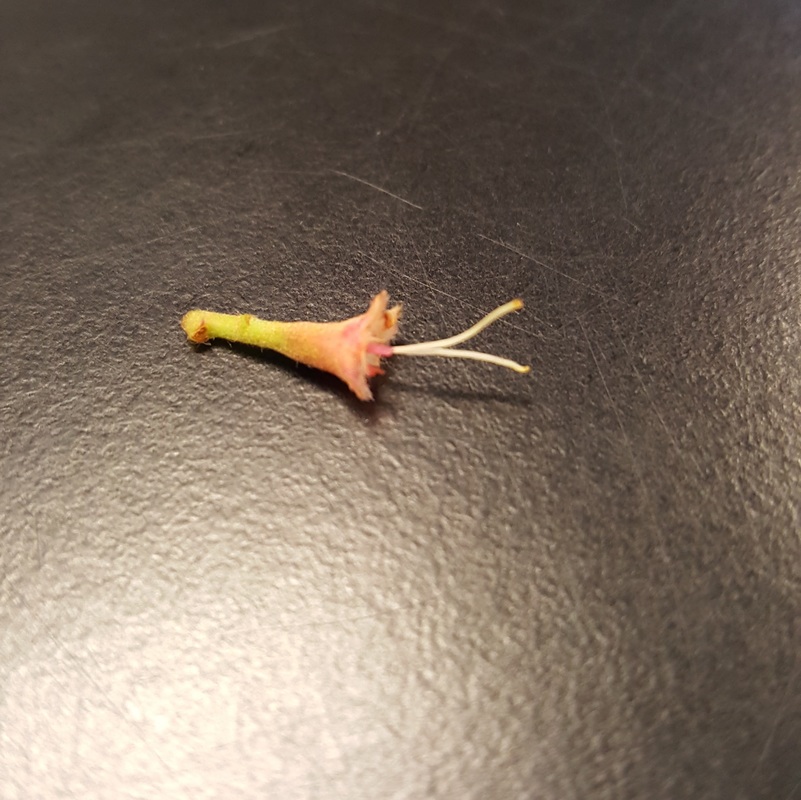
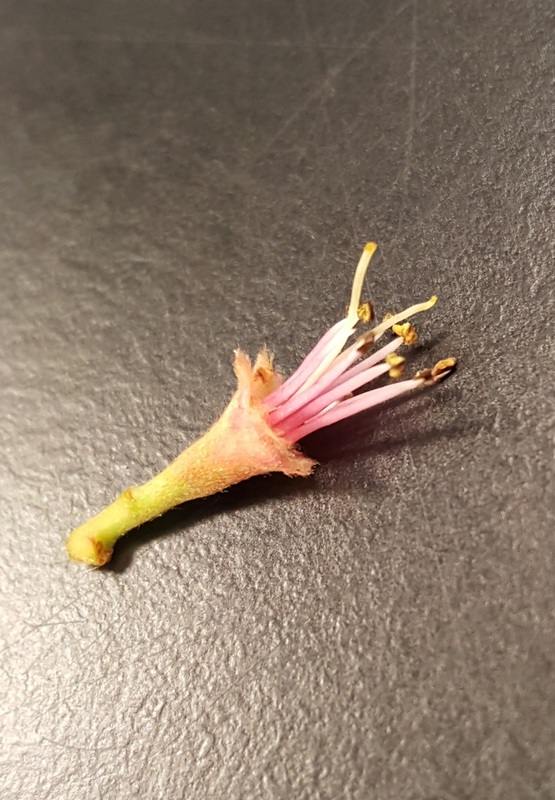
This is right before the last step of flower dissection, from the species Raphiolepis indica. This picture shows the flower after the sepals, petals, and stamens have been removed leaving only the carpels. -Photo and caption by Evan
|
The flower dissection was my favorite part of this lab. It was interesting to see the many ways to describe a flower since before this I did not ever really think about flowers in those terms. -by Evan
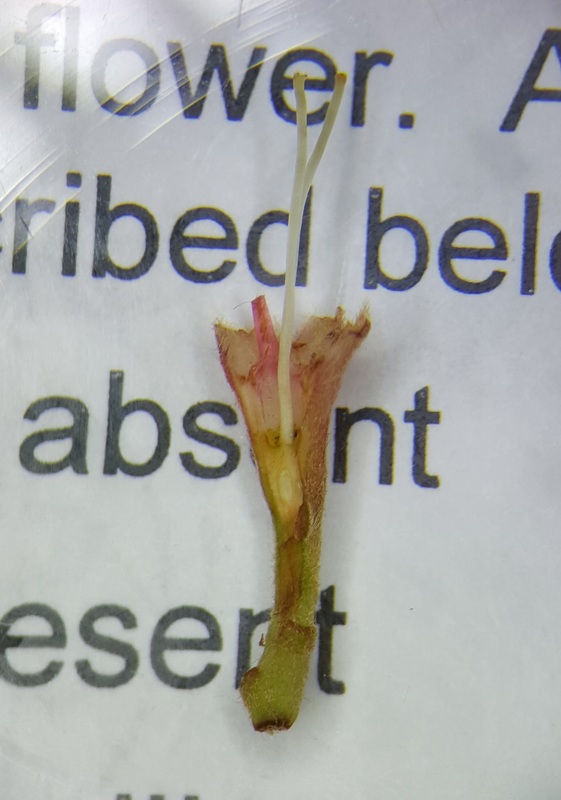
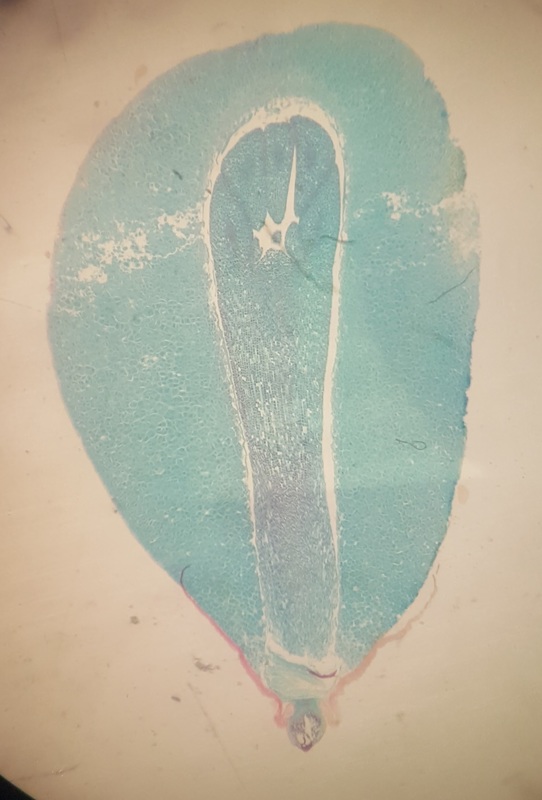
This picture is of a longitudinal section through the ovary from the flower of Raphiolepis indica. At the end of the carpel you can see a fatter section where the ovaries are located in this flower. - Photo and Caption by Evan
Roots and C-fern observations
C-fern observation
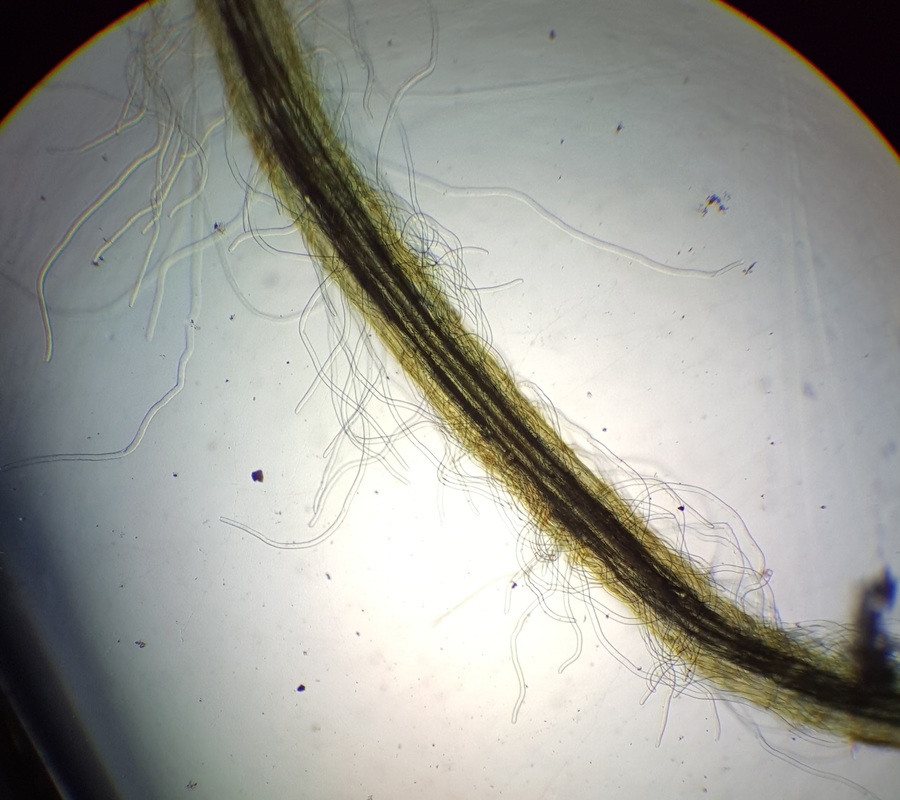
This image was taken under a compound microscope at 100x. The strings coming out of the root are root hairs which are used to increase surface area and gain more nutrients and water. Root hairs only grow in the area of maturation. - Photo and Caption by Evan
|
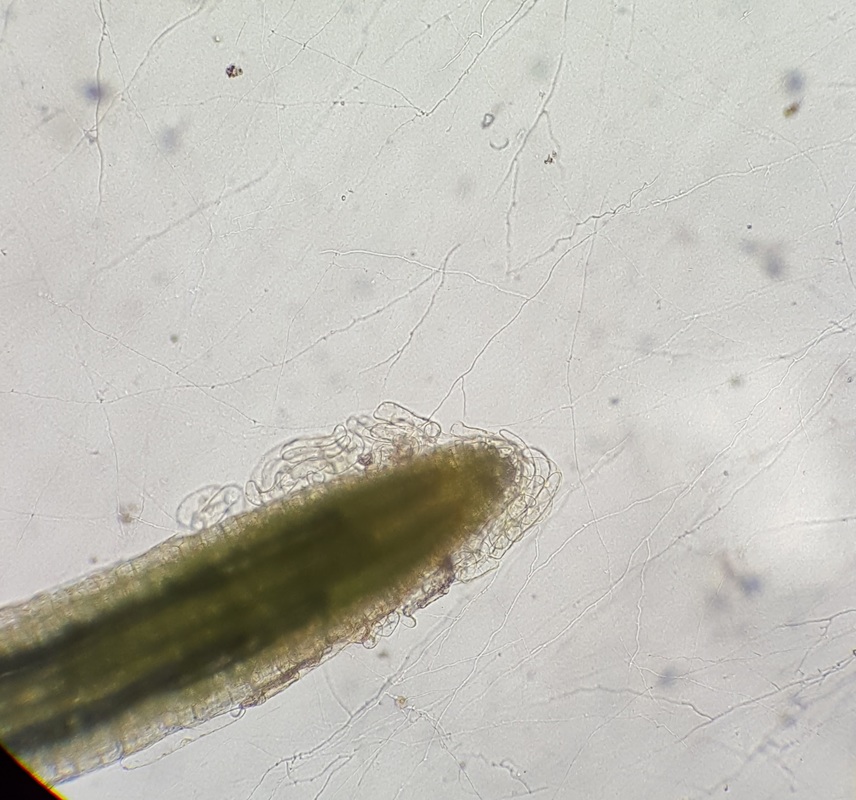
This image is of a root cap and viewed under a compound microscope at 100x. The root cap is the area of growth for roots. It is also responsible for gravity perception. - Photo and Caption by Evan
|
Onion, Allium cepa, root tip squash
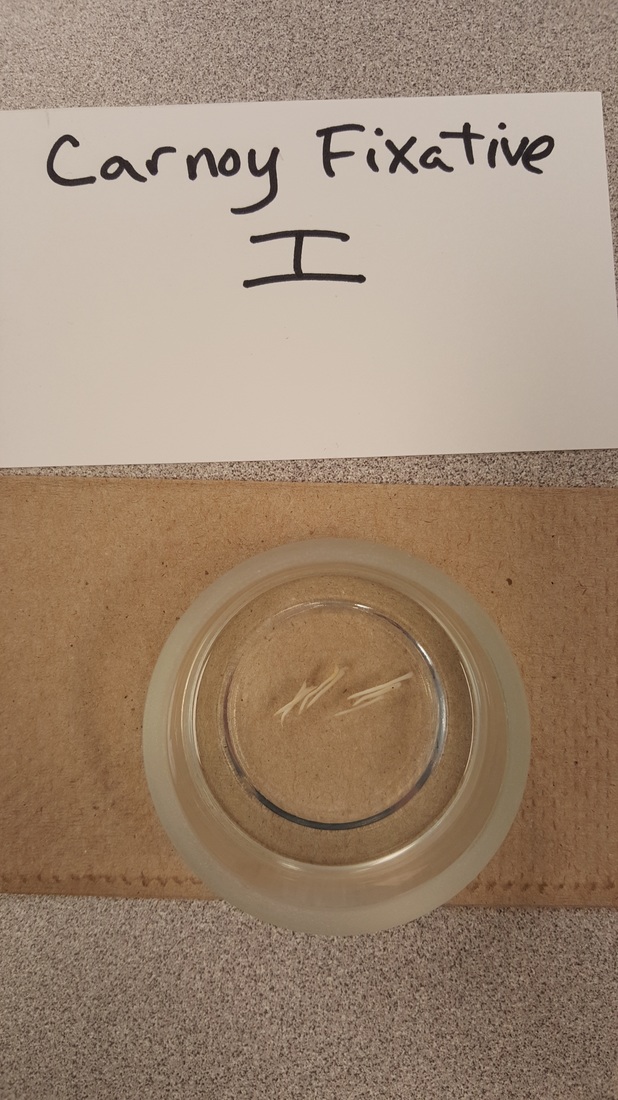
This was the first solution that the onion, Allium cepa, root was kept in. -Photo and Caption by Evan
|
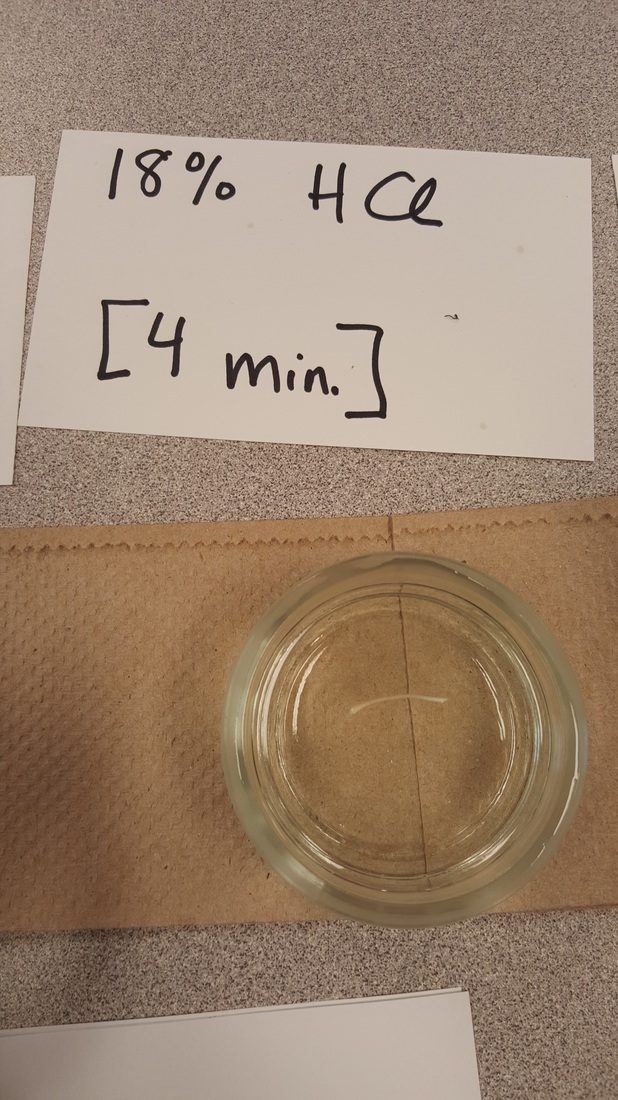
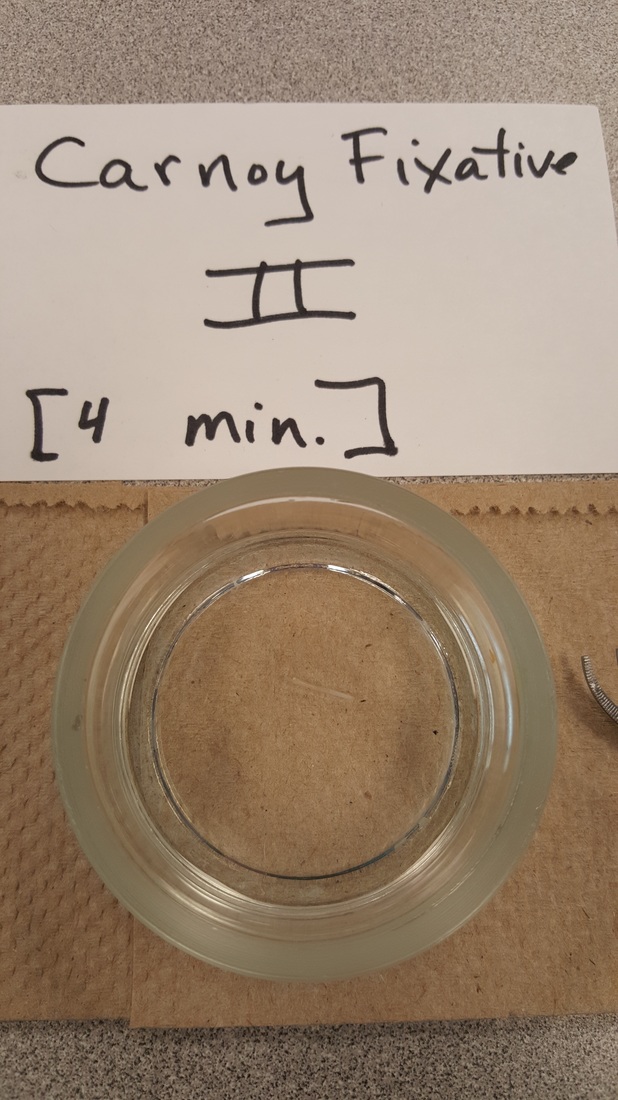
This solution was the second that the onion, Allium cepa, was placed in for four minutes. -Photo and Caption by Evan
|
This solution was the last that the onion, Allium cepa, root tip was placed in. -Photo and Caption by Evan
|

This is a slide made from squashing the root tip of an onion, Allium cepa, root. The tip of the root was cut off and placed on the slide since it is the area of cell division showing different stages of mitosis. The stain Toluidine blue was used on the mitotic squash. -Photo and Caption by Evan
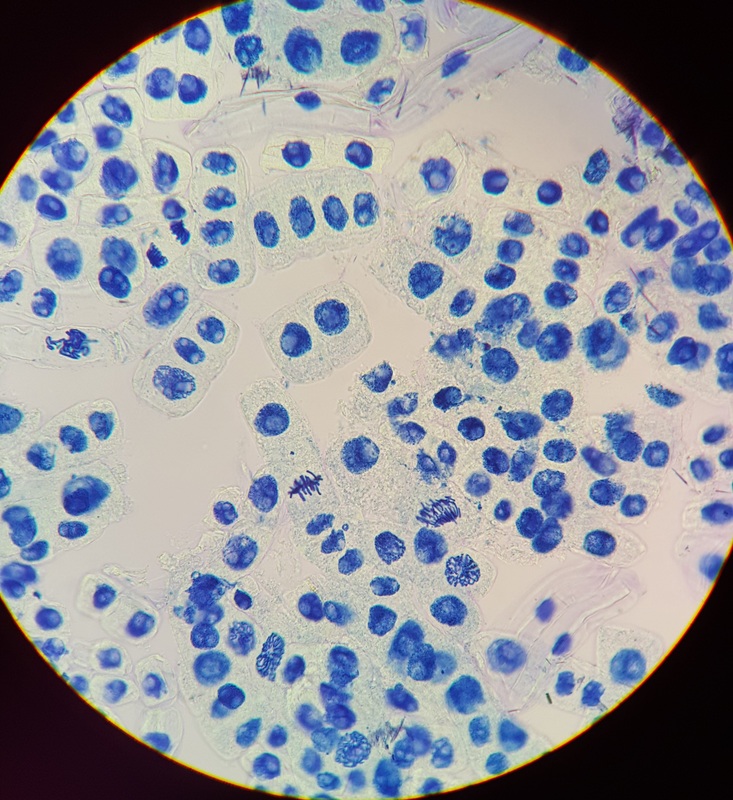
This image is of a mitotic squash of an onion, Allium cepa, root tip. The slide was viewed under a compound scope under 40x magnification. -Photo and Caption by Evan
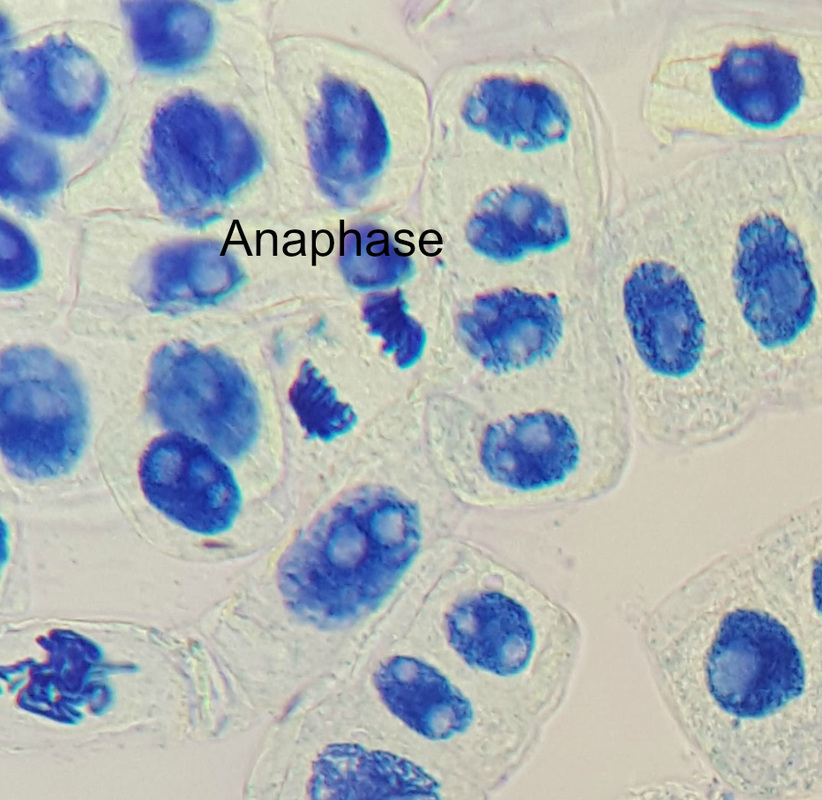
This is a close up of the photo above. It shows one of the onion root tip cells undergoing mitosis in Anaphase. -Photo and Caption by Evan
|
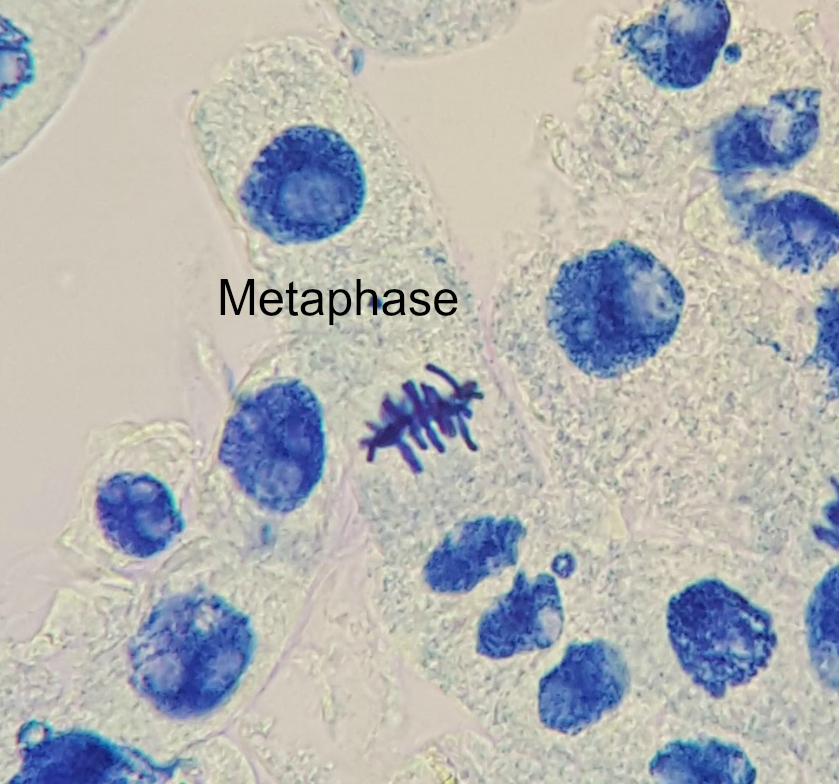
This is a close up of the picture above. It shows one of the onion tip cell undergoing mitosis in metaphase. -Photo and Caption by Evan
|
Growing a Plant from a Cutting
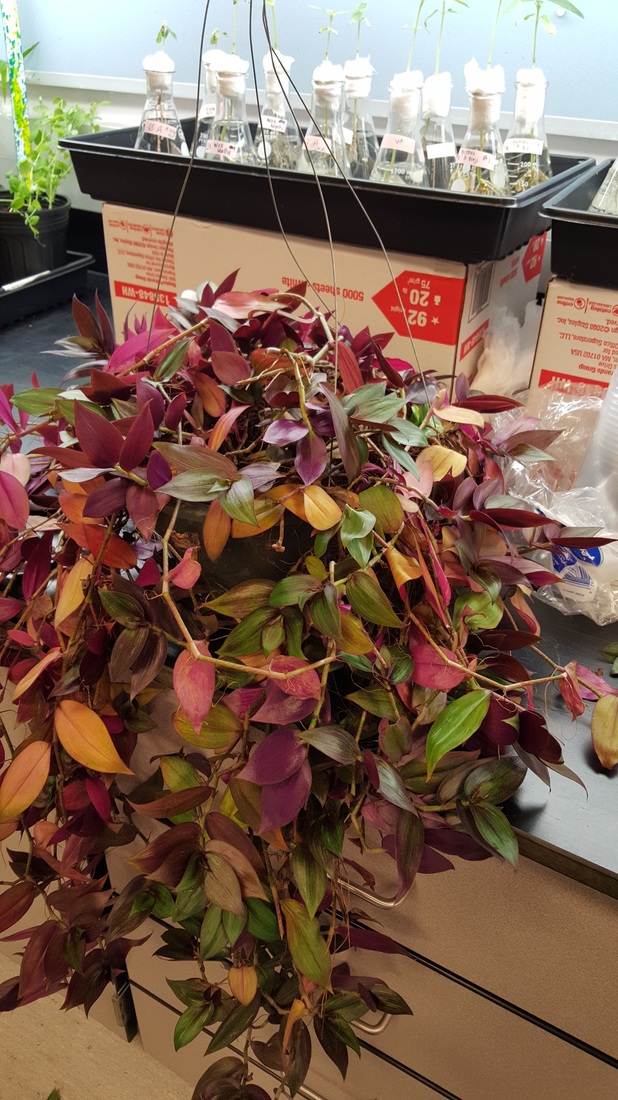
This is an inch plant that a cutting was taken from. -Photo and Caption by Evan
|
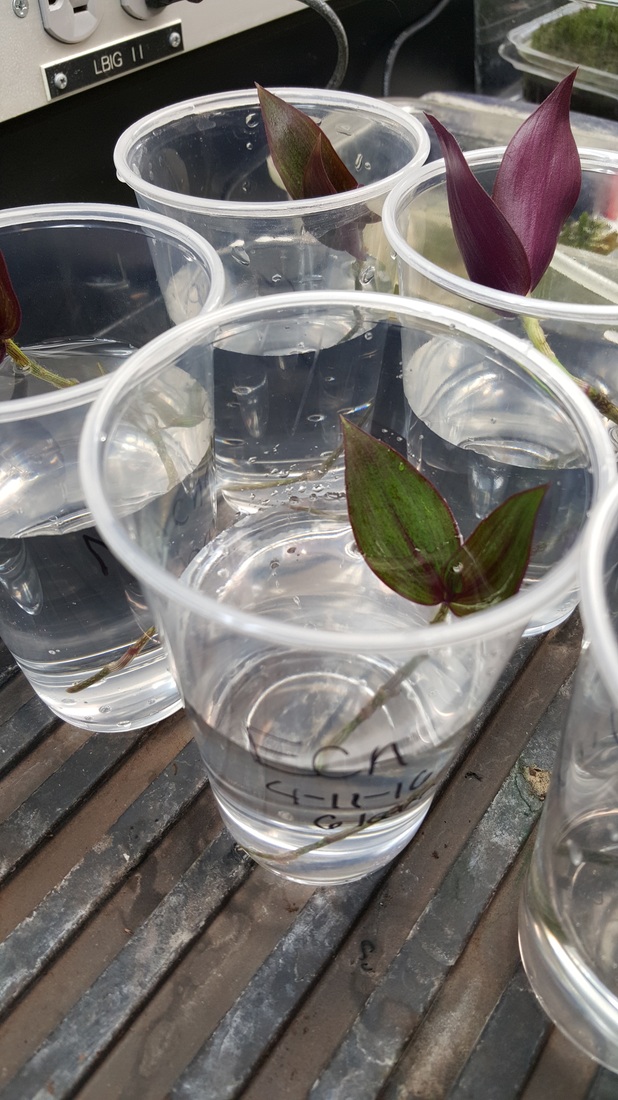
Tap water was placed in a cup with the cutting of an inch plant. Leafs were removed from the lower stem and after one week roots should begin to emerge. -Photo and Caption by Evan
|
