Botanical Explorations with (and without) Dissecting Scopes
Sarcococca saligna
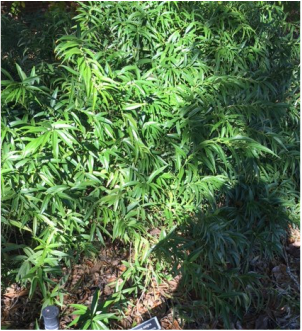
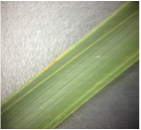
On Armstrong's campus, outside of the Science Center, we found a Sarcoccocca saligna. Green and smooth with fuzzy hair; no seeding growth. It also has a noticeable long vein in the center of the leaf with lighter short veins extending from the central vein. The leaf also has white spots on it.
-Lannie and Bryana
Sarcococca Saligna
|
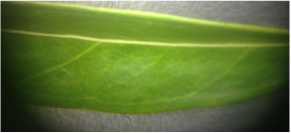
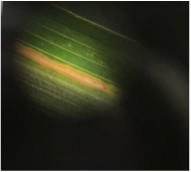
Sarcococca Saligna under the microscope with the lowest magnification (7.5x)
|
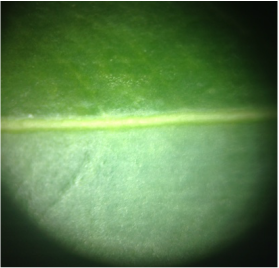
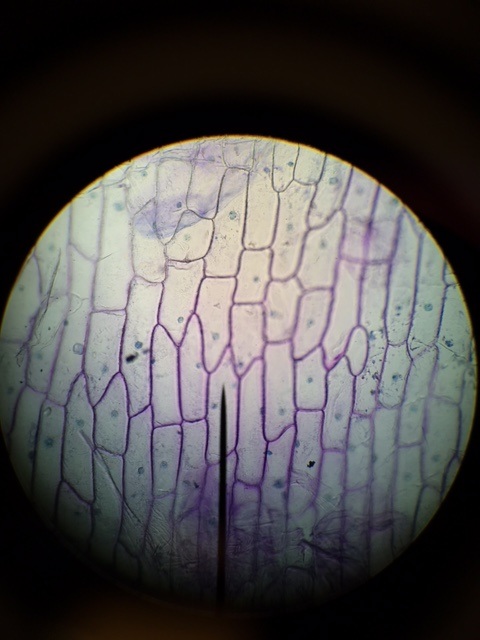
Sarcococca Saligna under the dissecting microscope under the highest magnification (50x)
|
Findings of the dwarf palmetto (Sabal minor)
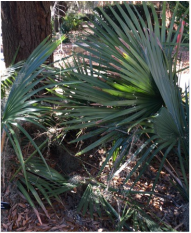
Outside the Science center on Armstrong's campus, we found a rigid long stem that if you look closely contains scale insects. Looking at it under the microscope, it almost resembles celery. This plant did not contain any seedling growth.
-Bryana and Lannie
Outside the Science center on Armstrong's campus, we found a rigid long stem that if you look closely contains scale insects. Looking at it under the microscope, it almost resembles celery. This plant did not contain any seedling growth.
-Bryana and Lannie
Sabal minor
Sabal minor in lowest magnification (7.5x)
|
Sabal minor in highest magnification (50x)
|
Plant Cells and Scientific DrawingsIn today's lab, we were able to accomplish preparing a wet mounted slide in order to view the epidermis, fruits and vegetables of certain plants under the telescope. We also recognized different slide preparation techniques and were able to distinguish and identify features of a living plant by using different biological stains. As an in class activity, we chose one of the plants and drew a full detailed picture. After today's lab, we have learned the different sectioning of parenchyma cells. We used the cross sectioning, longitudinal, and paradermal.
-Bryana & Duchess |
|
Parenchyma of Alium Cepa (onion), Toluidine Blue O, 400x magnification
While using the paradermal sectioning, a thin layer of the onion was placed on a slide with water and visualized under a compound microscope. The Toluidine Blue O stain allowed the cell walls to be seen more clear and you were also able to see some cytoplasmic streaming. Before the stain was added you could barely see the nucleus and the cell walls. The nucleus clings to the corner of the cell, because it is altered to that position since most of plant cells are vacuoles.
-Bryana Rounds 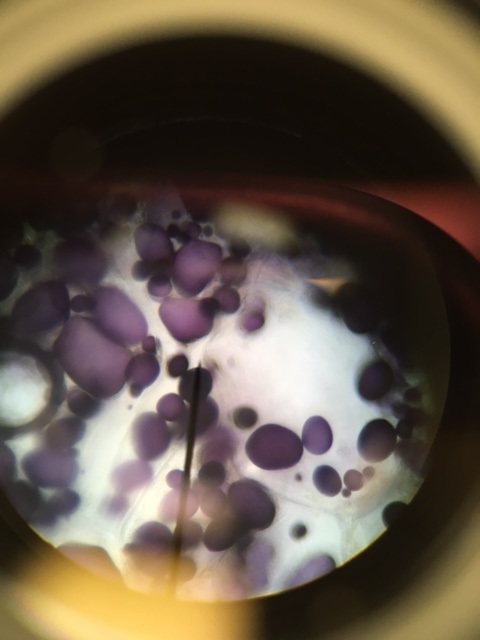
Parenchyma of Solanum tubersum tuber ,(potato), Iodine stain, 400x magnification; This was my favorite speciman, because the amyloplast are so unique and very pretty to look at. Its amazing how the dye allows things to become more clear.
While using cross sectioning, a slice of potato was placed on a slide and viewed under the microscope. When the starch indicator,iodine was added, you can see the dye take over immediately. Potatoes definitely have a lot of starch. With the stain, you could clearly see the amyloplast of the potato and the cell wall.
-Bryana Rounds 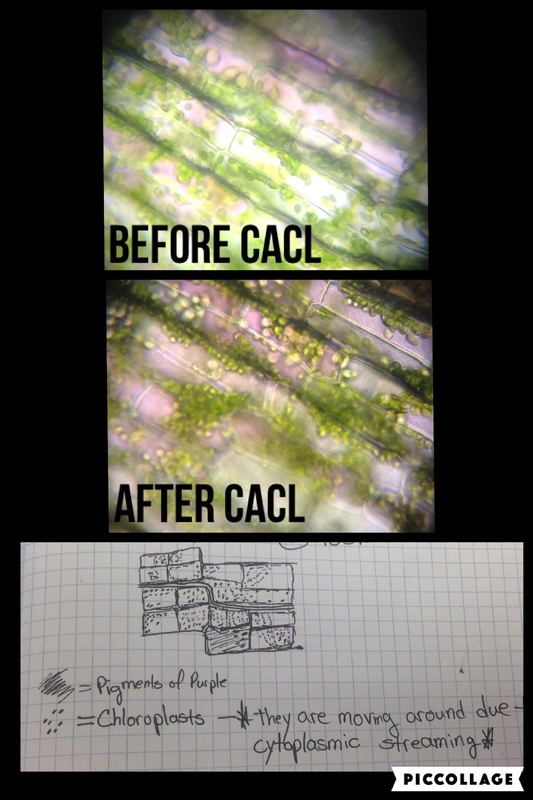
Elodea canadensis, unstained, 400x magnification,
An Elodea canadensis leaf was viewed under a compound microscope, The top picture (before CaCl was added) shows the cells on the leaf with pigments of purple and chloroplasts moving around mostly on edges of the cell due to cytoplasmic streaming. The middle picture ( after CaCl was added) shows a still image as the cell began to shrink and water was moved out of the cell due to osmosis seeming to group the chloroplasts together in the middle as the process continued. The bottom picture is a self representation of what the cells and its contents looked like before adding CaCl.
-Duchess Miller 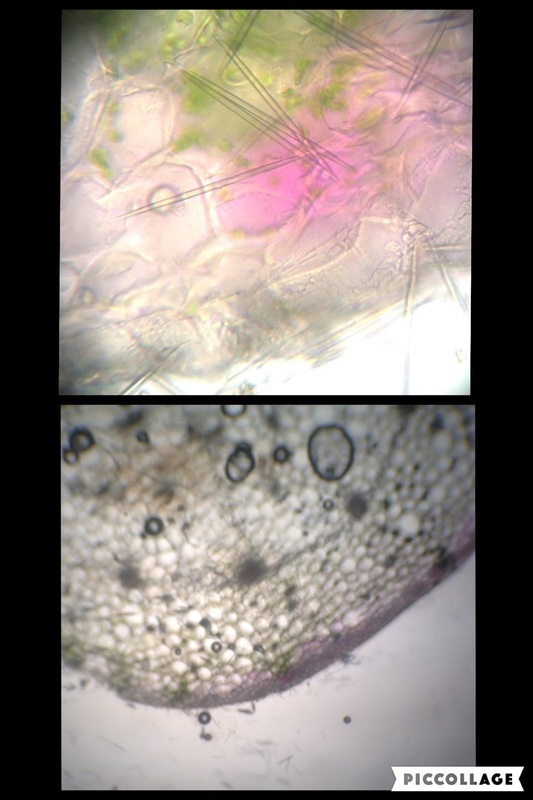
Tradescantia Stamen Hair Cells, cross sectioned, unstained, Top picture magnifies at 100x, Bottom picture magnified at 40x
Using a cross sectioning technique a thin slice of the stem was cut and placed on a slide under a compound microscope to view the above images. In the top picture right away the needle like structures are noticed, these structures are raphide crystals used by the plant as a defense mechanism. At this high magnification it is also easy to see the anthocyanin pigments (lavendar), and some chloroplasts. In the bottom picture a lower magnification was used to get a broader view of the cells in the stem. Here you can see the many cells contained just within this thin slice of the stem and the pigments mentioned from the above picture that are giving the plant it's lavender color around the outside of the stem.
-Duchess Miller Photosynthesis |
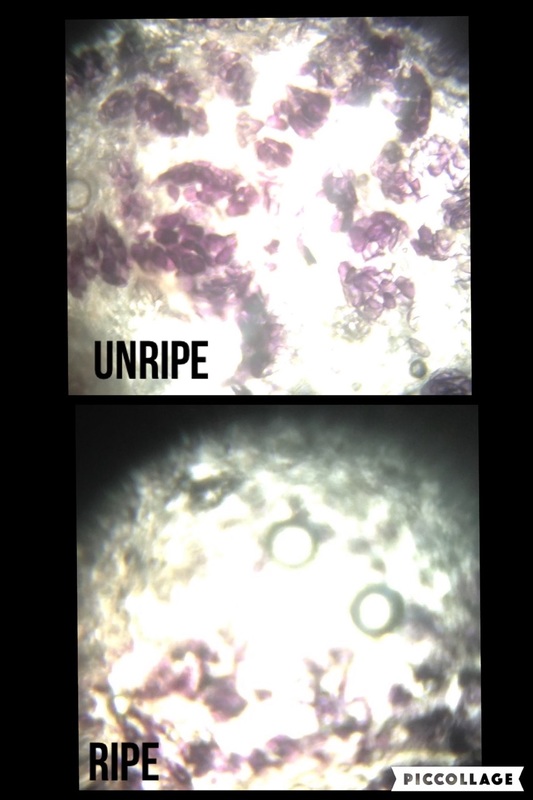
Parenchyma of Musa sp. (banana), Iodine stain, 400x magnification
Slide prepared and photographed by Duchess Miller
Using cross sectioning a slice from each banana was cut and placed under a compound microscope. The stain indicates the starch contained in each type of banana.
-Duchess Miller 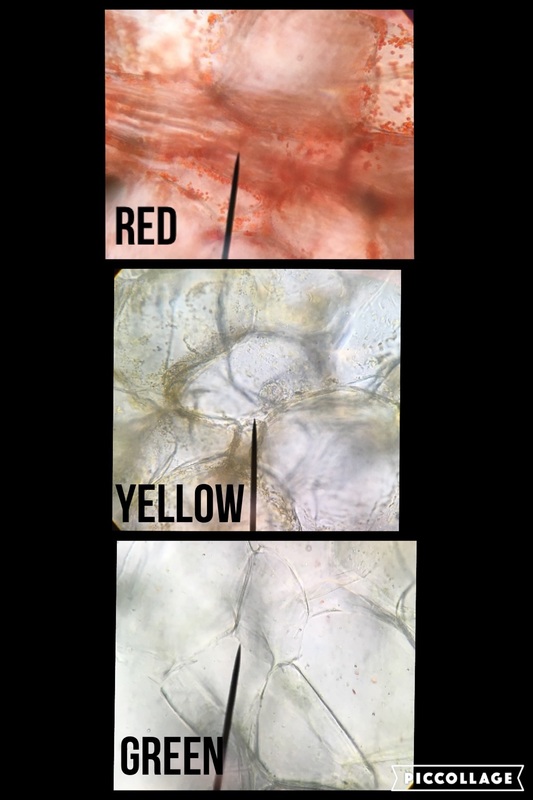
Parenchyma of Capsium Annuum(bell peppers), 400x magnification
Using longitudinal sectioning, a thin slice of each bell pepper was placed on a slide and visualized under a compound microscope. Under the microscope, you were able to view the cell walls. Also able to see the chromoplast of the red bell pepper and chloroplast of the green bell pepper.
-Bryana Rounds 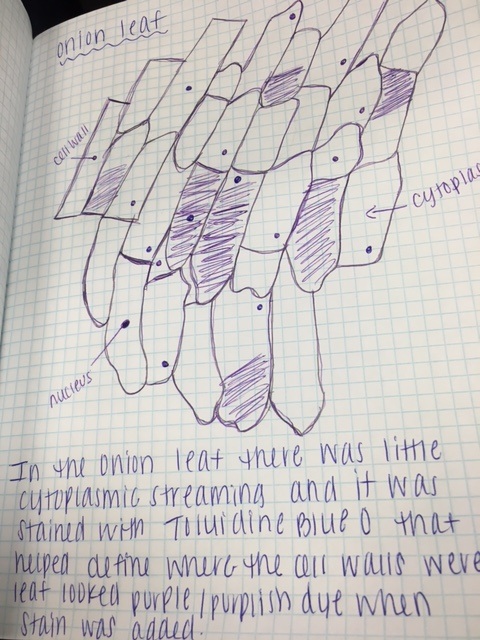
|
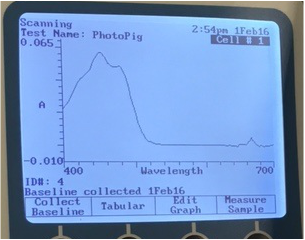
Today's lab consisted of using chromatography paper which separates and identifies the differences between pigments. The pigments that were used was chlorophyll a, chlorophyll b, carotene, and xanthophyll. We were able to use iodine again in order to see which parts of the plants contained more starch after removing majority of it's chlorophyll. Using a spectrometer, we were able to see the difference of each pigment and how much light can absorb by using the extraction from a Magnolia leaf. After today's lab, I have learned how to use chromatography paper and how to go about analyzing the differences of pigments.
-Bryana Rounds
-Bryana Rounds
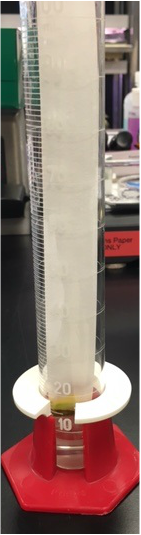
This picture is representing the setup of the chromatography paper which is separating four pigments using petroleum ether and methylene chloride as solvents.In this process a magnolia leaf was pressed onto the paper using a glass rod in order to produce a visual green line at the bottom of the paper.
-Bryana Rounds
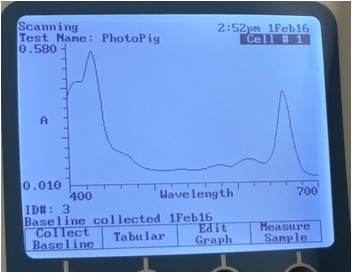
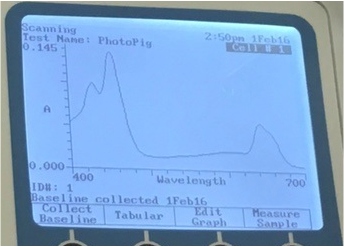
Absorption spectrum of chlorophyll a. -Bryana Rounds
|
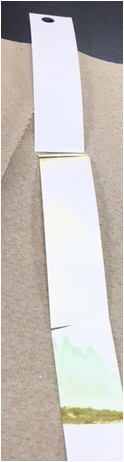
After the petroleum ether and methylene chloride helped separate the pigments on the chromatography paper. The top yellow band is the carotene pigment. the faint yellow area is the xanthophyll, the light green area that looks like mountains is the chlorophyll a, and the small green band at the bottom is the chlorophyll b. -Bryana Rounds
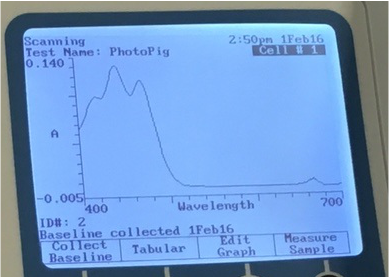
Absorption spectrum of chlorophyll b.
-Bryana Rounds
|
Absorption spectrum of xanthophyll. -Bryana Rounds
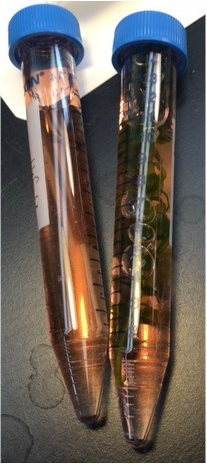
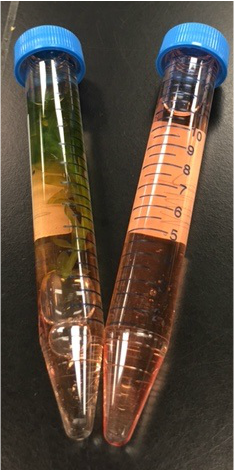
Tubes for CO2 consumption before placed in the light/dark. Solution in tube is acidic because carbonic acid was formed after blowing into a tube withe water and phenol red.
-Bryana Rounds
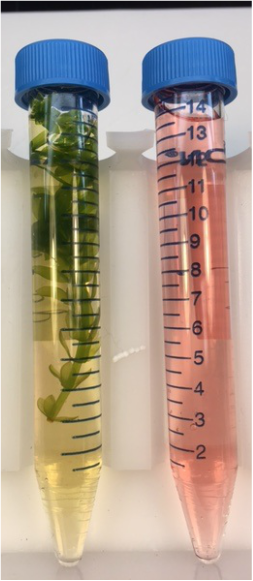
These tubes were placed under light for an hour and clearly there is a change. The tube with the Elodea leaf is now a hot pink color.
-Bryana Rounds
|
Absorption spectrum of carotene. -Bryana Rounds
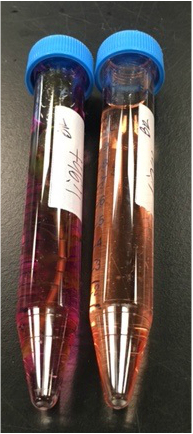
Tubes that were placed in the dark. You can see that there was not a huge change after one hour, but if you look closely one tube is lighter than the other. The reason there was no big change could be that there was not enough time..
-Bryana Rounds
Phenol red tubes that were placed in darkness for 48 hours and you can clearly see the tube with the Elodea leaf is lighter indicating CO2 was released by this plant.
-Bryana Rounds
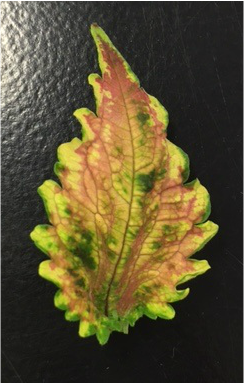
The Coleus leaf before added in boiling water, boiling ethanol, and before iodine was added. Also before chlorophyll was removed.
-Bryana Rounds

Coleus leaf after being in boiling water, boiling ethanol, and coated with iodine. In the areas where it was pink, it doesn't seem to be as much starch as in the areas that were green. This was my most favorite activity of the day, because it was so unique to see the colors disappeared so quickly. Also it was interesting to see which parts of the plant held more starch.
-Bryana Rounds
|
