LAB ONE:
Intro to Plant Matter: Dissecting Investigations on Campus
We, Athena and Kelsey, worked as a team to collect five samples of plant matter from the general area of the science centre entrance directly across from the athletics building entrance. We then used the standard ("antique") dissecting microscope to investigate each sample's composition more thoroughly. Each photograph is captioned with the common name and magnification details.
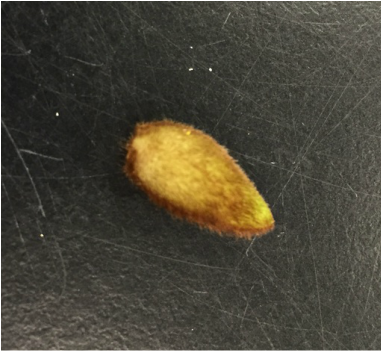
We were surprised to find that, under the dissection microscope, all of the samples, even the stems and scales, were either furry or fibrous in nature.
We then worked together to publish our photos for you to see. Enjoy!
We were surprised to find that, under the dissection microscope, all of the samples, even the stems and scales, were either furry or fibrous in nature.
We then worked together to publish our photos for you to see. Enjoy!
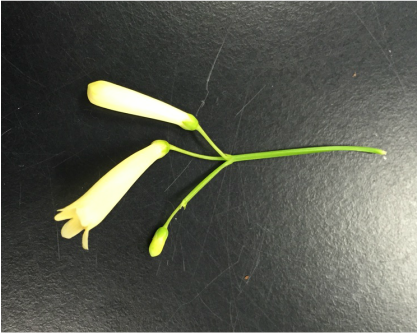
Silky Yellow Firecracker Plant Flower. No Magnification. Photo Credit: Kelsey Hymel
|

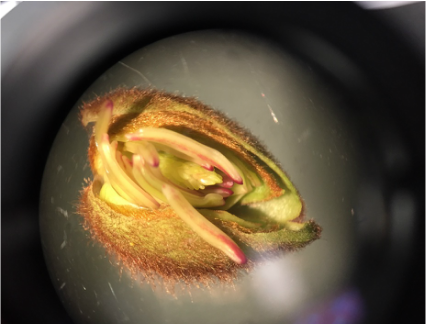
Velvet, Reproductive Yellow Firecracker Plant Flower under Standard Dissection Microscope. 30x Magnification [MAX]. Photo Credit: Athena Downes
|
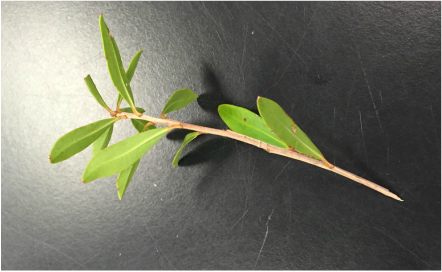
Smooth Arid Cyrillic Stem. No Magnification. Photo Credit: Athena Downes
|
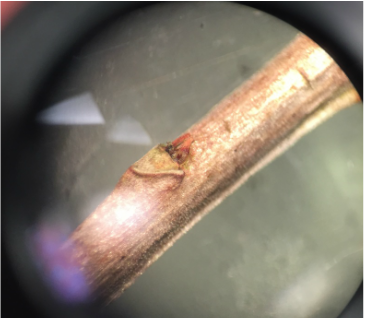
Woody Arid Cyrilla Stem under Standard Dissecting Microscope. 25x Magnification. Photo Credit: Kelsey Hymel
|
Unopened Magnolia Bud. No Magnification. Photo Credit: Kelsey Hymel
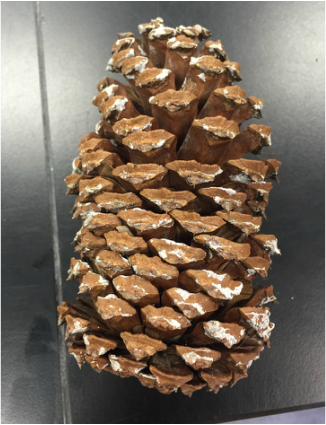
Complete Pinecone. No Magnification. Photo Credit: Athena Downes
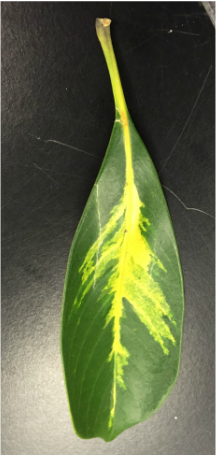
Shiny, Waxy Starburst Leaf. No Magnification. Photo Credit: Kelsey Hymel
|
Fuzzy, Reproductive Magnolia Bud under Standard Dissecting Microscope. 9x Magnification. Photo Credit: Athena Downes

Multi-layered Pinecone Ovulate Cone Scale under Standard Dissecting Microscope. 12X Magnification. Photo Credit: Kelsey Hymel
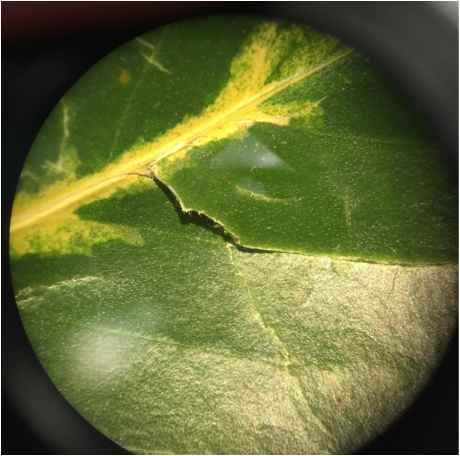
Fibrous Starburst Leaf under Standard Dissecting Microscope. 7x Magnification [MIN]. Photo Credit: Athena Downes
|
LAB TWO:
Plant Cells and Scientific Drawings
This week we dove right in to examining parenchyma cells or the principle sites of photosynthesis, assimilation, and storage. We observed many tissue samples from angiosperms (Phylum Anthophyta).
We cut sections from our samples of eight different plants and made slides using a variety of stains and techniques. Sectioning and dying our samples allowed us to highlight the structures inside the tissues. Thus, when we viewed the tissues under our compound microscopes, we were able to observe proplastids, cell walls, cytoplasmic streaming, and much more!
Have a look at what we saw by viewing our photos and scientific drawings, and prepare to be amazed!
"My favourite specimen of the day was seeing the difference between the ripe and un-ripe banana. Seeing the multitude of amyloplast plastids in the un-ripe smear highlighted purple by the Iodine dye versus the stark lack of starches in the ripened smear painted a very clear picture!" -Athena Downes
"My favorite specimen of the day was the Elodea canadensis due to the ease at which one can view the chloroplasts streaming along the edges of the cell wall and cytoplasmic bridges in the cytoplasm. It was also really neat to watch the plant cells begin to shrink after the 5% CaCl solution was added, followed by chloroplast accumulation towards the middle of each cell as the vacuoles loses water due to osmosis, opposite of the cytoplasmic streaming." -Kelsey Hymel
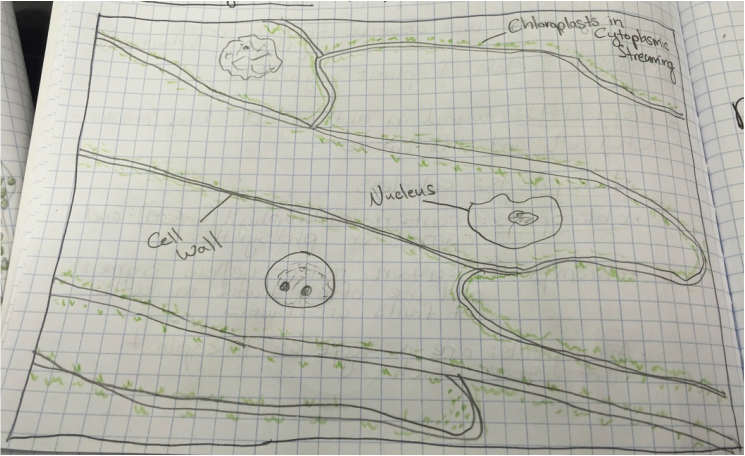
-Sketch by Athena Downes of Identifiable Structures [Cell Wall, Chloroplasts in Cytoplasmic Stream, and Nucleus] as Seen in Epidermis of Allium Cepa (Onion)
-Total Magnification: 400X , Compound Microscope
-Specimen stained with TBO, "Toluidine blue"
-Epidermal Peel Section
-Slide prepared by Athena Downes
-Image by Kelsey Hymel
***NOTE: The TBO stain turns pectic substances a pink-purple colour except for lignin containing walls which turn blue or blue-green. Also the vacuole of each cell takes up appx. 90% of the cell space which makes the nucleus appear to be pushed against the cell wall.***
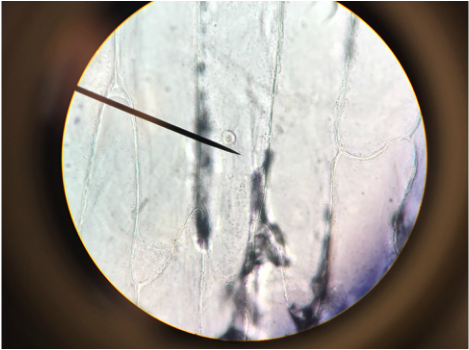
-Epidermis of Allium cepa (Onion)
-Total Magnification: 400X , Compound Microscope
-Specimen stained with TBO, "Toluidine blue"
-Epidermal Peel Section
-Slide prepared by Athena Downes
-Image by Kelsey Hymel
|
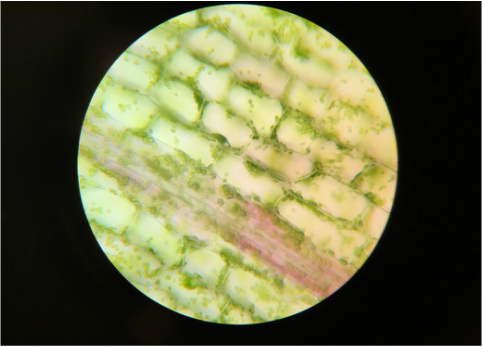
-Canadian Pondweed Elodea canadensis Cells
-Total Magnification: 400X, Compound Microscope
-Specimen not stained
-Wholemount Section
-Slide prepared by Kelsey Hymel
-Image by Kelsey Hymel
|

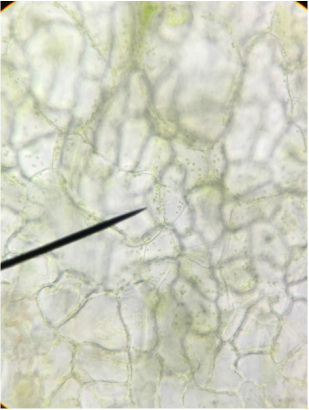
-Canadian Pondweed Elodea canadensis Cells in 5% CaCl Solution- Image citation: Slide Prepared and Photographed by Brendin Page- ***NOTE: In our procedure we added 5% CaCl salt solution to our Elodea canadensis sample. This caused the cytoplasmic streaming to slow greatly and the cells to move to the middle and skrink. Water cells were moving via osmosis out of the cells. Unfortunately, we got so enthralled in our scope, that we forgot to photo this step! So here is a photo taken by classmate Brendin Page (and posted here with his kind permission) so that you can see what we saw as well!***

-Sketch by Kelsey Hymel of Identifiable Structures [Cell Wall, Cytoplasmic Bridges, Chloroplasts in Cytoplasm, and Inferred Vacuole Space] as Seen in Canadian Pondweed Elodea canadensis Cells
-Total Magnification: 400X , Compound Microscope
-Specimen not stained
-Wholemount Section
-Slide prepared by Kelsey Hymel
-Image by Kelsey Hymel
-Chloroplast Plastids in Cell of Green Bell Pepper Fruit Capsicum annuum
-Total Magnification: 400X, Compound Microscope - Specimen Not Stained - Sectioned Sample -Slide Prepared by Athena Downes -Image by Kelsey Hymel
|
-Chromoplast Plastids in Cell of Yellow Bell Pepper Fruit Capsicum annuum
-Total Magnification: 400X, Compound Microscope - Specimen Not Stained - Sectioned Sample -Slide Prepared by Athena Downes -Image by Kelsey Hymel
|
-Chromoplast Plastids in Cell of Red Bell Pepper Fruit Capsicum annuum
-Total Magnification: 400X, Compound Microscope - Specimen Not Stained - Sectioned Sample -Slide Prepared by Athena Downes -Image by Kelsey Hymel
|
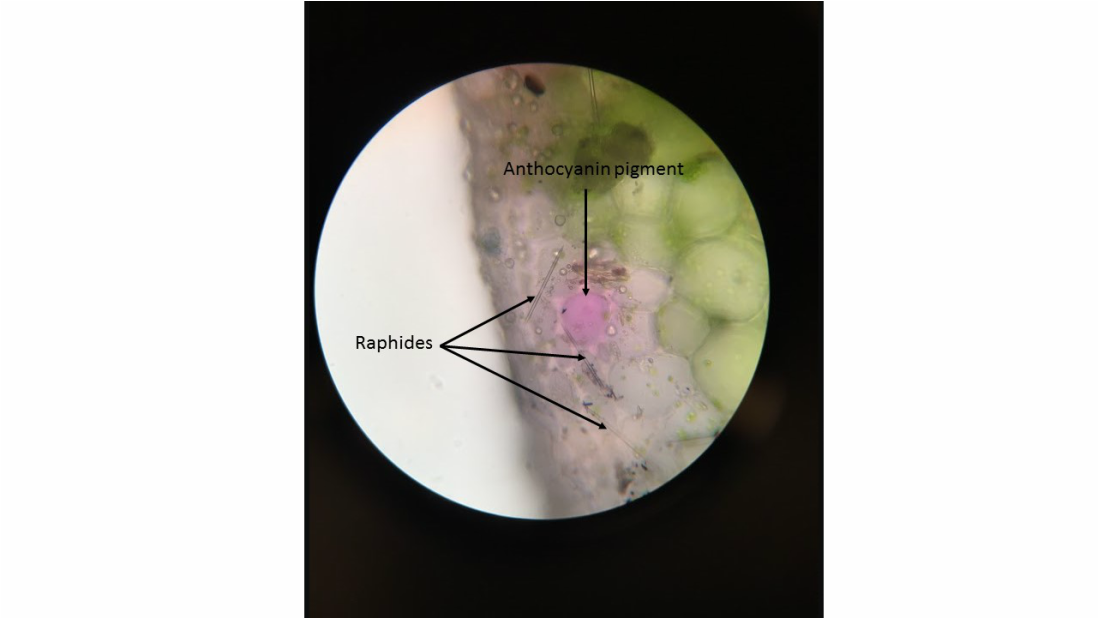
-Observation of Spiderwort Tradescantia Stem -Identifiable Structures of Raphides and Anthocyanin Pigments in Vacuoles of Epidermal Cells -Total Magnification: 400X, Compound Microscope -Specimen Not Stained -Cross Section -Slide Prepared by Kelsey Hymel -Image by Kelsey Hymel
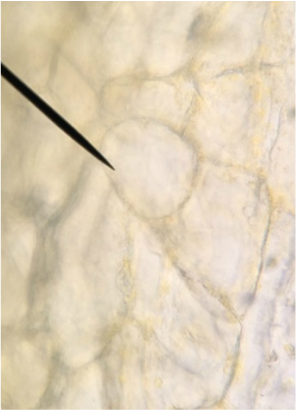
-Parenchyma of Solanum tuberosum (Potato)
-Total Magnification: 400X, Compound Microscope - Specimen Not Stained - Sectioned Sample -Slide Prepared by Athena Downes -Image by Kelsey Hymel
|
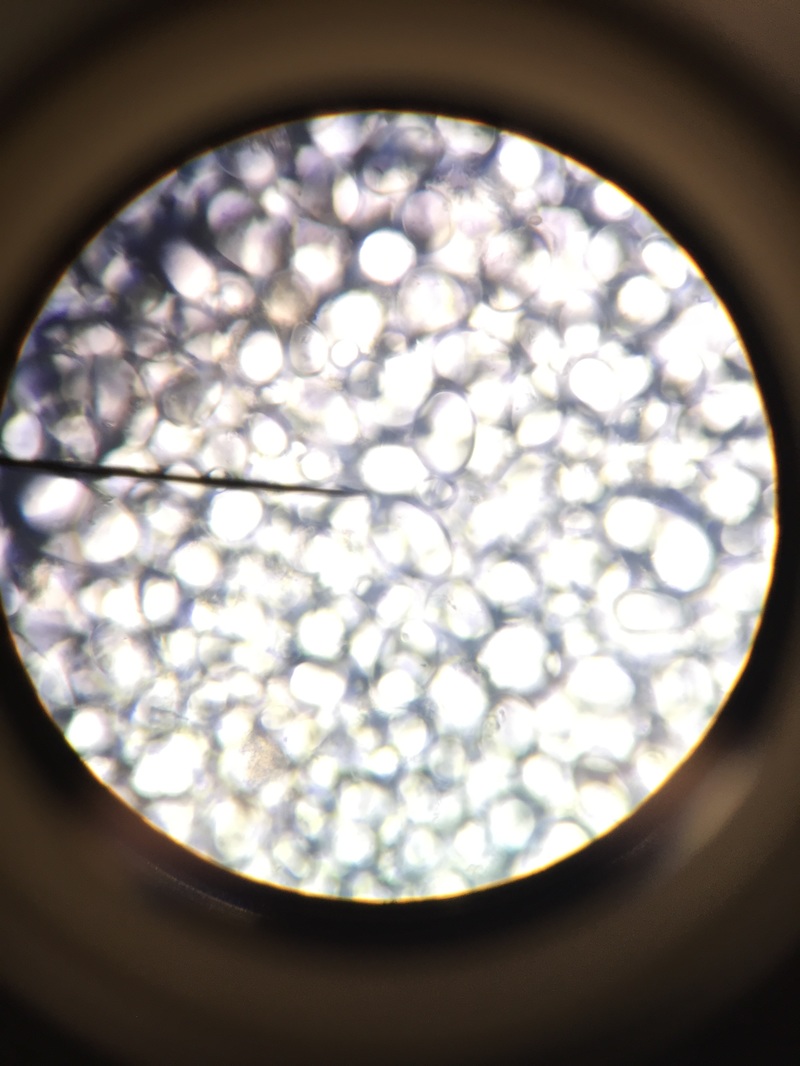
-Parenchyma of Solanum tuberosum (Potato)
-Total Magnification: 400X, Compound Microscope - Specimen Stained with Iodine I2KI - Sectioned Sample -Slide Prepared by Athena Downes -Image by Kelsey Hymel ***NOTE: The dark purple color of the starchy amyloplasts after the Iodine stain was applied.***
|
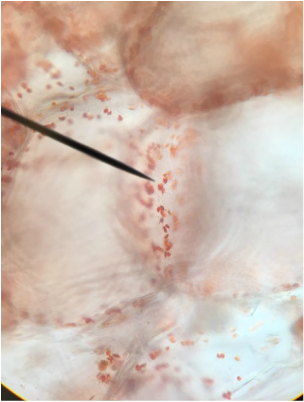
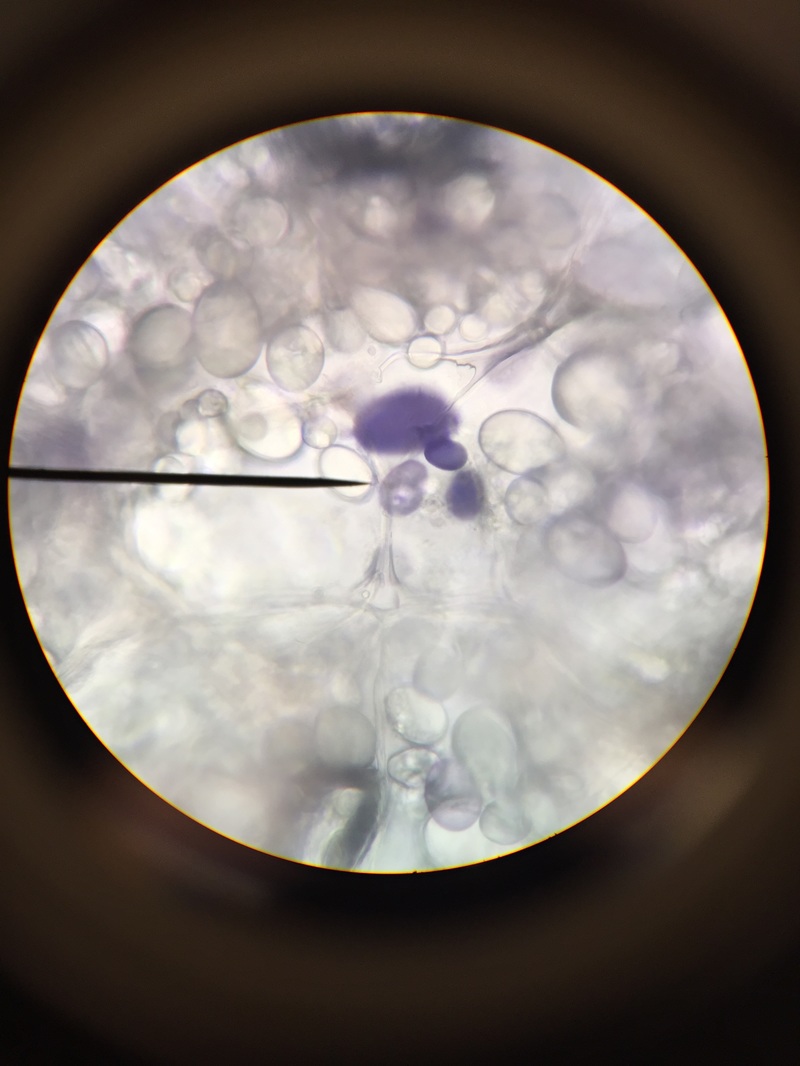
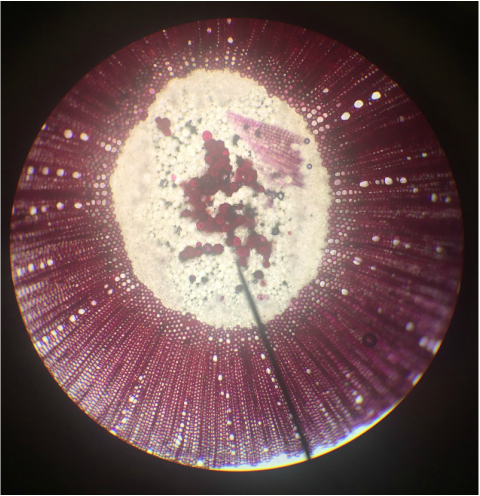
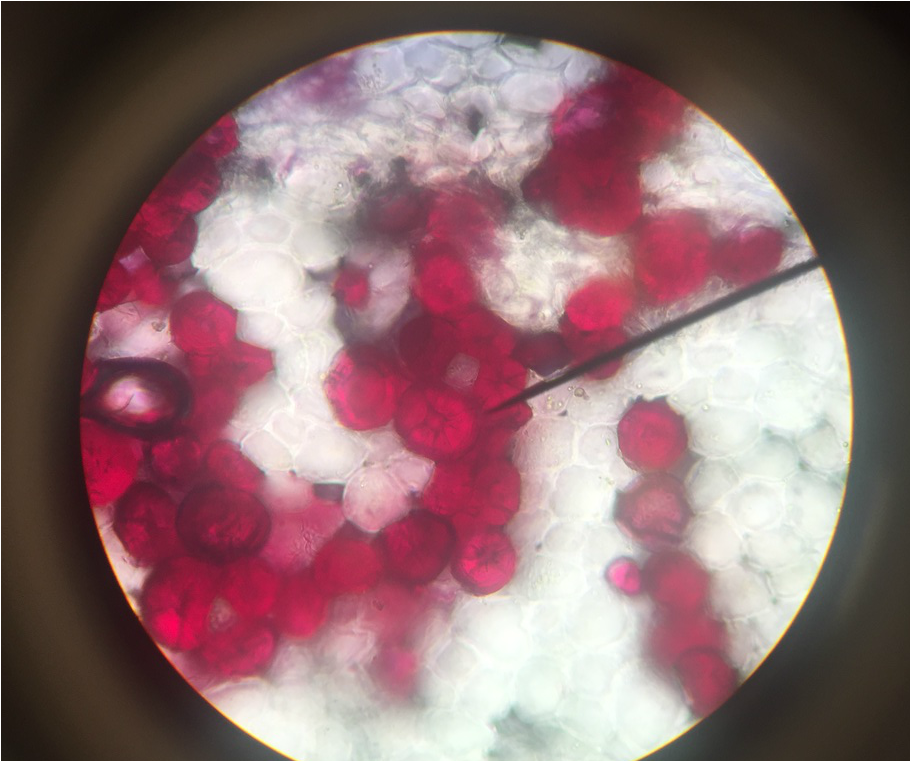
-Parenchyma of Musa sp. (Banana-unripened)
-Total Magnification: 400X, Compound Microscope - Specimen Stained With Iodine I2KI - Smear Sample -Slide Prepared by Athena Downes -Image by Athena Downes ***NOTE: All of the purple cells are starchy as revealed by the starch indicator Iodine.***
|
-Parenchyma of Musa sp. (Banana-ripened)
-Total Magnification: 400X, Compound Microscope - Specimen Stained With Iodine I2KI - Smear Sample -Slide Prepared by Athena Downes -Image by Kelsey Hymel ***NOTE: These banana cells are almost transparent and lacking the starches from the un-ripe sample.***
|
LAB THREE:
Photosynthesis
This week we used Armstrong's new spectrometers to measure the differential absorption of light of varying wavelengths by the chloroplast pigments. We extracted and identified the chloroplast pigments of our sample Magnolia grandiflora through chromatography. These processes helped us to visually see the spectrum of absorption that the magnolia plant utilizes by having more than one photosynthetic pigment.
Then, we used Elodea sp. to demonstrate that the "synthesis" reactions are dependent on the products from the "photo" reactions; in other words, in the absence of light- there is no photosynthesis!
Finally, we performed a starch test on leaves from a coleus or Plectranthus scutellariodes to examine the effects of different pigments and photosynthesis.
"My favorite experiment today was extracting and identifying the pigments of the Magnolia grandiflora. It was amazing to see the colors separate out of the crushed leaf cells. Then, using the spectrometers to graph the absorbance of each different color was very clarifying. How fascinating that the entire rainbow spectrum is utilized by the different pigments working in collusion!" -Athena Downes
"Though it was super neat to watch the colors separate out into the different bands on the chromatography paper from the magnolia leaf, my favorite component of this week's lab included the starch test we performed on the leaf of a coleus plant. I watched in awe during Dr. LP's demonstration up front as the pinkish-purple parts of the leaf literally vanished within mere seconds upon being dropped in the boiling water, and I couldn't wait to perform this test on our own once set free. Though the aroma from the boiling ethanol was a bit pungent at times during the second phase of the experiment, it was worth it to watch the green parts of the leaf disappear, turning the leaf translucent before the addition of the iodine. On our particular leaf specimen, it was interesting to see that only ~50% of the leaf was actually photosynthesizing as less than half of the leaf was stained dark by the iodine, noting the presence of starch." -Kelsey Hymel
Experiment #1 - Plant Pigments
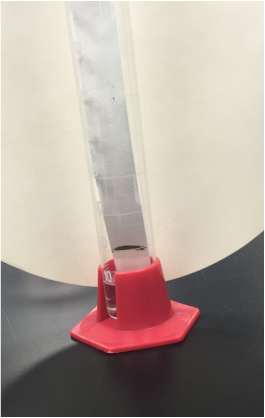
-The Chromotography Experimental Set-up by Athena Downes - Inside, the Chromotophy Paper Showing Dark Green Line of Magnolia grandiflora Leaf Cells Which Kelsey Hymel Crushed onto the Paper Using a Glass Stiring Rod and a Magnolia Lea f-Photograph by Kelsey Hymel
|
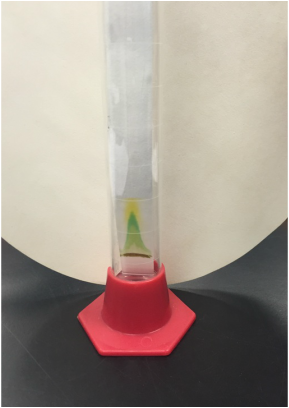
-The Extraction of Plant Pigments in Process - Chromotography Paper resting in Developing Solvent 2:1 Mixture Petroleum Ether and Methylene Chloride - Experiemental Set-up by Athena Downes - Inside, the Chromotophy Paper Showing Dark Green Line of Magnolia grandiflora Leaf Cells Prepared by Kelsey Hymel -Photograph by Kelsey Hymel
|
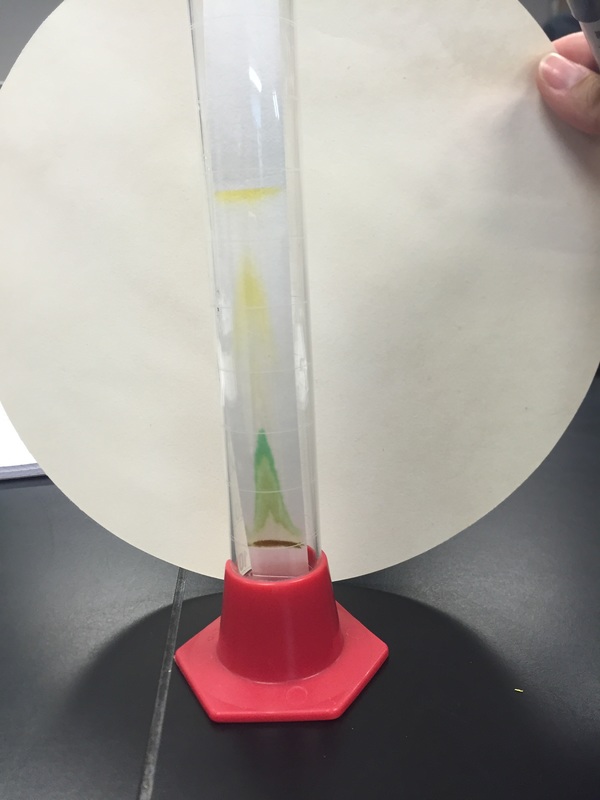
-The Completed Extraction of Four Plant Pigments - Experiemental Set -up by Athena Downes - Inside, the Chromotophy Paper Showing Dark Green Line of Magnolia grandiflora Leaf Cells Prepared by Kelsey Hymel Crushed - Photograph by Kelsey Hymel
|
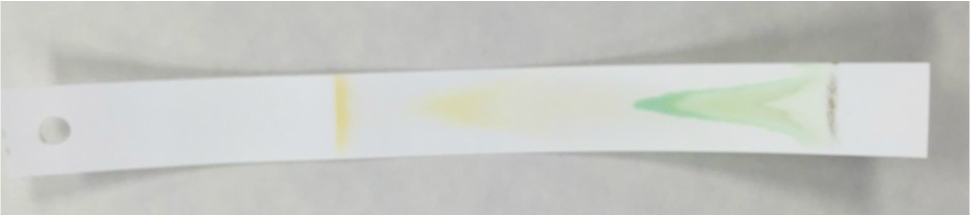
- The Chromotagraphy Paper Showing the Four Different Pigments Contained in the Magnolia grandiflora Leaf Cells - From Left, Carotene [Dark Orange Line], Xanthophylls [Yellow Curve], Chlorophyll a [Dark Blue/Green Curve], and Chlorophyll b [Lighter Green/Lime Curve] *NOTE: The once dark green line of crushed leaf cells now appears brown in color.* - Photograph by Kelsey Hymel
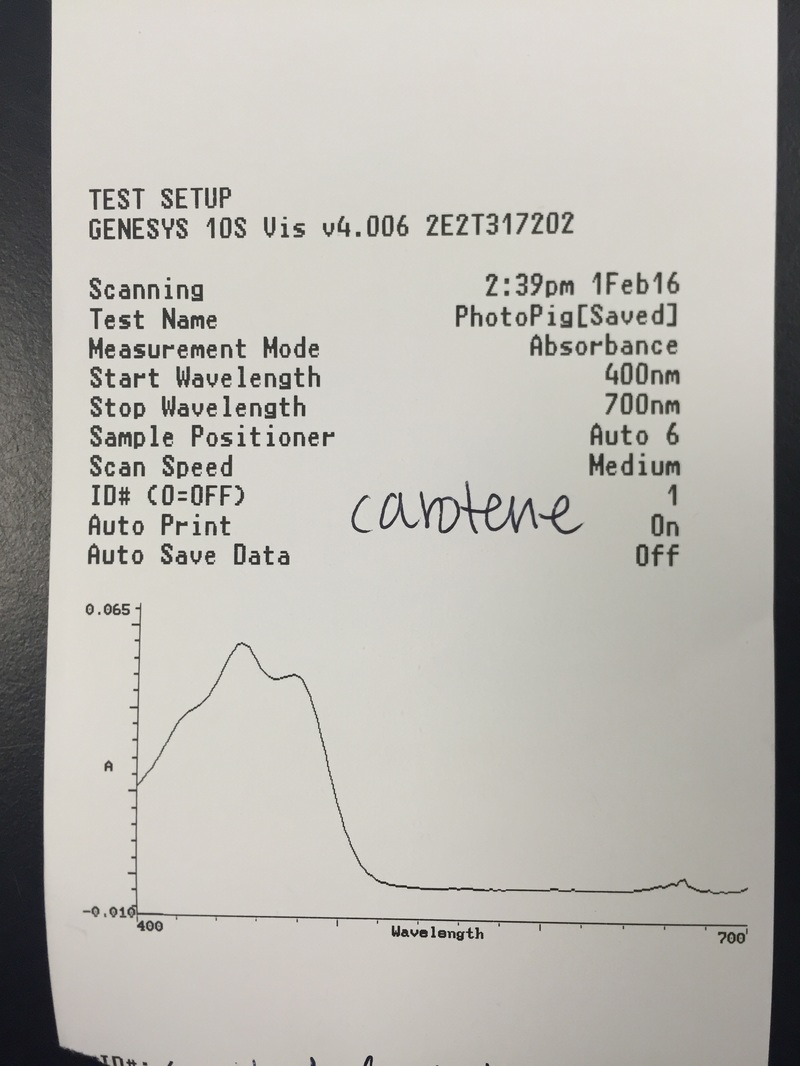
- Absorption Spectrum of Carotene Spectrometer Results - Photograph by Kelsey Hymel
|
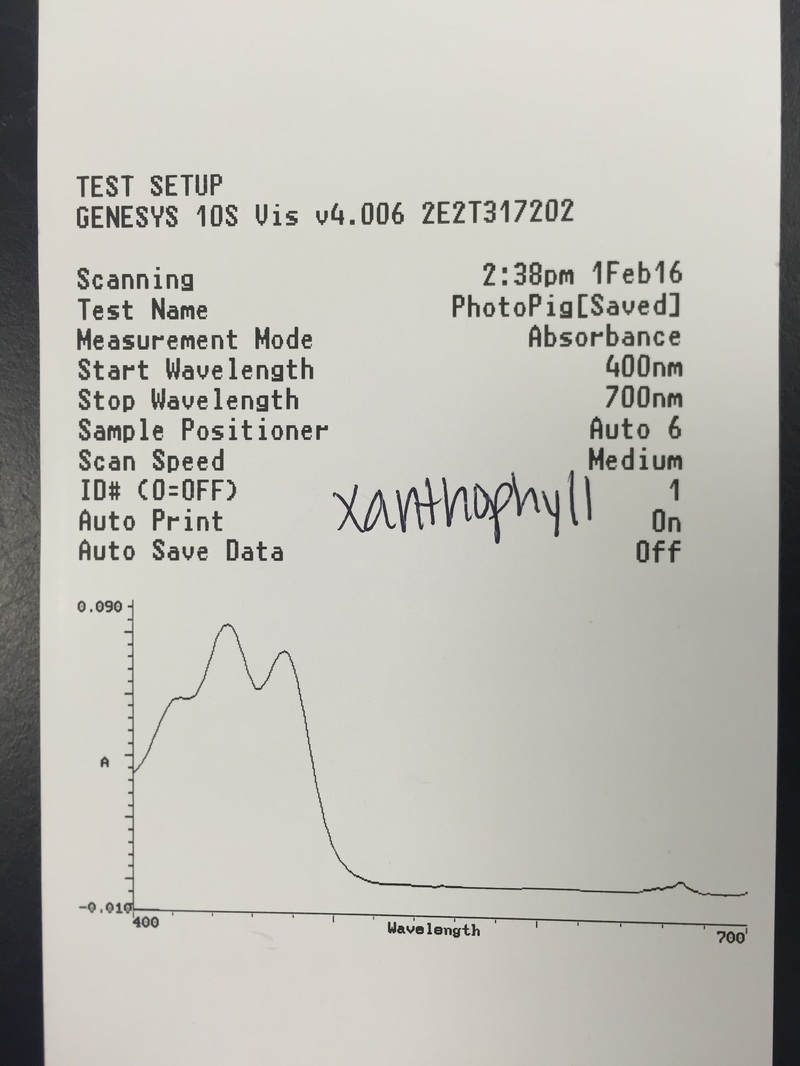
- Absorption Spectrum of Xanthophyll Spectrometer Results - Photograph by Kelsey Hymel
|
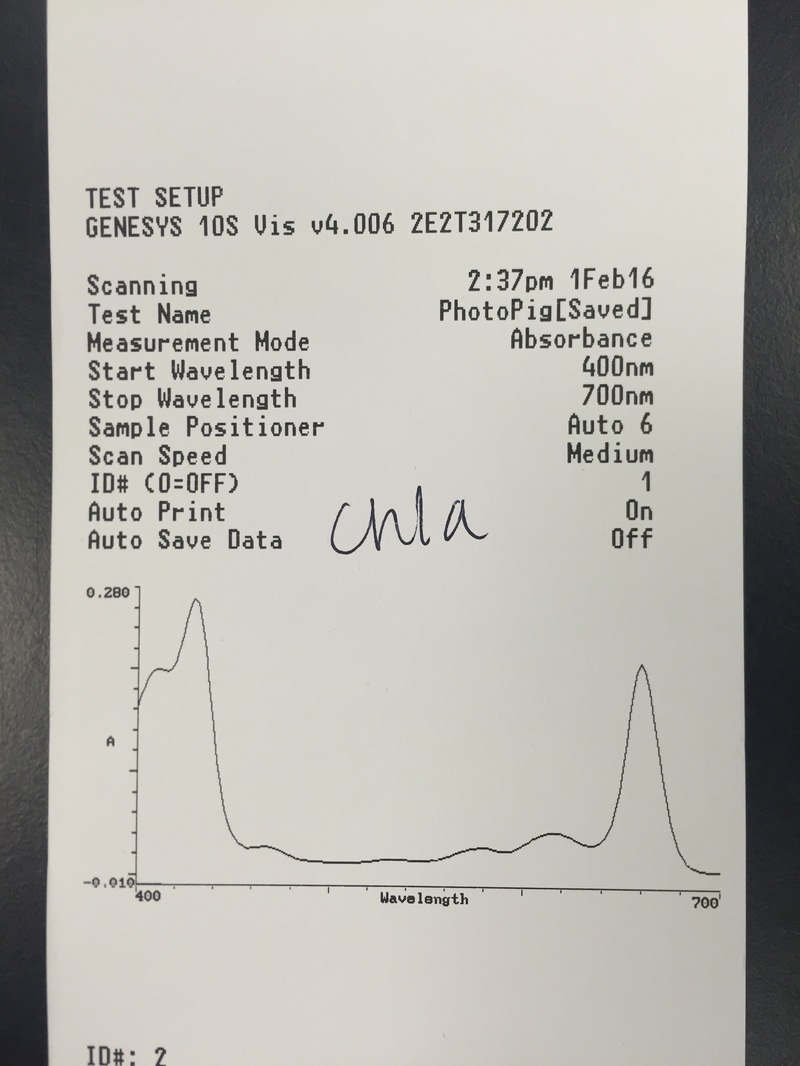
- Absorption Spectrum of Chlorophyll a Spectrometer Results - Photograph by Kelsey Hymel
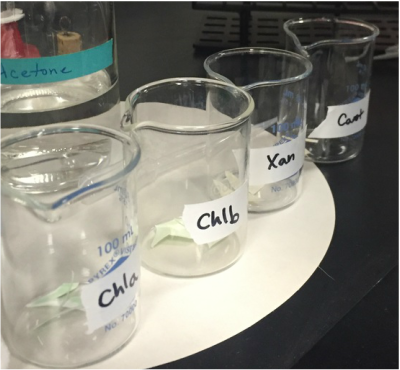
- Beakers With the Pigments Cut Out of the Chromatography Paper Ready for Solvent - Experiment Team: Craig Harrel, Hetal Bahat, Athena Downes, and Kelsey Hymel - Photograph by Athena Downes
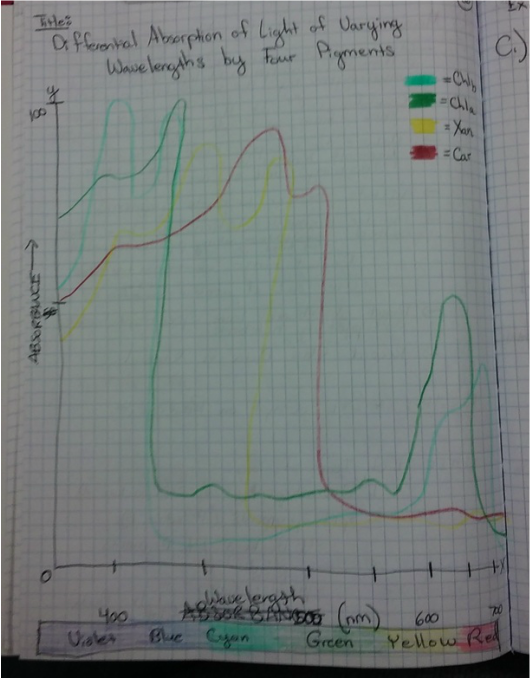
- Plotted Graph of the Four Pigments Wavelength Spectrum and Absorbance - *NOTE: Absorbance NOT to Scale, but the Image Shows the Coverage of the Rainbow Spectrum by the Pigments Which Demonstrates the Usefulness of a Plant Having More Than One Pigment for Photosynthesis* - Graph Produced and Photographed by Athena Downes
|
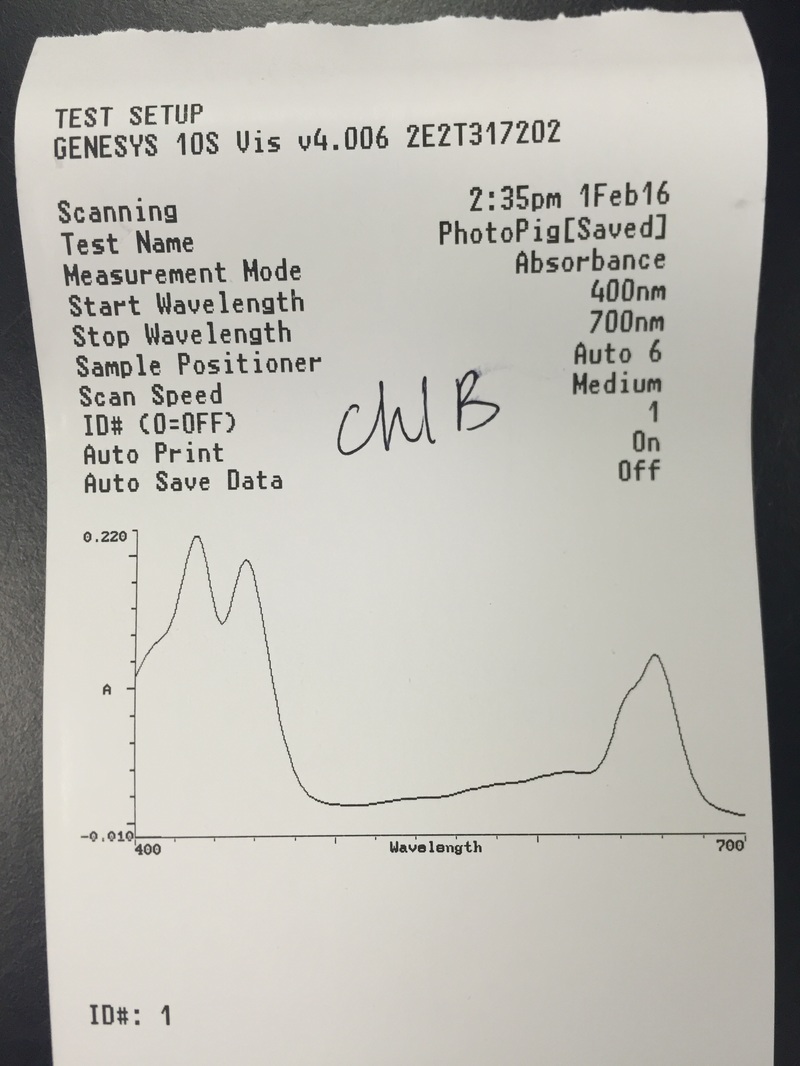
- Absorption Spectrum of Chlorophyll b Spectrometer Results - Photograph by Kelsey Hymel

- Kelsey Hymel Adding 5ml of Acetone Solvent to Each Beaker to Form Pigment Solutions - Photograph by Athena Downes
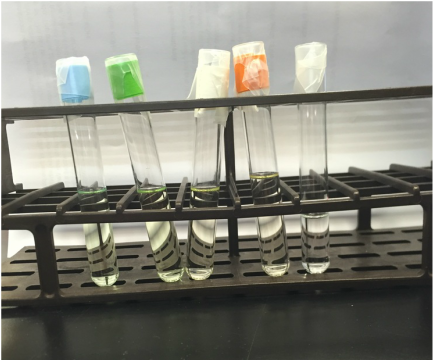
- Pigments in Solution - From Left to Right: Chlorophyll a, Chlorophyll b, Xanthophylls, and Carotene - These Test Tubes Were Loaded Directly into the Spectometer for Analysis- *NOTE: You can see the Absorption Spectrum Print-outs for Each Pigment Above* - Photograph by Kelsey Hymel
|
Experiment #2 - CO2 Consumption in Photosynthesis
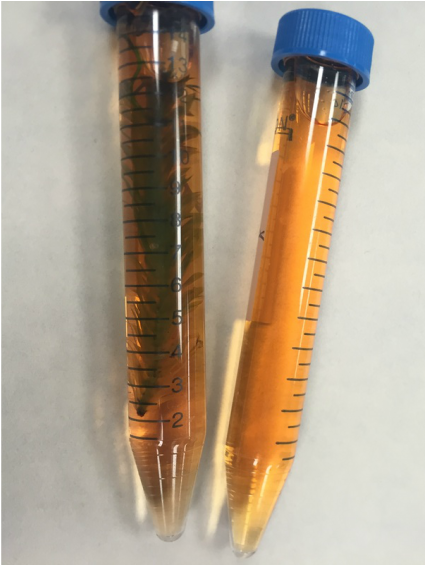
- Our Light Exposed Samples Prior to One Hour Reaction Time - On Left Sample of Elodea sp. in pH Indicator Solution [3 Drops 1% phenol red in 150ml of tap water with added CO2 from Blowing in a Drinking Straw for 8-10 Seconds] - On Right "Control" Solution of pH Indicator - Both Samples Color Orange Indicating Acidic pH - Photograph by Kelsey Hymel
|

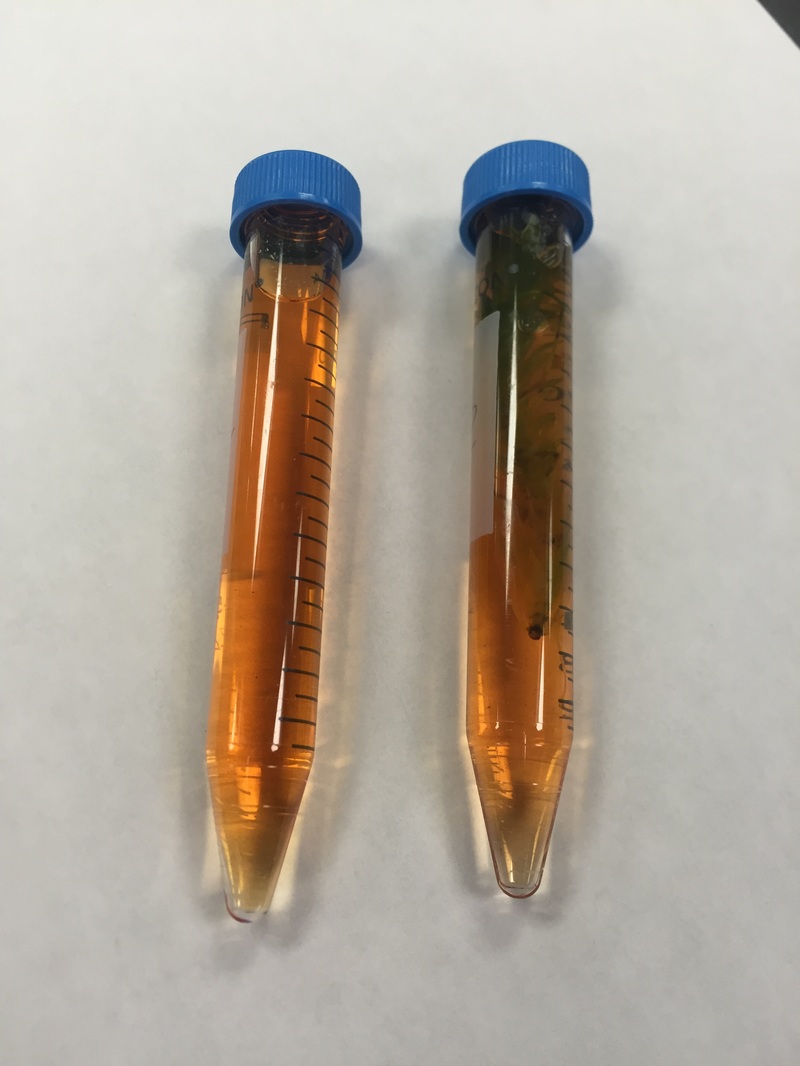
- Our Light Exposed Samples After One Hour - On Left Sample of Elodea sp. Showing ph Change to Color Red Indicating Basic pH - On Right "Control" Solution of pH Indicator With No Color/pH Change *NOTE: This Result Tells Us That Photosynthesis was Occuring to Use Up the CO2 From the Solution* - Photograph by Kelsey Hymel
|
- Our Light Deprived Samples Prior to One Hour Reaction Time - On Right Sample of Elodea sp. in pH Indicator Solution [3 Drops 1% phenol red in 150ml of tap water with added CO2 from Blowing in a Drinking Straw for 8-10 Seconds] - On Left "Control" Solution of pH Indicator - Both Samples Color Orange Indicating Acidic pH - Photograph by Kelsey Hymel
|
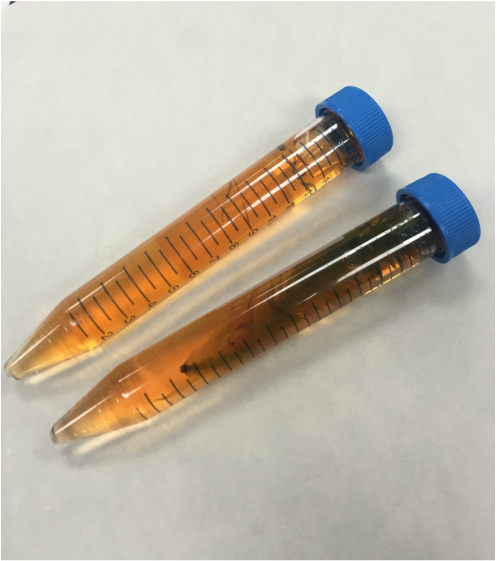
- Our Light Deprived Samples After One Hour - On Right Sample of Elodea sp. Showing Very Slight ph Change to Lighter Orange Indicating Slightly More Acidic pH - On Right "Control" Solution of pH Indicator With No Change in Color/pH *NOTE: This Result Tells Us That Photosynthesis was NOT Occuring to Use Up the CO2 From the Solution, but Rather that Respiration was Occuring to Increase the Concentration of CO2 in the Tube with Elodea sp. * - Photograph by Kelsey Hymel
|
Experiment #3 - Test for Starch Differences in Pigments

- Our Plectranthus scutellariodes Leaf - This leaf if special because it is Variegated or Patterened with Areas of Both Green and Pink - Pink Areas are Areas with Anthocyanin (water soluble) Pigments Stored in Vacuoles - Green Areas are Areas with Chlorophyll Pigments Found in Thykaloid Membranes of Chloroplasts - Phtograph by Kelsey Hymel
|
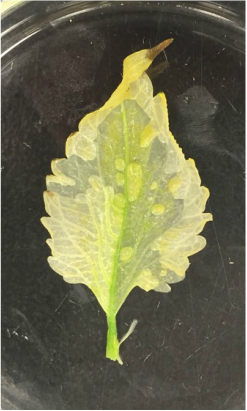
- Our Plectranthus scutellariodes Leaf After Being Boiled in H2O to Remove Anthocyanins and Boiled in Ethanol to Remove Chlorophyll - Pink Areas of Anthocyanin Concentration Have Turned Clear - Green Areas of Chlorophyll Concentration Have Turned Clear - Phtograph by Kelsey Hymel
|

- Our Plectranthus scutellariodes Leaf After Being Treated With Iodine Startch Indicator [Areas with Starch Present Will Turn Dark Blue/Black] - Pink Areas of Anthocyanin Concentration Showed Negative Result for Starch - Green Areas of Chlorophyll Concentration Showed Positive Result for Starch *NOTE: This tells us not only that starch was only present in the green areas, but also that not all parts of this species of leaf photosynthesize. In fact, only the green parts do!* - Phtograph by Kelsey Hymel
|
LAB FOUR:
Simple and Complex Tissues
This week we used our burgeoning section making skills to compare and contrast parenchyma, collenchyma, and sclerenchyma cells of the ground tissue system. Also we observed and identified the three tissue systems of the plant body as well as the water-conducting cells of the vascular tissue system while thinking about the importance of their structures to their functions. Finally, we described the characteristic of the epidermis.
*NOTE: All scientific facts about the different cells types and functions that are referenced on the images are from class materials.*
"I have to say this lab was the most fascinating photographically thus far! I am continually amazed by the intricate and fabulous microscopic world of plant cells, and I am so pleased to be able to share our photos with you. My favourite specimen of this lab was the Apium graveolens (celery petiole) because of the variety of cells, colours, and functions that could be seen in the one tiny section!" -Athena Downes
"This has been my favorite lab to date! I love preparing slides and staining slides in general, but to be rewarded by such awesome looking specimens was a special bonus. I would never be able to guess in a million years that these all these photographs came from plant tissues and cells. They are all fascinating, but I do have to say my favorite specimen was the sclerenchyma fibers of the snake plant, Sansevieria trifasciata, the TBO stained the fibers such a bright, electric blue that looked more like a spider's web than a cross-section of fibers in a common plant." -Kelsey Hymel
-Parenchyma Cells of Celery Petiole, Apium graveolens , - Stained with Toluidine Blue O (TBO) - Transverse Section- Total Magnification 400x - Slide Prepared by Athena Downes - Photo Credit: Athena Downes
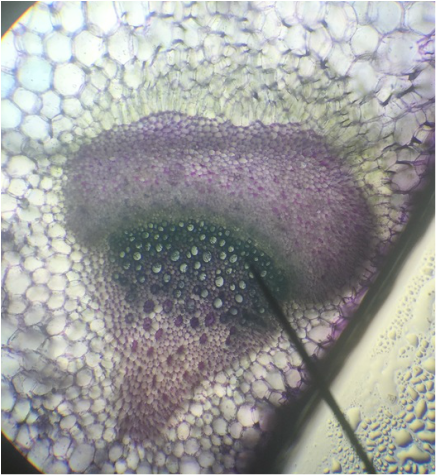
- Lignified Treachery Elements (the Large Green Circles )in the Xylem [Does Need to be Living, Water and Mineral Salt Transport; No ATP req.] and Un-lignified (Large Purple Circles) of Phloem [Must be Living Cells, Food, Sucrose, Amino Acid Transport; Uses ATP] as Observed in Celery Petiole, Apium graveolens - Stained with Toluidine Blue O (TBO) - Transverse Section- Total Magnification 400x - Slide Prepared by Athena Downes - Photo Credit: Athena Downes
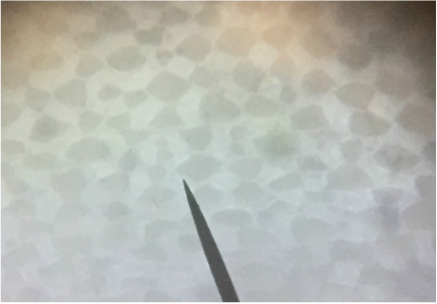
- A Bundle of Angular Collenchyma Cells of Celery Petiole,i> Apium graveolens - Stained with Toluidine Blue O (TBO) - Transverse Section- Total Magnification 400x - Slide Prepared by Athena Downes - Photo Credit: Athena Downes ***NOTE: These are the cells which give celery its stringy property. These cells appeared pink/purple at lower magnification indicating the presence of pectins in the matrix. There are two other types of morphologically different collenchyma, lacunar and lamellar, which are not pictured here; all three types of collenchyma can be found in the elongating outer cells of stems, petioles, flowers, and stalks where they provide strength as these organs grow.***
|
-Complete Vein in Celery Petiole, Apium graveolens - Stained with Toluidine Blue O (TBO) - Transverse Section- Total Magnification 100x - Slide Prepared by Athena Downes - Photo Credit: Athena Downes ***NOTE: This image shows the variety of parenchyma cells common in plant organs. These cells perform photosynthesis, storage, secretion, and short distance transport and are shaped differently according to their position and function in the cells.***
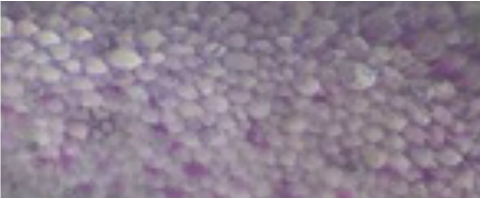
-Pink/Purple Parenchyma Cells Located in Phloem Showing Presence of Pectins in Celery Petiole, Apium graveolens - Stained with Toluidine Blue O (TBO) - Transverse Section- Total Magnification 400x - Slide Prepared by Athena Downes - Photo Credit: Athena Downes
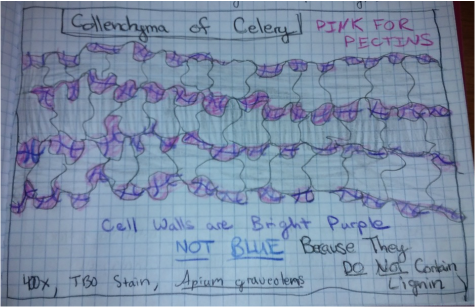
- Representation of Angular Collenchyma Cells of Celery Petiole,i> Apium graveolens - Stained with Toluidine Blue O (TBO) - Transverse Section- Total Magnification 400x -Drawing by Athena Downes - Photo Credit: Athena Downes ***NOTE: Pink and Purple indicate presence of pectins in the matrix. There is no blue because the cell walls are not lignified and thus dark purple.***
|
- Structural Support Cells Called Brachysclereids or "Stone Cells" in Sclerenchyma Cells of Pyrus communis , Pear Fruit, Showing Lignified Cell Walls and Pit Canals - Stained with TBO - Sectioned Sample - Total Magnification 400x - Slide prepared by Kelsey Hymel - Photo Credit: Kelsey Hymel ***NOTE: Stone cells are the cells which give pears their gritty texture.***

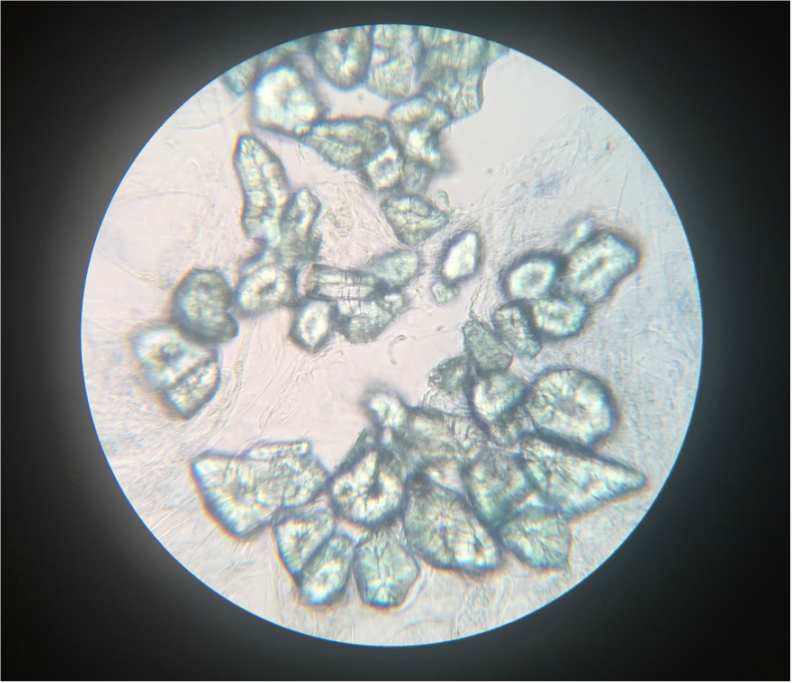
- Sclerenchyma Cells of Persea americans , Avocado Fruit, Showing Lignified Cell Walls and Brachyscleriod Stone Cells with Pit Canals - Stained with phloroglucinola-HCL - Sectioned Sample - Total Magnification 400x - Slide prepared by Athena Downes - Photo Credit: Athena Downes ***NOTE: Lignified cell walls appear various shades of red depending on type and amount of lignin; due to the intensity of this colour we can infer presence of a significant amount of lignin in the secondary cell walls of the brachysclereids.***
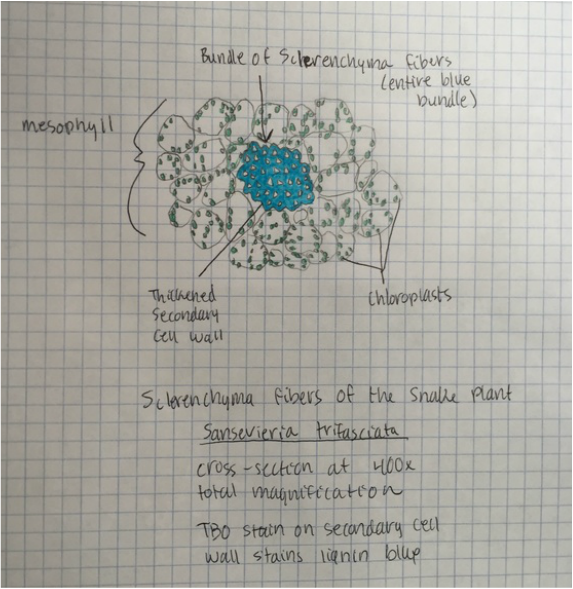
- Representation of Sclerenchyma Fibers of Snake Plant, Sansevieria trifasciata , Showing Bundle of Fibers in the Mesophyll , Thickened Secondary Cell Walls (Bright Blue), and the Green Chloroplasts- Stained with TBO - Cross-Sectioned Sample - Total Magnification 400x - Drawing by Kelsey Hymel - Photo Credit: Kelsey Hymel ***NOTE: The secondary cell wall stains bright blue or blue green because of the presence of thickened layers of ligin.***
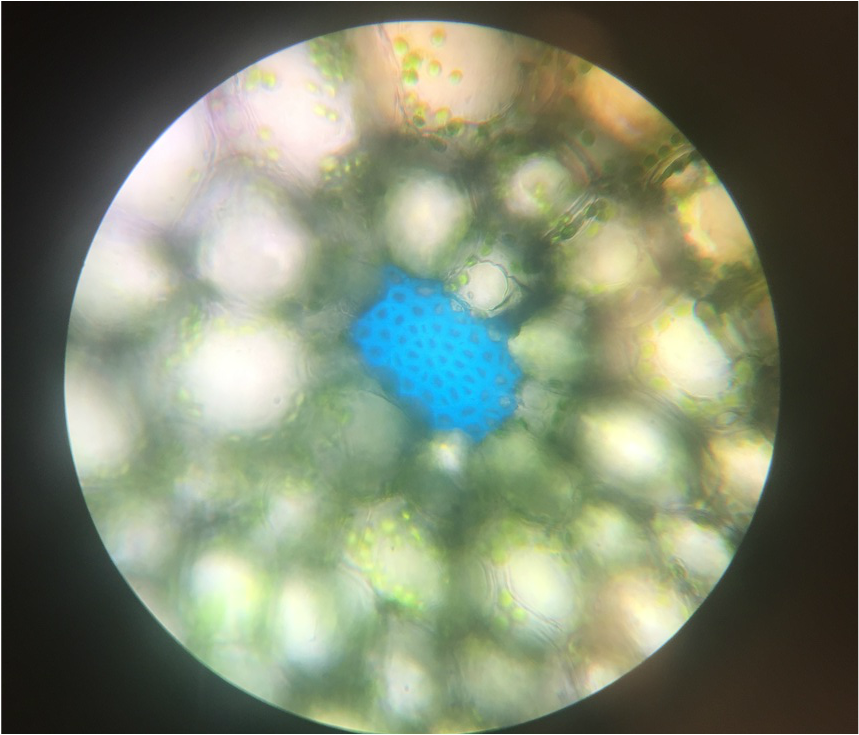
- Sclerenchyma Fibers of Snake Plant, Sansevieria trifasciata , Showing Bundle of Fibers in the Mesophyll , Thickened Secondary Cell Walls (Bright Blue), and the Green Chloroplasts- Stained with TBO - Cross-Sectioned Sample - Total Magnification 400x - Slide prepared by Kelsey Hymel - Photo Credit: Kelsey Hymel ***NOTE: The secondary cell wall stains bright blue or blue green because of the presence of thickened layers of ligin.***
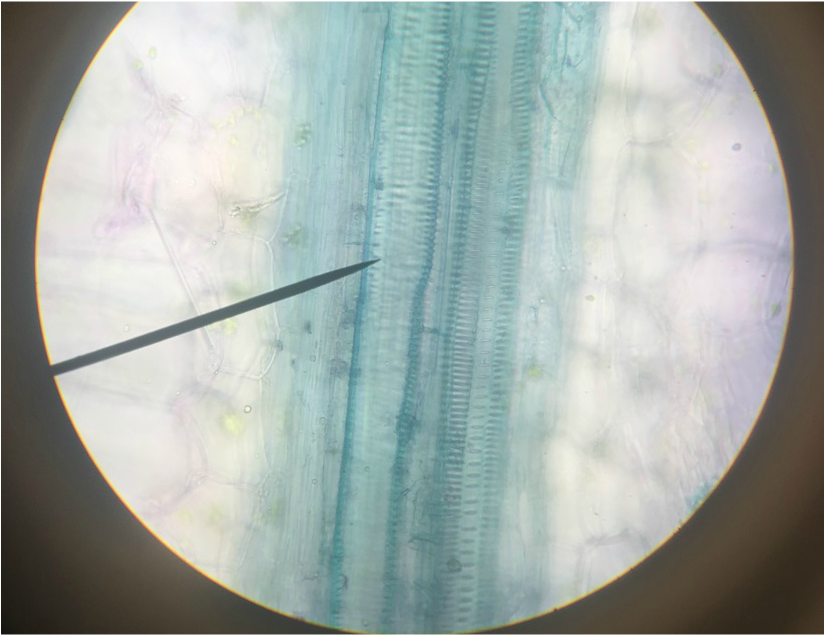
- Sclerenchyma Fibers of Snake Plant, Sansevieria trifasciata , Showing Narrow, Elongated Shape of the Supportive Fibres in the Xylem- Stained with TBO -Longitudinal Section - Total Magnification 400x - Slide prepared by Athena Downes - Photo Credit: Athena Downes***NOTE: The secondary cell wall stains bright blue of blue green because of the presence of thickened layers of login. Annular, spiral, and scalariform secondary cell wall structures can be seen in this image.***
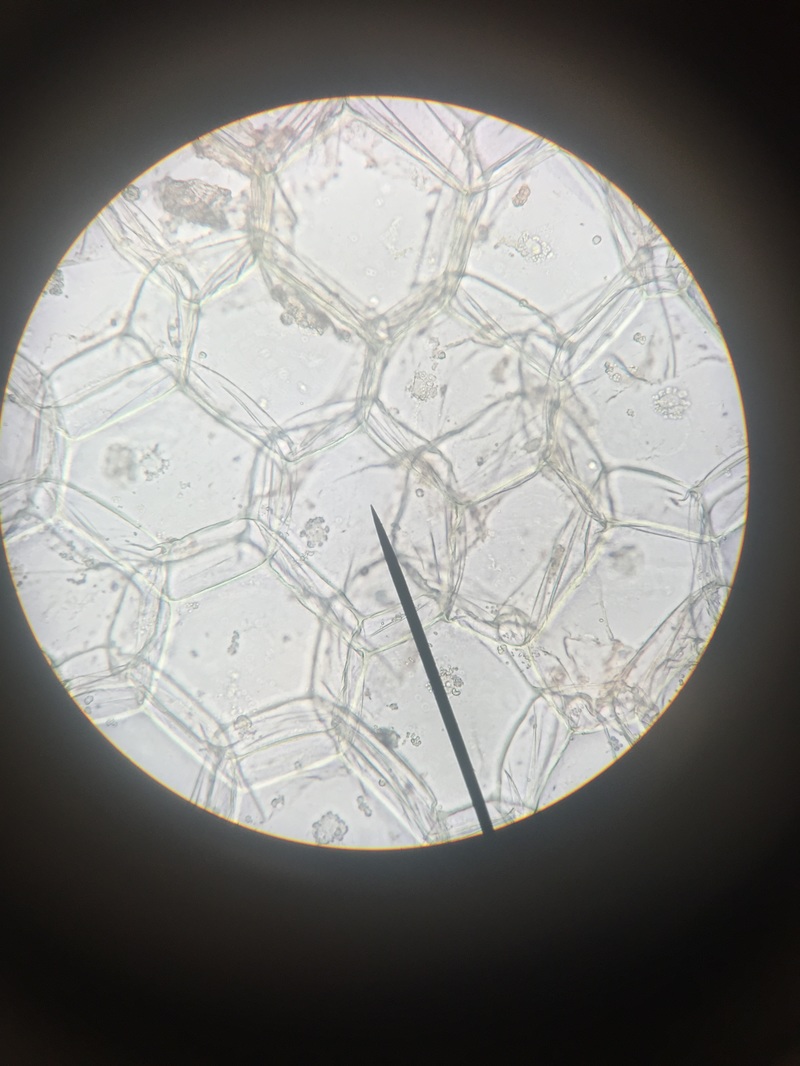
- Upper Epidermis of Inch Plant, Tradescantia zebrine - Sample Not Stained - Epidermal Peel Section - Total Magnification 400X - Slide Prepared by Athena Downes - Photo Credit: Athena Downes
|
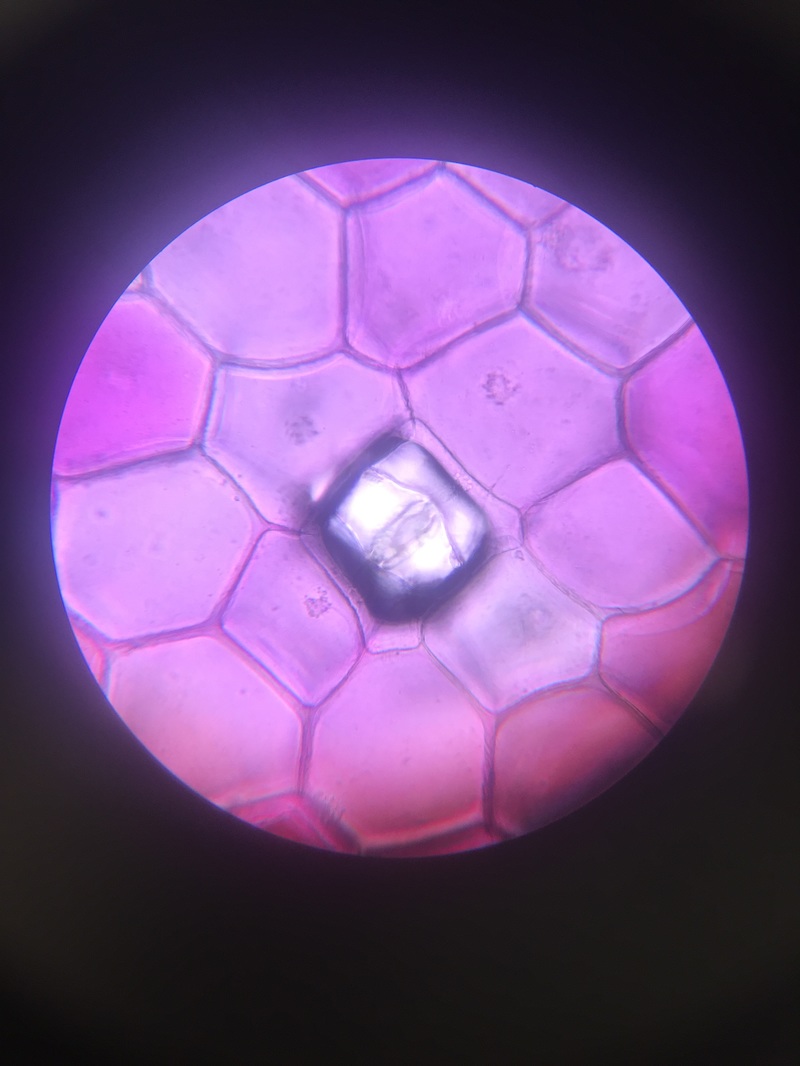
- Lower Epidermis of Inch Plant, Tradescantia zebrina , Showing Presence of Guard Cell in Stomatal Complex- Sample Not Stained - Epidermal Peel Section - Total Magnification 400X - Slide Prepared by Kelsey Hymel - Photo Credit: Kelsey Hymel ***NOTE: Also, the colour is purple from the presence of anthocyanin pigments in the vacuoles.***
|
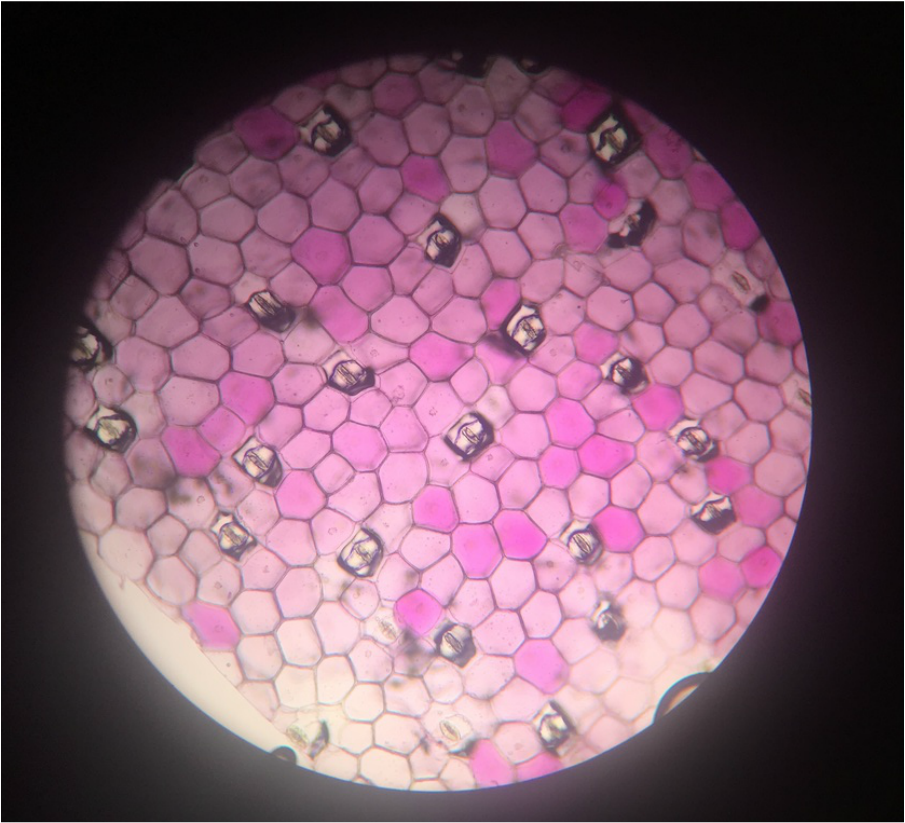
- Wide View of Lower Epidermis of Inch Plant, Tradescantia zebrina , Showing Presence of Guard Cells in Stomatal Complexes- Sample Not Stained - Epidermal Peel Section - Total Magnification 100X - Slide Prepared by Kelsey Hymel - Photo Credit: Kelsey Hymel ***NOTE: Also, the colour is purple from the presence of anthocyanin pigments in the vacuoles.***
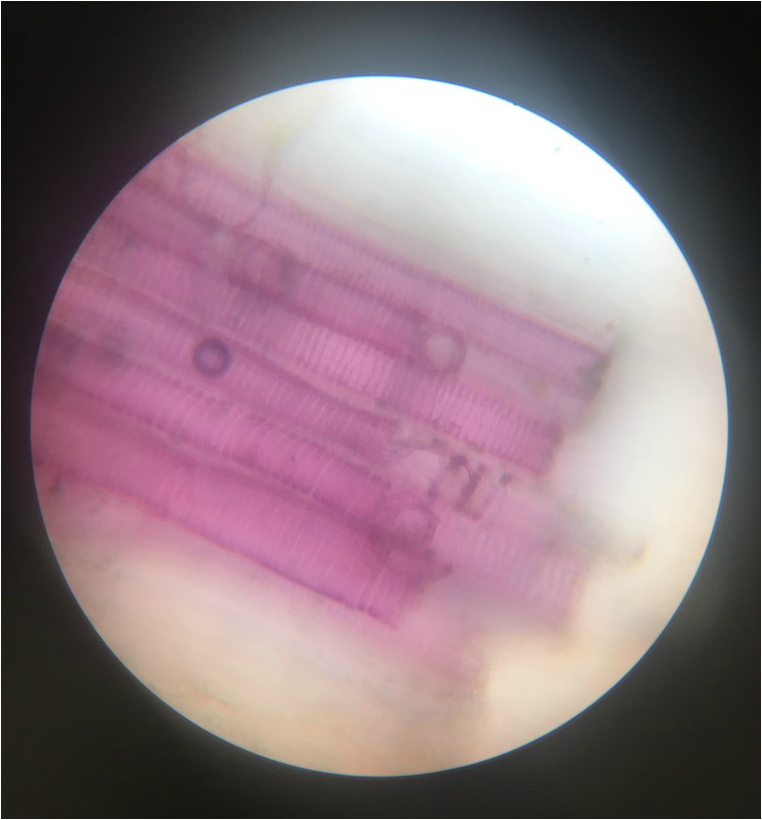
- Tracheids of Coleus Stem, Coleus blumei, Showing Spiral and Scalariform Structured Secondary Cell Wall - Stained with phloroglucinal-HCL- Longitudinal Section - Total Magnification 400X - Slide Prepared by Kelsey Hymel - Photo Credit: Kelsey Hymel

- Treachery Elements (Dark Red Collar), Sclereids (in Pith and Cortex), and Parenchyma Tissue in Wax Plant, Hoya cams - Stained with phloroglucinal-HCL - Cross Section - Total Magnification 40x - Slide Prepared by Athena Downes - Photo Credit: Athena Downes ***NOTE: p-HCL stain dyes sclereids and treachery elements red.***
|
- Magnified View of Collar of Tracheary Elements in Wax Plant, Hoya cams - Stained with phloroglucinal-HCL - Cross Section - Total Magnification 100x - Slide Prepared by Athena Downes - Photo Credit: Athena Downes ***NOTE: The layers of structure in the tracheary elements of the the xylem. These treachery elements are the water conducting cells!***
|
- Brachysclereids in Cortex of Hoya, Hoya cams - Stained with phloroglucinal-HCL - Cross Section - Total Magnification 400x - Slide Prepared by Athena Downes - Photo Credit: Athena Downes ***NOTE: Lignified secondary cell walls and ramiform pits.***
LAB FIVE:
GMO Investigation Part One
This week we learned the difference between biotechnology- or the science of enhancing natural plants with scientific methods such as hydroponics [growing plants without soil]- and genetic engineering- or the science of physically changing the molecular and genetic composition of a known organism to create a new modified organism which could not be found in nature on its own.
We watched a documentary called "The Future of Food" which made a compelling case that GMO (genetically modified organisms) are spreading globally, and the average consumer cannot be assured that what they are eating off the grocery shelves is not GMO. Thus, being eager scientists in search of experimental proof, we brought in food samples from which to extract DNA, run PCR (polymerase chain reaction), and be able to see for ourselves if GMO food is right in our own houses without our knowledge.
We watched a documentary called "The Future of Food" which made a compelling case that GMO (genetically modified organisms) are spreading globally, and the average consumer cannot be assured that what they are eating off the grocery shelves is not GMO. Thus, being eager scientists in search of experimental proof, we brought in food samples from which to extract DNA, run PCR (polymerase chain reaction), and be able to see for ourselves if GMO food is right in our own houses without our knowledge.
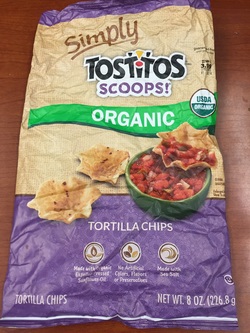
We chose "Simply Organic Scoops" by Tostitos as our test food. We hypothesize that these chips will not have GMO ingredients because they are organic which is supposed to mean we can trust them to be pure and free of chemical influence. INGREDIENTS:
Organic yellow corn, organic expeller pressed Sunflower oil, and sea salt. - Photo Credit: Kelsey Hymel
Step One: Extraction of DNA from Food Samples
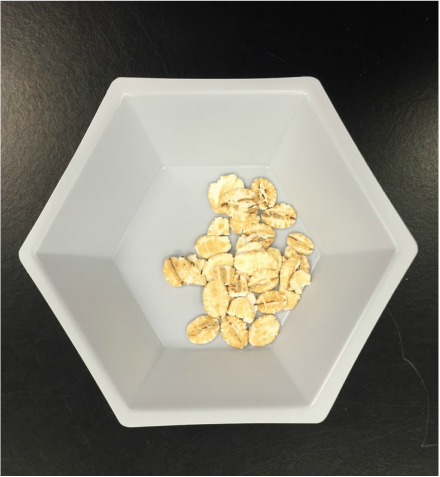
- 1g Certified non-GMO Food that We Processed in Same Fashion as Our Test Sample of Tostito's Scoops. This non-GMO is our Scientific Control. -Sample Prepared by Athena Downes - Photo Credit: Kelsey Hymel
|
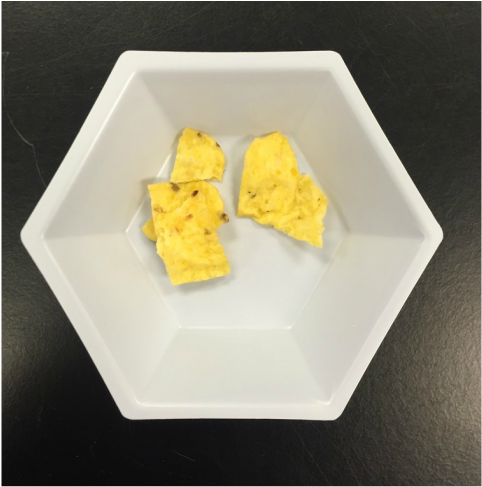
- 1g Test Food Sample (in our case Tostito's "Simply Organic Scoops"). This is Our Expierimental Test. -Sample Prepared by Athena Downes - Photo Credit: Kelsey Hymel
|
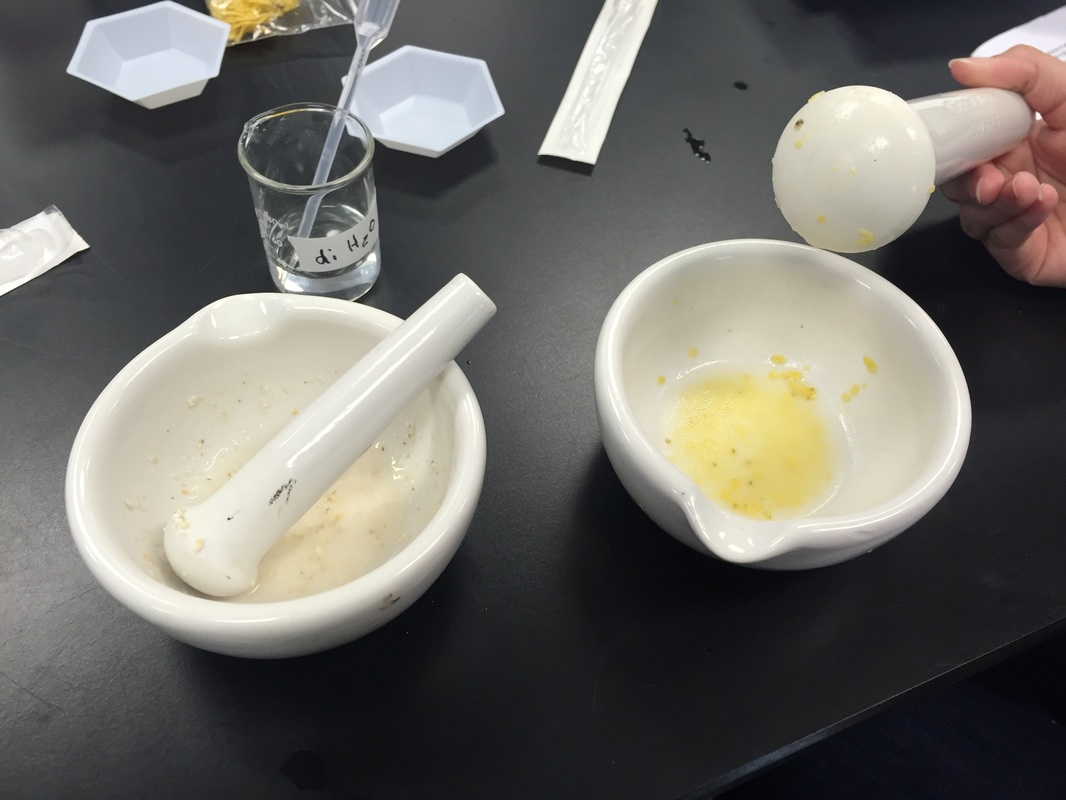
- Our Certified non-GMO Control on Left Being Ground by Kelsey. Our "Simply Organic" Tostito's Scoops on the Right. - Using a Mortar and Pestle, We Disrupted the Samples to Extract the Plant DNA. - Photo Credit: Kelsey Hymel
|
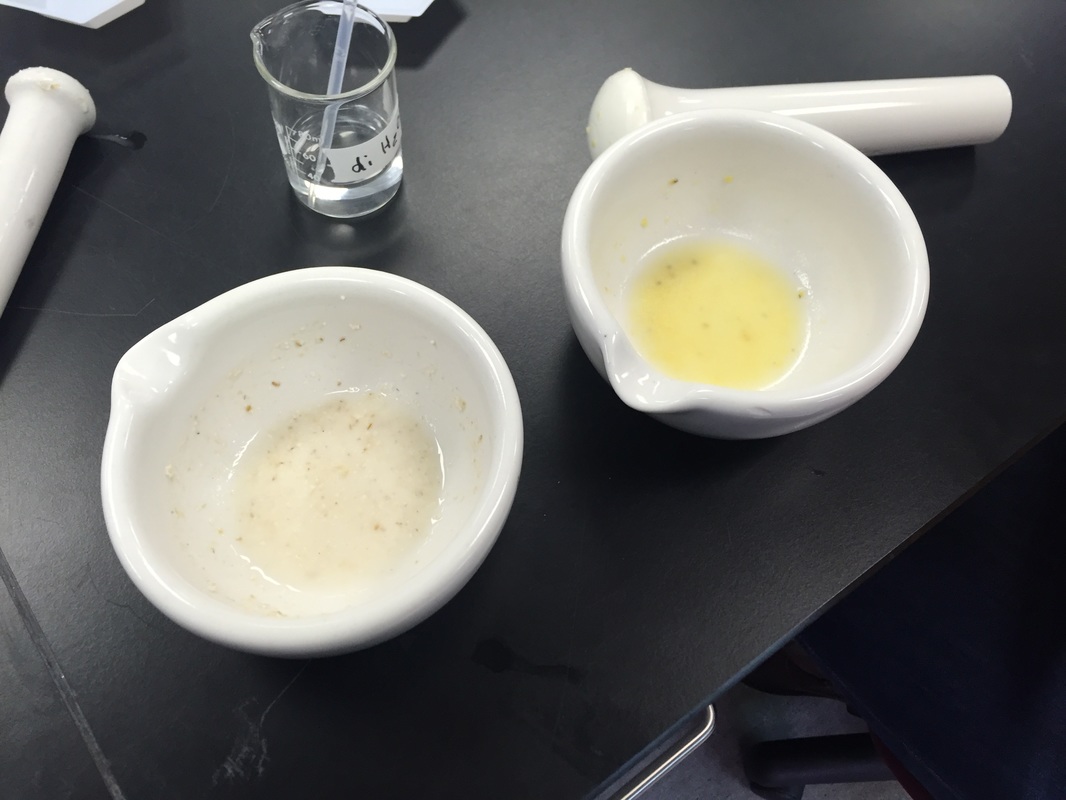
- Our Certified non-GMO Control Slurry on Left Prepared by Kelsey. -Our "Simply Organic" Tostito's Scoops Slurry on the Right Prepared by Athena Downes. - Once Our Sample and the H2O Reached a Liquid Slurry State it was Ready to Pipet into Screwcap Tubes - Photo Credit: Kelsey Hymel
|
->The screw cape tubes that we pipetted the DNA containing slurries into were pre-loaded by Dr. LP with "InstaGene Matrix". This matrix has negatively charged microscopic beads that grab the metal ions out of our slurries. Without the Magnesium ions, the naturally present enzymes released from the cellular contents cannot perform their breakdown reactions, and the DNA is saved from being denatured.<-
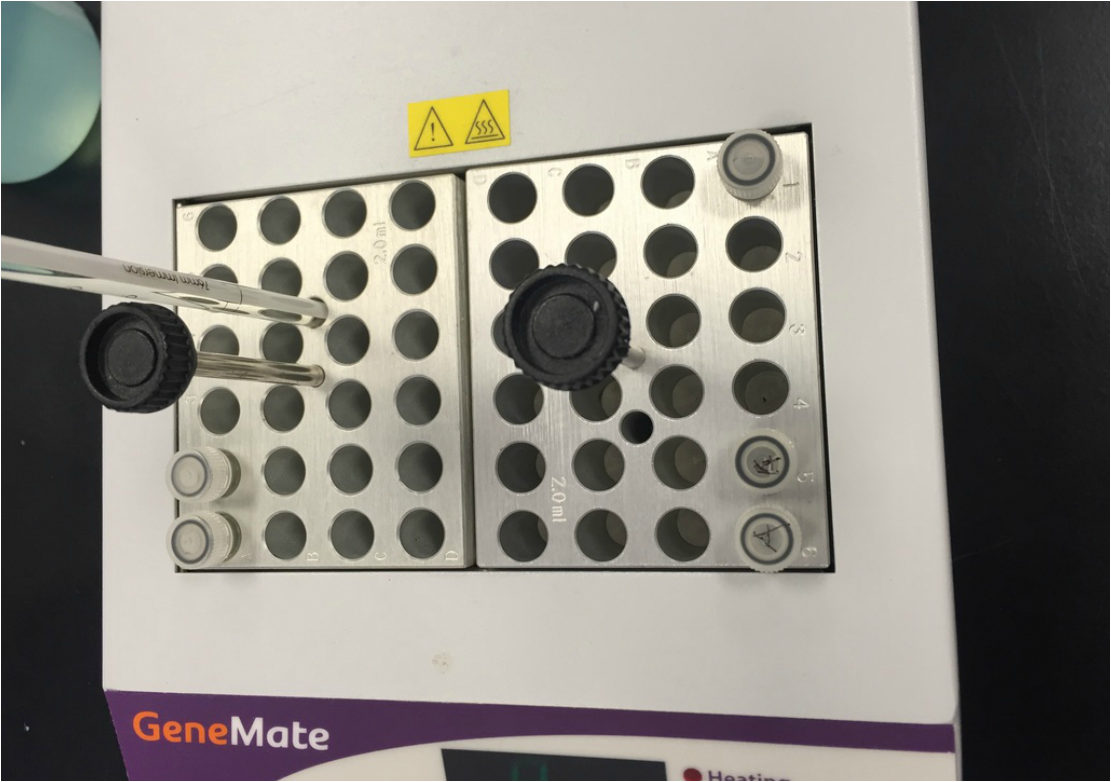
-Our Two Tubes of Plant DNA in Their 5 Minute 95 Degree Celsius Dry Bath - We Placed Our Samples in this Hot Bath to Destroy the Enzymes that Would Otherwise Denature Our DNA - Samples Prepared as a Team - Photo Credit: Kelsey Hymel

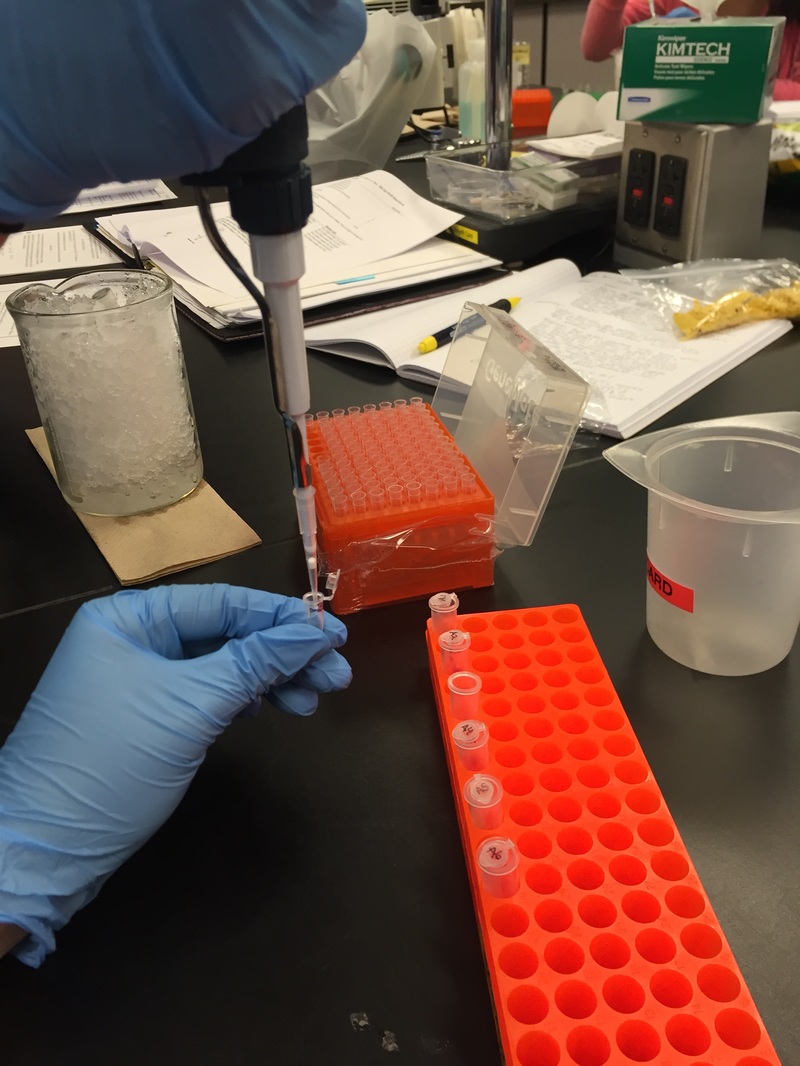
- Here We are Loading Our Screwcap Tubes with our Plant DNA into a Centrifuge - We Centrifuged the Samples in Order to "Spin Down" or Collect at the Bottom the DNA Sample so That it is Ready to Be Used for PCR - Photo Credit: Kelsey Hymel
Step Two: Setting Up Our PCR Reactions
We prepared to run two PCR reactions on each of our three DNA samples (Non-GMO -, Tostito's, and GMO + Control). In one PCR preparation we mixed each type of DNA with PMM or Plant Master Mix [bright green] which has primers which will locate a DNA sequence that is common in all plants [chloroplast from photosystem II], and this PCR will show whether we successfully extracted plant DNA from our Tostito's food sample. In the other PCR preparation we mixed each type of DNA with GMM or GMO Master Mix [bright pink] which has primers that will locate DNA sequence [CaMV 35S or NOS] that is common in most (85%) of all Genetically Modified Organisms (Plants).
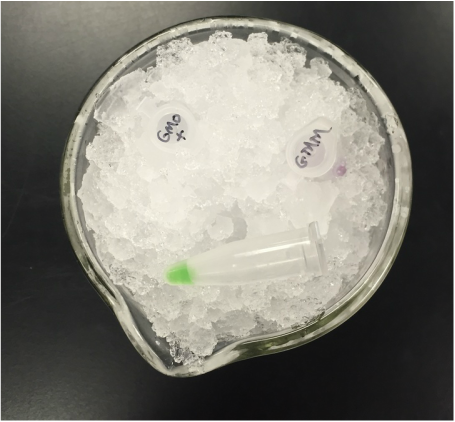
- GMO + DNA, GMO Master Mix (GMM), and Plant Master Mix (PMM) Prepared by Dr. LP - Shown in this Photo is the Bright Green Plant Master Mix - Photo Credit: Kelsey Hymel
|
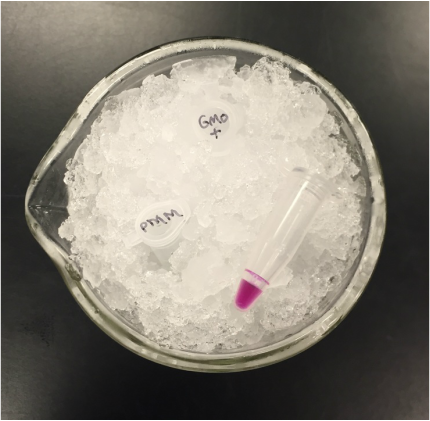
- GMO + DNA, GMO Master Mix (GMM), and Plant Master Mix (PMM) Prepared by Dr. LP - Shown in this Photo is the Bright Pink GMO Master Mix - Photo Credit: Kelsey Hymel
|
- Here We Are Preparing the PCR Tubes With the DNA and Master Mix Combos- Samples Prepared as a Team- Photo Credit: Athena Downes
|
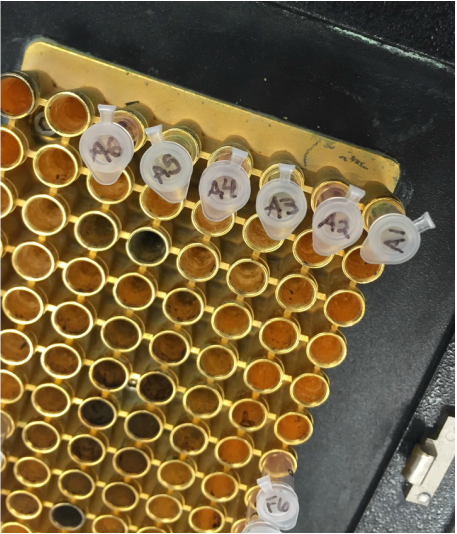
- Here Are Our Prepared PCR Tubes on Ice With Our 3 Types of DNA - We are Waiting to Load the Samples into the PCR Thermal Cycler as a Class - Photo Credit: Athena Downes
|
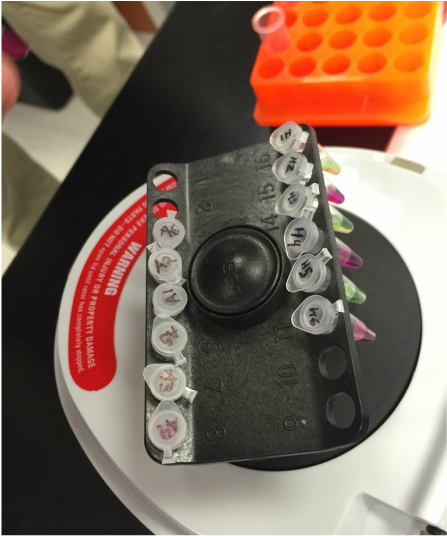
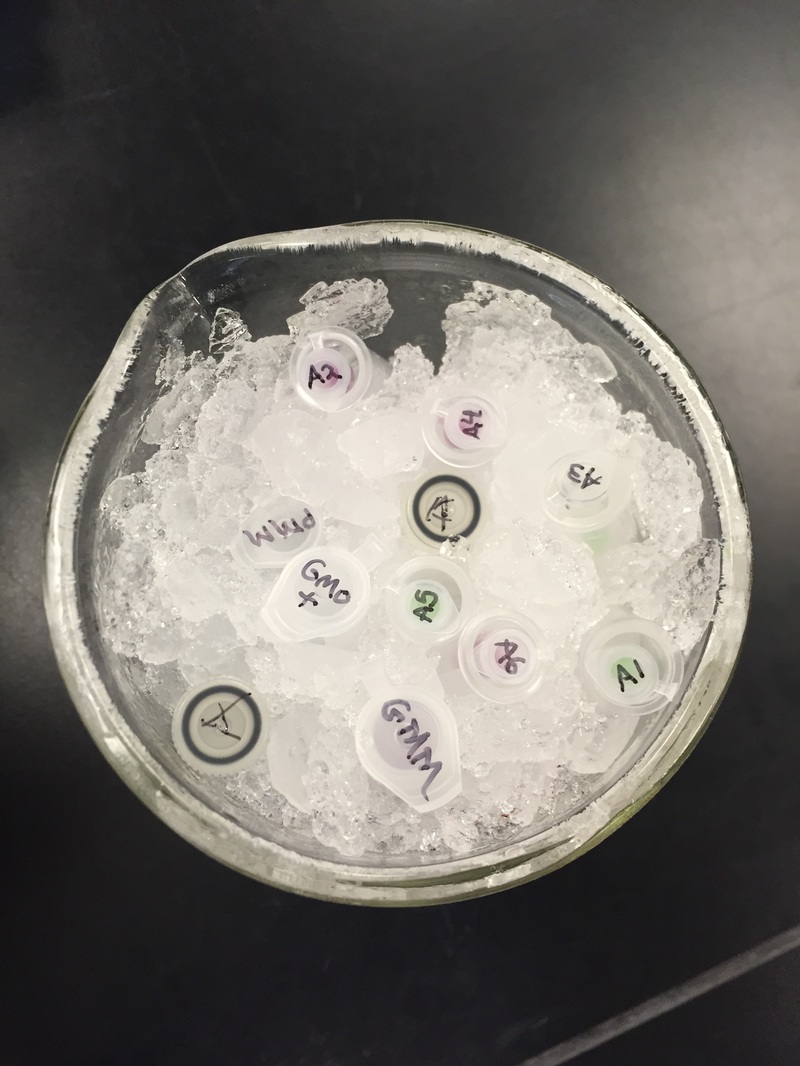
- We Did One Last 5 Second "Spin Down" of our DNA/MasterMix Combos Before We Loaded Them into the Thermal Cycler - A1) GMO [-] DNA / PMM - A2) GMO [-] DNA / GMM - A3) Tostito's DNA / PMM - A4) Tostito's DNA / GMM - A5) GMO [+] DNA / PMM - A6) GMO [+] DNA / GMM - Samples Prepared as a Team - Photo Credit: Athena Downes
|
- All of Our PCR Tubes In the Thermal Cycler Ready for the Primers to Find and Excise the DNA Base Pair Sequences for Which We Are Looking - This Process Will not Only Exicse the Sequences but Copy or "Amplify" Them Until We Have Billions of Copies Which We Will Be Able to Visualize Using Gel Electrophoresis Next Week! - Photo Credit: Athena Downes
|
Watch This Space for Our Exciting Results!
Will our Tostito's "Simply Organic Scoops" be shown to contain Genetically Modified Organisms?!
LAB SIX:
GMO Investigation Part Two
This week we used our PCR products to run gel electrophoresis in order to visualize the results of our PCR amplification from last week. We used both positive and negative controls in order to ensure that we did in fact extract DNA and then have both a GMO and non-GMO result to compare our food sample against.
First we mixed our extracted DNA samples with Orange G dye which helped to keep of DNA in solution and also contained tracking dye of known molecular size so that we can tell when the gel electrophoresis has run to completion. As DNA is negatively charged it runs down the gel to the positively charged end. Also, in lane seven of our gel, we loaded a molecular mass ruler in order to make reading our result more accurate.
We used 2% agarose gel with 30 minutes of run time at 100 volts.
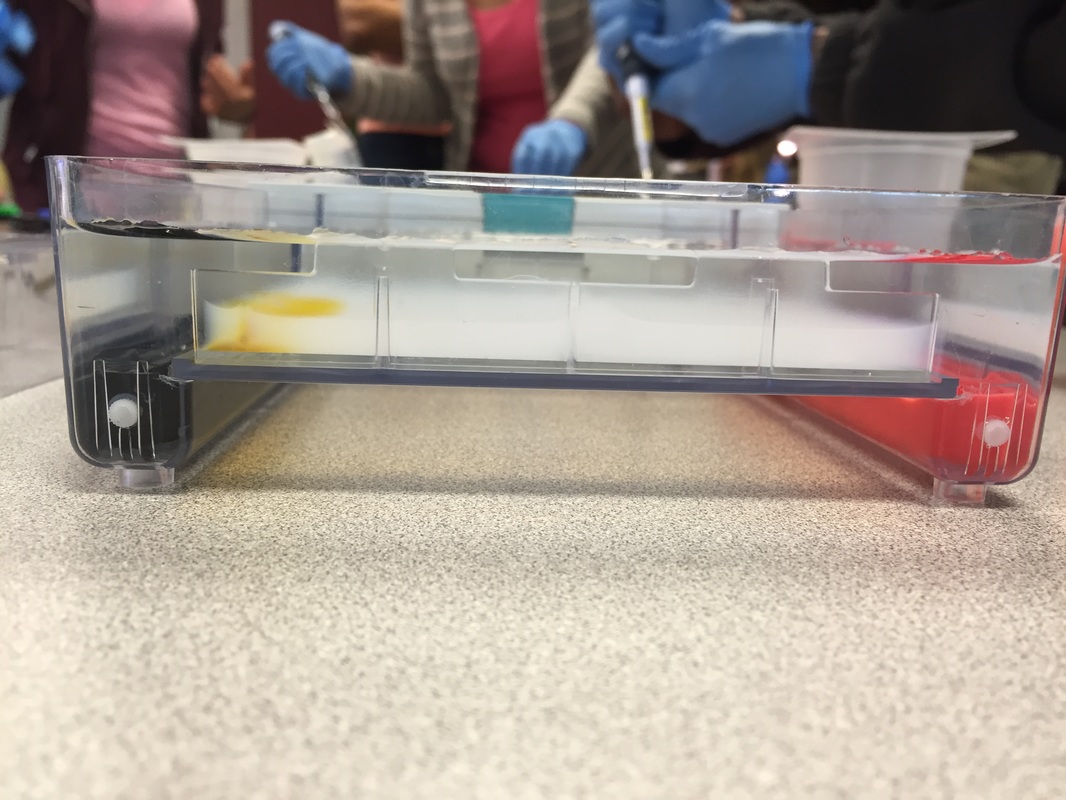
- Depth Profile View of Gel Electrophoresis Tray Showing Our Samples Loaded - Samples Prepared and Loaded by Athena Downes and Kelsey Hymel- Photo Credit: Kelsey Hymel
|

- Overhead View of All 6 Samples and MWR Loaded into the Gel - Left to Right, 1) Non-GMO Food Control with PMM 2) Non-GMO food control with GMM
3) Test food with PMM 4) Test food with GMM 5) GMO Positive Control with PMM 6) GMO Positive Control with GMM 7) PCR Molecular Weight Ruler (MWR) - Photo Credit: Kelsey Hymel
|
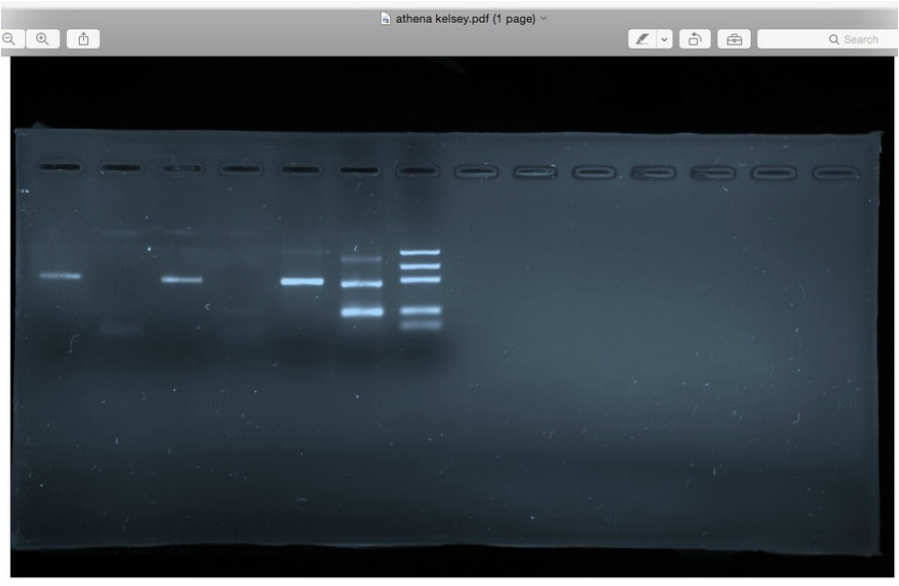
- Gel Electrophoresis Results- Lanes 1,3,5 Show Successful Extraction of Plant DNA - Lane 2 [GMO - Control] Shows the Absence of GMO DNA While Lanes 4 [tostitos sample] ,6 [GMO + control] Show GMO DNA - Photo File Provided by Dr. LP -
RESULT: USDA CERTIFIED ORGANIC TOSTITOS SHOWED GMO POSITIVE RESULT!
OF COURSE, TO BE DULY DILIGENT WE WOULD WANT TO RETEST OUR SAMPLE TO CONFIRM; BUT THIS HI-LIGHTS THE NEED FOR GMO LABELING. WE PURCHASED "USDA ORGANIC" CHIPS TRYING TO AVOID CHEMICALS / ARTIFICIAL ELEMENTS, AND- WHILE PAYING MORE FOR LESS VOLUME-IN THE END WE WERE STILL INGESTING GENETICALLY MODIFIED ORGANISMS.
LAB SEVEN:
Bryophytes (Non-Vascular Plants) and Ferns (Seed- Free Plants)
This week in lab we got up close and personal with representatives of Phylum Bryophyta (true mosses), Phylum Hepaticophyta (liverworts) and Phylum Monilophyta (ferns). We learned about their specialized life cycles and observed the gametophyte and sporophyte generations of each taxon.
"My favourite part of this lab was getting to see the male and hermaphrodite gametophytes. Marvellous, microscopic masterpieces of biological ingenuity. Fantastic." - Athena Downes
"My favorite part of the lab was the examination of the leaf-like structure of Sphagnum sp. (or "peat moss") since it truly confirmed that mosses lack vascular tissue. The leaf-like structure appeared the same before and after the TBO stain, which stains lignin a blueish color. Though the leaf-like structure does resemble a leaf, this test proves that it is in fact NOT a true leaf as it lacks vascular tissue that would've been visible with the TBO stain if present." - Kelsey Hymel
-the Mosses:
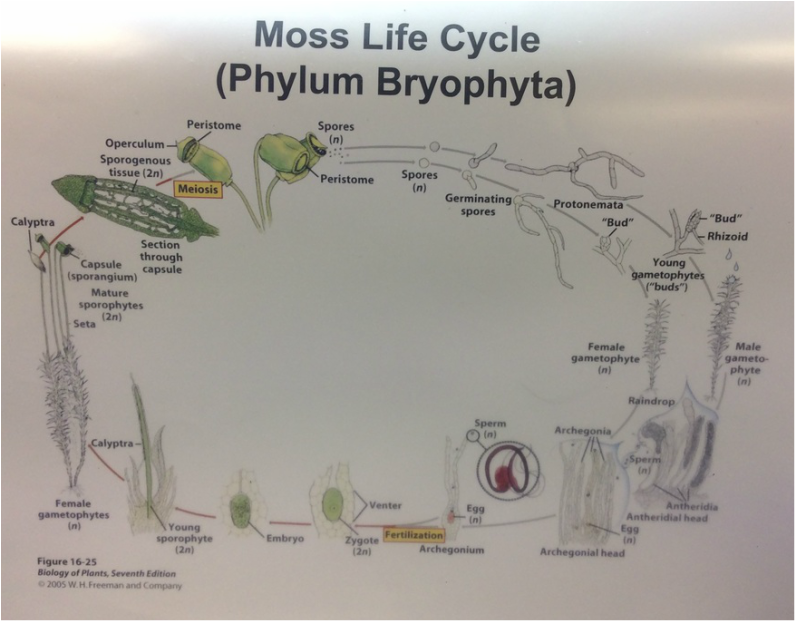
Photo Credit: Athena Downes
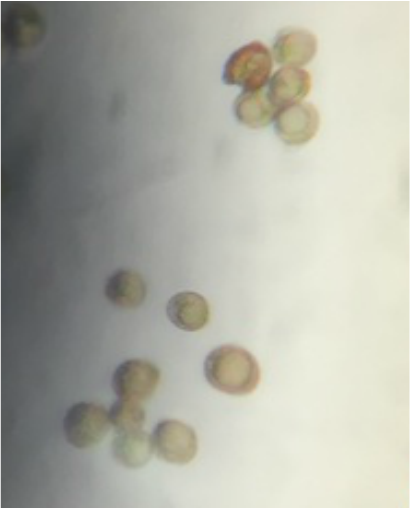
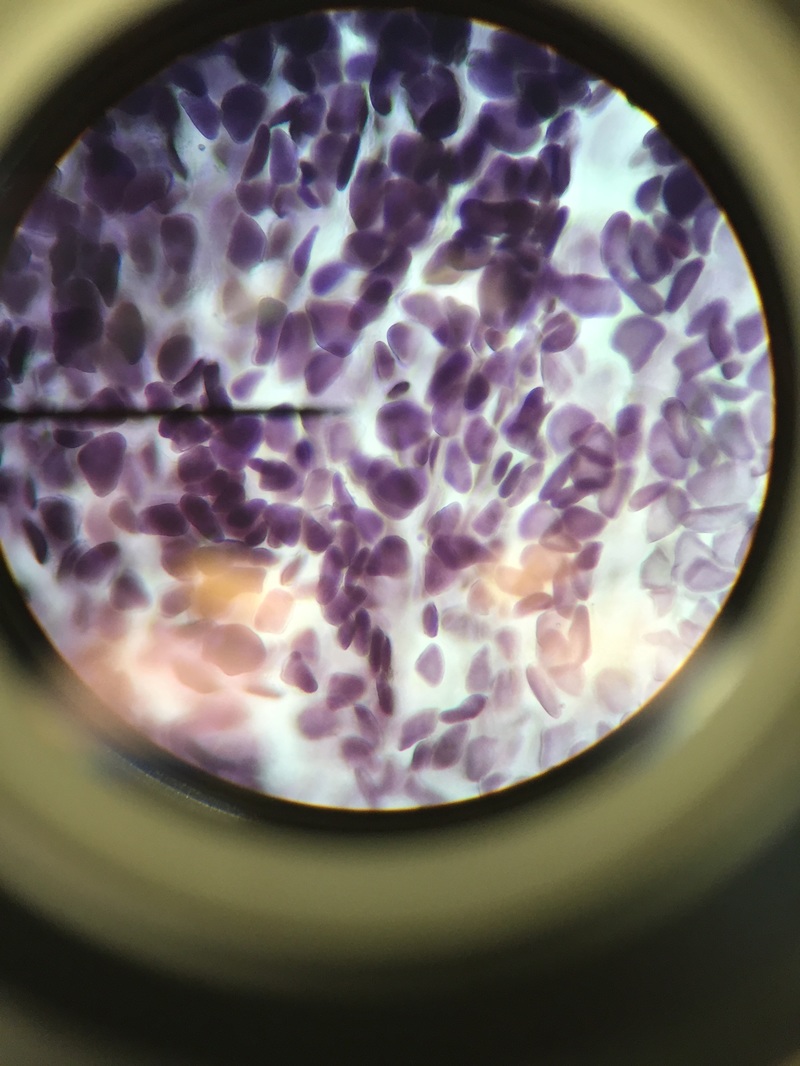
- Wholemount of Moss Spores ( Polytrichum sp.) - Slide Prepared by Dr. LP - Dissecting Scope - 30X Magnification - Photo Credit: Kelsey Hymel - Moss Spores are Produced in the Sporangia of the Sporophyte Which Grows out of the Female Archegonia on the Female Gametophyte - Each Haploid Spore will Grow into a New Male or Female Gametophytes Upon Germination -
|
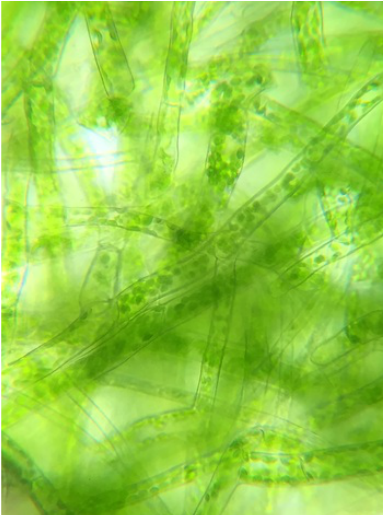
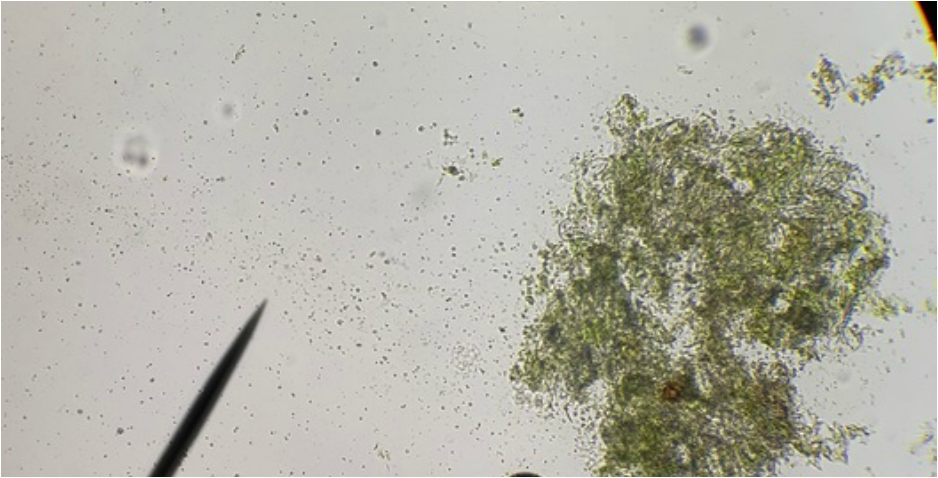
- Wholemount of Living Moss Protonema and Bud - Viewed Under Compound Microscope - 400X Magnification - Slide Prepared by Athena Downes - Photo Credit: Kelsey Hymel - The Moss Protonema Grows Out of the Germinating Spores and Then "Buds" Form off the Protonema to Grow Upward into Gametophytes -
|
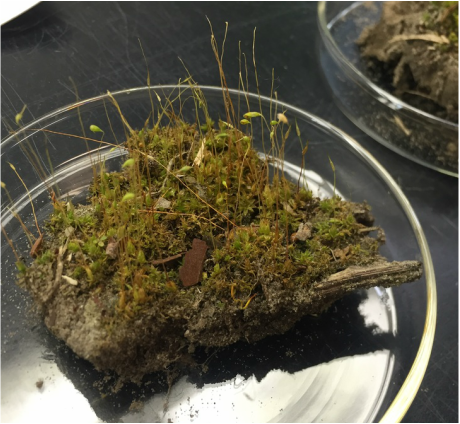
- Moss Gametophytes with Sporophyte Attached - Unidentified Species - Photo Credit: Athena Downes -
|
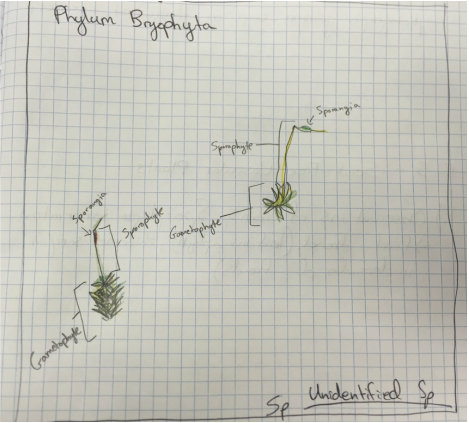
- Moss Gametophytes with Sporophyte Attached - Drawing by Athena Downes - Photo Credit: Athena Downes -
|
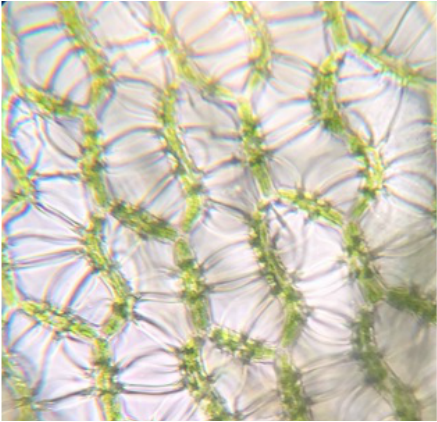
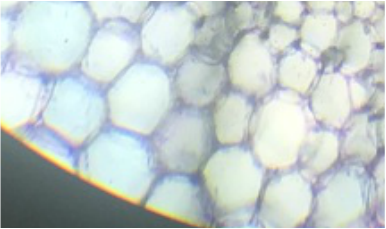
Whole Mount of Sphagnum Moss - No Stain Applied - Viewed Under Compound Microscope - 400X Magnification - Slide Prepared by Kelsey Hymel - Photo Credit: Kelsey Hymel - Note the Beautiful Chlorophylous Cells Full of Chloroplasts and the Colorless Hyaline Cells -
|
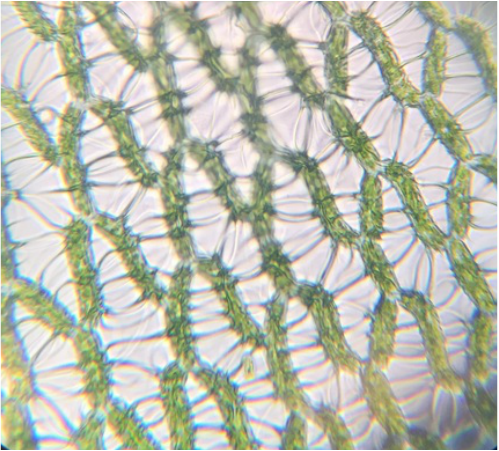
Whole Mount of Sphagnum Moss - TBO Stain Applied - Viewed Under Compound Microscope - 400X Magnification - Slide Prepared by Kelsey Hymel - Photo Credit: Kelsey Hymel - Note the Absence of Blue Lignin Marker from the TBO Stain - This Confirms that Lignin is Absent in Non-Vascular Moss -
|
-the Liverwort:
(Phylum Hepaticophyta)
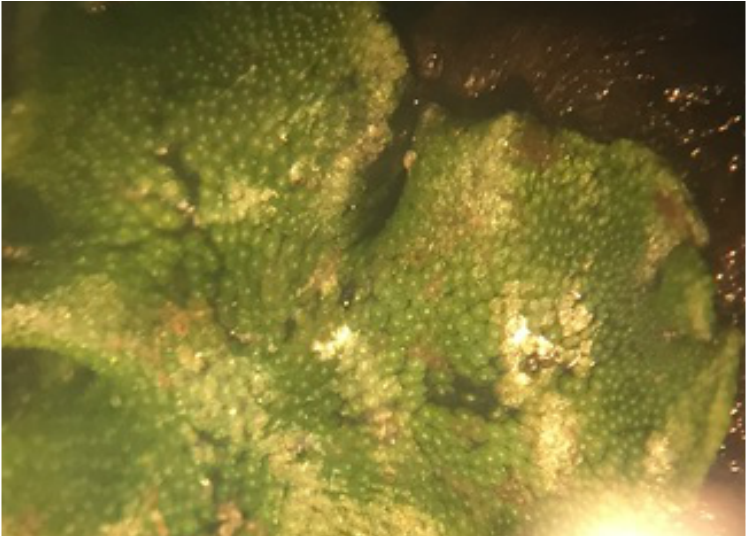
- Phylum Hepaticophyta Liverwort ( Marchantia sp.) Thallus Viewed Under Dissecting Scope - 30x Magnification - Specimen Prepared by Dr. LP - Photo Credit: Kelsey Hymel - Note the Pores in the Surface of the Tissue Which Allow Gas Exchange -
-the Ferns:
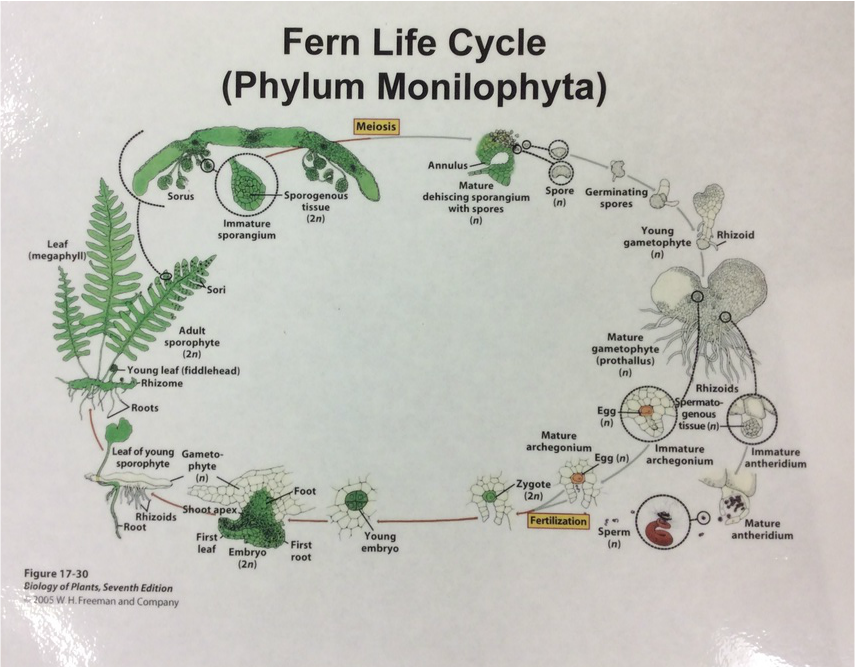
Photo Credit: Athena Downes
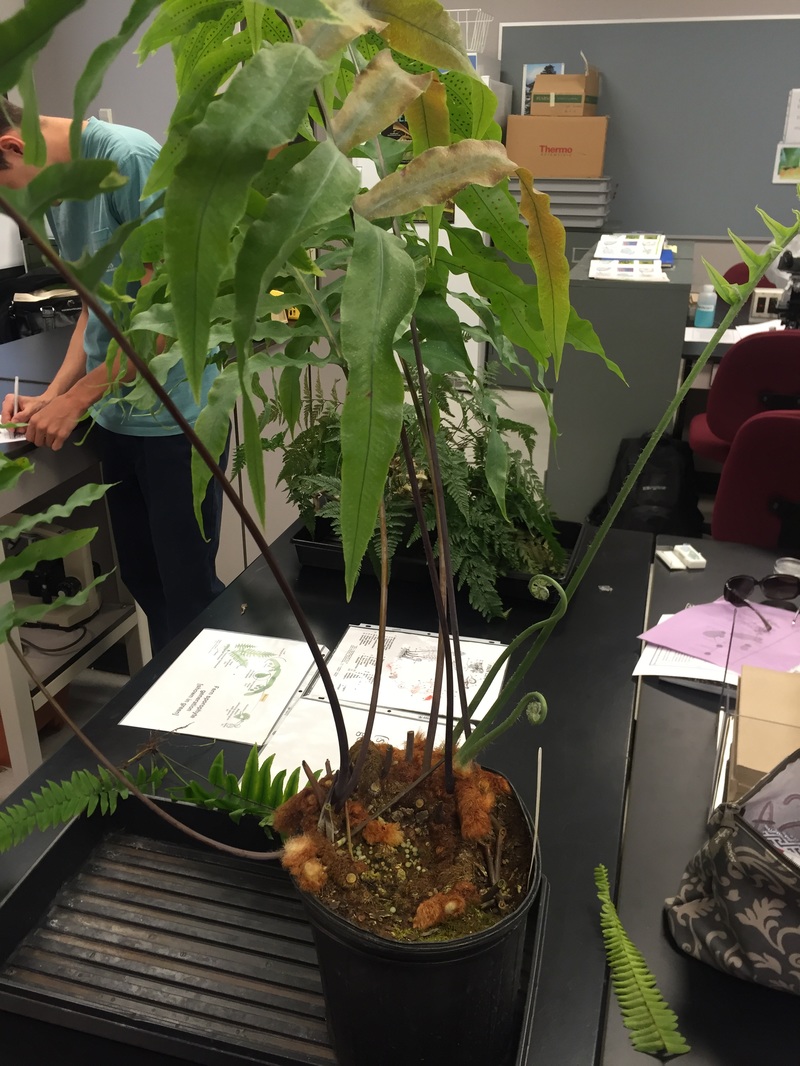
- Fern ( Phlebodium sp. ) Sporophyte Showing Fronds, Rhizomes, Sori, and Fiddleheads - Photo Credit: Kelsey Hymel - Note the Rare Chris (Homo sapiens) Positioned Behind the Fern Fronds Taking Studious Notes -
|

- Drawing by Kelsey Hylmel of Fern (Phlebodium sp.) Sporophyte Showing Fronds, Rhizomes, Sori, and Other Distinguishing Features - Photo Credit: Kelsey Hymel
|
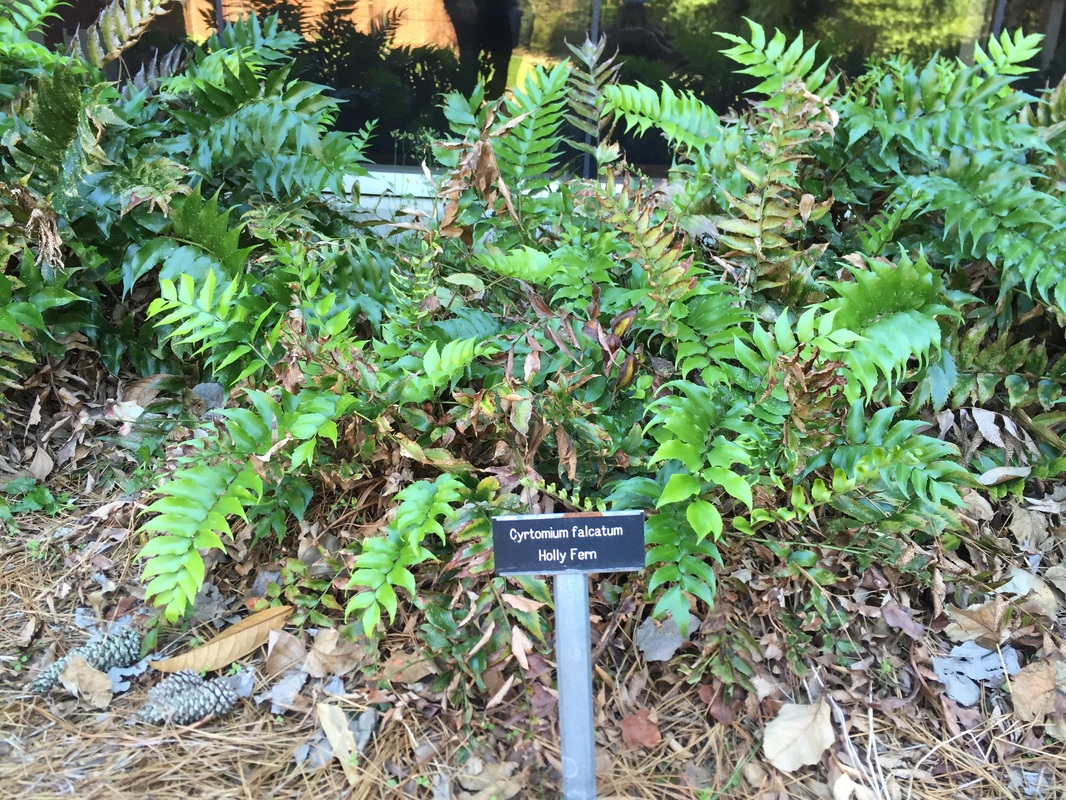
- We Ventured Onto Campus and Found this Holly Fern (Cyrtomium falcatum) Outside the Science Center - We Collected a Frond with Sori on the Underside to Examine Back in the Lab - Photo Credit: Kelsey Hymel -
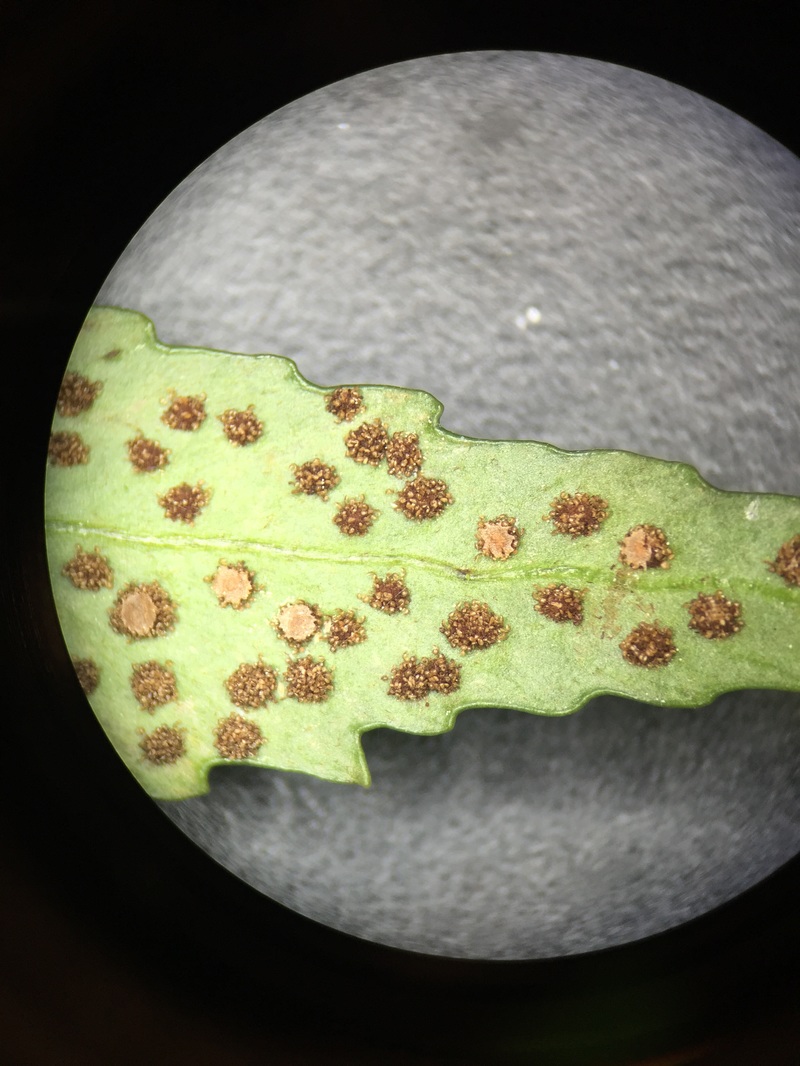
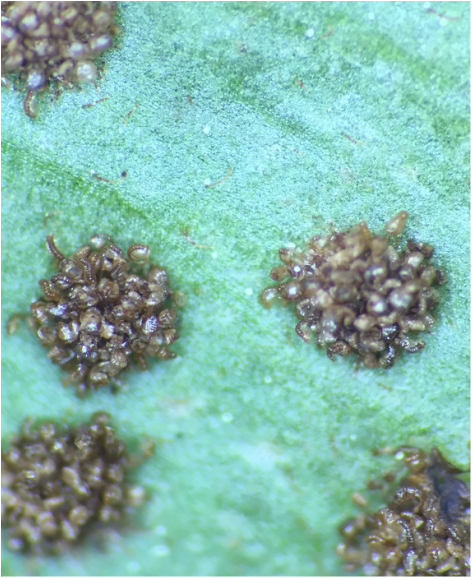
- Holly Fern (Cyrtomium falcatum) Abaxial Surface Showing Sori Which are Clusters of Sporangia - Viewed Under Dissecting Microscope - 7.5X Magnification - Photo Credit: Athena Downes - Note the Blister-like Indusium Which are Flaps of Tissue that Protect the Sporangia Unitl They are Mature -
- Sporangia Clustered into Sori on Abaxial Surface of Fern Frond (Cyrtomium falcatum) - Viewed with Dissecting Microscope - 30X Magnification - Photo Credit: Athena Downes
|
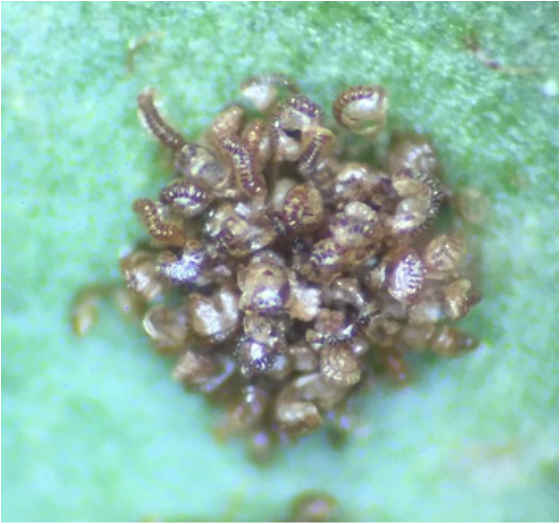
- Sporangia Clustered into Sori on Abaxial Surface of Fern Frond (Cyrtomium falcatum) - Viewed with Dissecting Microscope - 50X Magnification - Photo Credit: Athena Downes - Note the Annulus with Characteristic Thick and Thin Layers of Cells to Promote Uneven Drying and Eventual Breaking Open to Release the Spores -
|
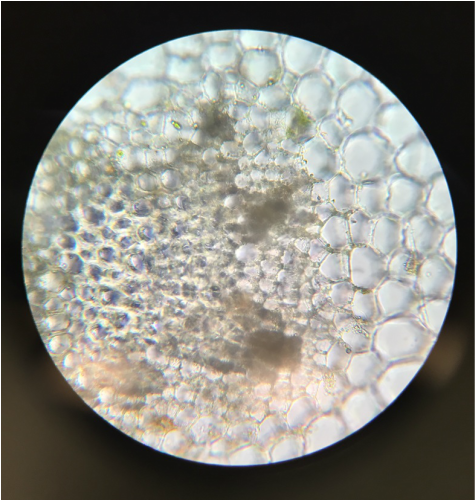
- Cross Section of Fern Stem ( Psilotum sp.) - Specimen not Stained - Slide Prepared by Kelsey Hymel - Compound Microscope - 400X Magnification- Photo Credit: Kelsey Hymel -
|
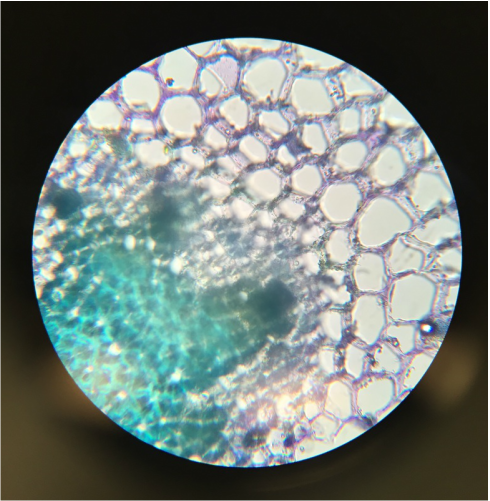
- Cross Section of Fern Stem ( Psilotum sp.) - TBO Stain Applied - Slide Prepared by Kelsey Hymel - Compound Microscope - 400X Magnification - Photo Credit: Kelsey Hymel - Note the Bright Blue/Green Colour of the Inner Lignified Vascular Tissues Made Visible by the TBO Stain -
|
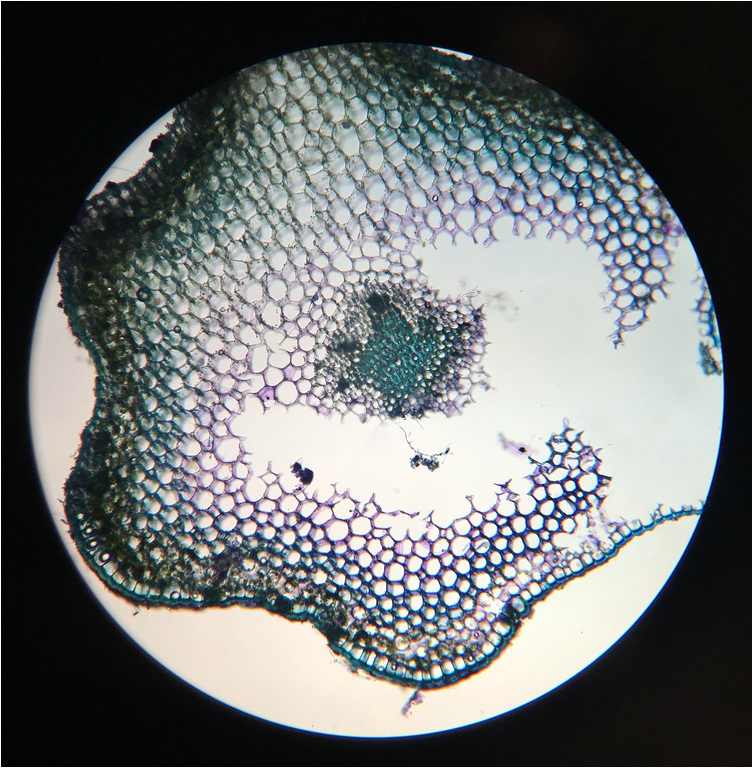
- Cross Section of Fern Stem ( Psilotum sp.) - TBO Stain Applied - Slide Prepared by Kelsey Hymel - Compound Microscope - 40X Magnification - Photo Credit: Kelsey Hymel - Note the Bright Blue/Green Colour of the Exterior and Inner Lignified Vascular Tissues Made Visible by the TBO Stain -

- Psilotum sp. "Whisk" Fern - Note the Yellow Sporangia on Tips - Also the Dichotomous Branching and Photosynthetic Stems - This Fern Lacks True Leave and Roots - Photo Credit: Athena Downes -
|
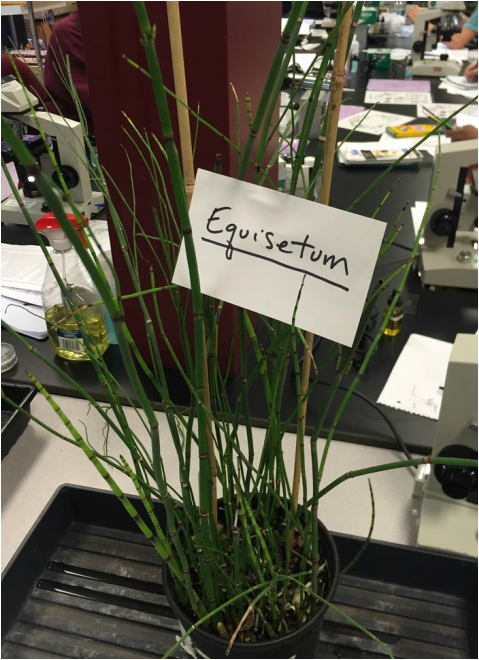
- Equisetum sp. "Horsetail" Fern - Note the Small Scale-like Leaves in the Whorls at Nodes - This Fern has Silica in its Epidermal Cells and was Known to Pioneers as the "Scouring Rush" as it was Used to Scrub Things Clean - Photo Credit: Athena Downes -
|
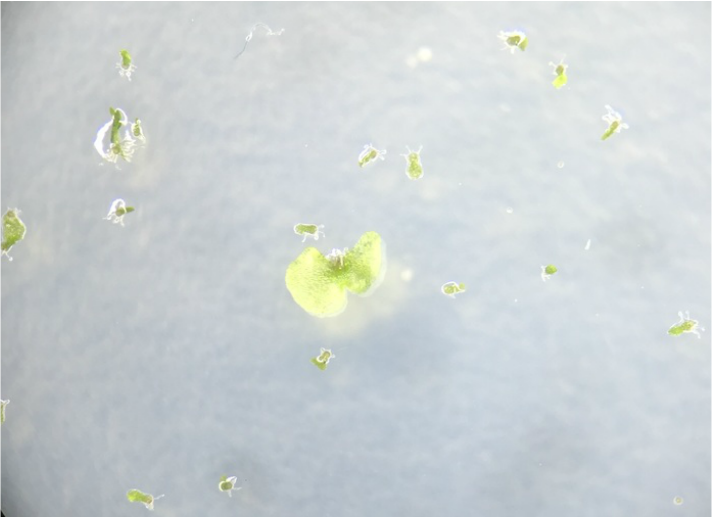
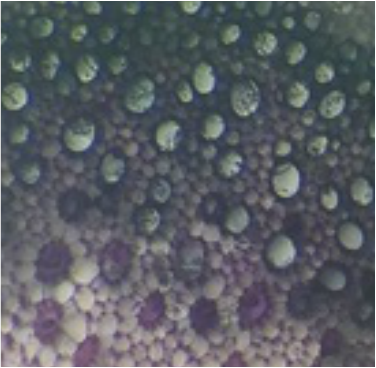
- C-fern Gametophytes on an Agar Plate - Viewed Under Dissecting Microscope - 7.5X Magnification - Note the Large Hermaphrodite Surrounded by the Minuscule Males - Photo Credit: Athena Downes -
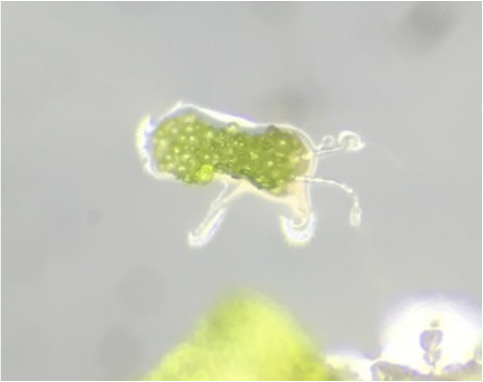
- C-fern Male Gametophyte on an Agar Plate - Viewed Under Dissecting Microscope - 50X Magnification - Photo Credit: Athena Downes -
|
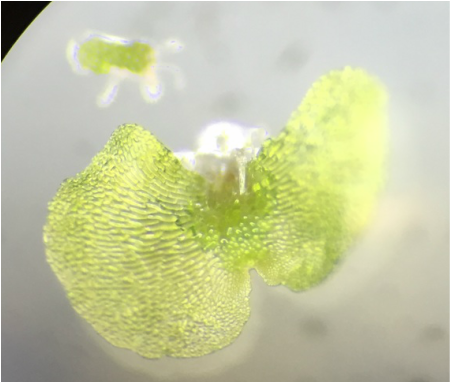
- C-fern Hermaphrodite Gametophyte in Front Focus on an Agar Plate - Viewed Under Dissecting Microscope - 50X Magnification - Note the Out-of-Focus Male Gametophyte for Size Comparison - Photo Credit: Athena Downes -
|
- Whole-mount C-fern Male Gametophyte - Viewed Under Compound Microscope - 40X Magnification - Slide Prepared by Athena Downes - Photo Credit: Athena Downes -
- Whole-mount C-fern Male Gametophyte - Viewed Under Compound Microscope - 100X Magnification - Slide Prepared by Athena Downes - Photo Credit: Athena Downes -
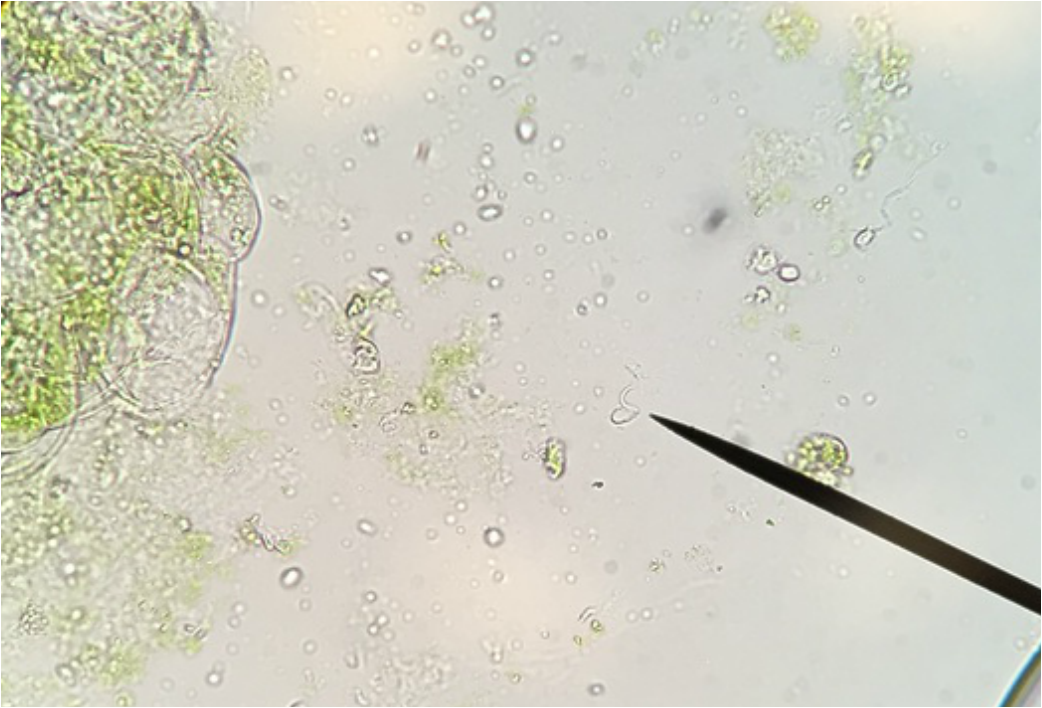
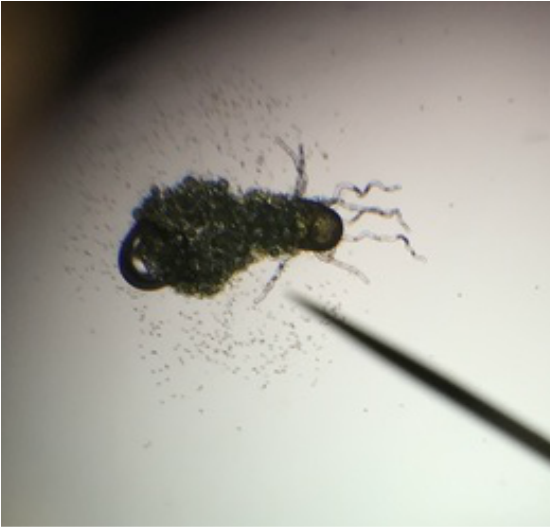
- Whole-mount C-fern Male Gametophyte - Viewed Under Compound Microscope - 400X Magnification - Slide Prepared by Athena Downes - Photo Credit: Athena Downes - Note the Gametophyte Sperm on the Tip of the Pointer - Man Did We have to Wait a Long Time for Him to Stop Swimming! -
LAB EIGHT:
Gymnosperms and Angiosperms (Seed Plants)
This week we took a campus walk to explore Armstrong's on-site arboretum and experienced for ourselves some living representatives of gymnosperms and angiosperms. As we visited each specimen we talked about the life cycles and sequences of events for each taxon. For gymnosperms we visited a cycad, a ginkgo, a gnetophyte, and a conifer; and then for angiosperms we collected flower samples and dissected them back in the lab.
"My favorite specimen in this lab was definitely getting to see the ginkgo tree that is here on campus! I did not know that we had one, and I really enjoyed the unique opportunity to see a such a special species firsthand!." -Athena
"My favorite specimen in this lab was the Dawn Redwood. I loved hearing the story of how scientists only knew of this plant species from fossilized remains and thought to be extinct until living members were found only several decades ago. The fact that this tree resides on campus shows the power of conservation as Dr. LP told our class that once this species was found, its seeds were shipped to campuses all over the United States. It's really neat to know that I pass by a "living fossil" of sorts nearly everyday." -Kelsey

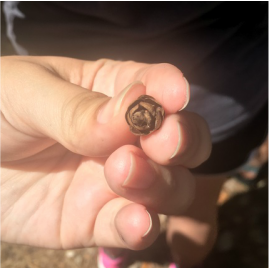
- Female Pine (Pinus sp.) Cone - Photo Credit: Athena Downes -
|
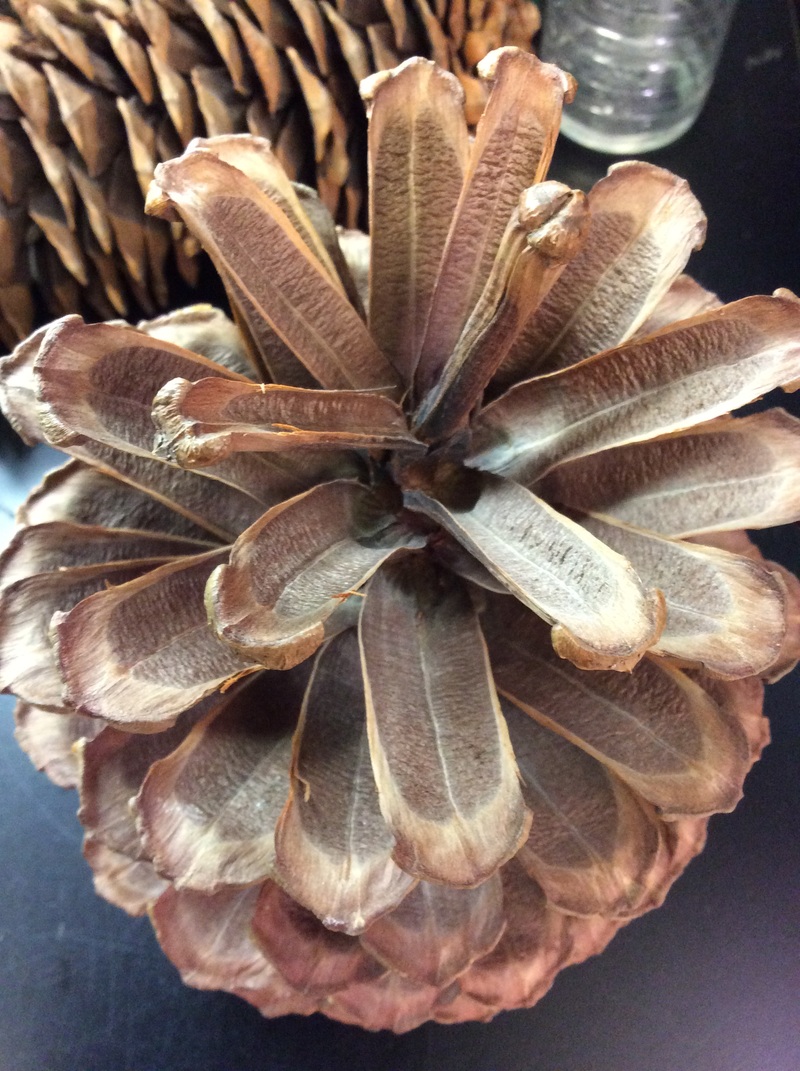
- Female Pine (Pinus sp.) Cone - Photo Credit: Athena Downes - Notice two depressions on the upper surface of each woody scale. This is where the ovules were located [after fertilization the ovules develop into seeds]. -
|
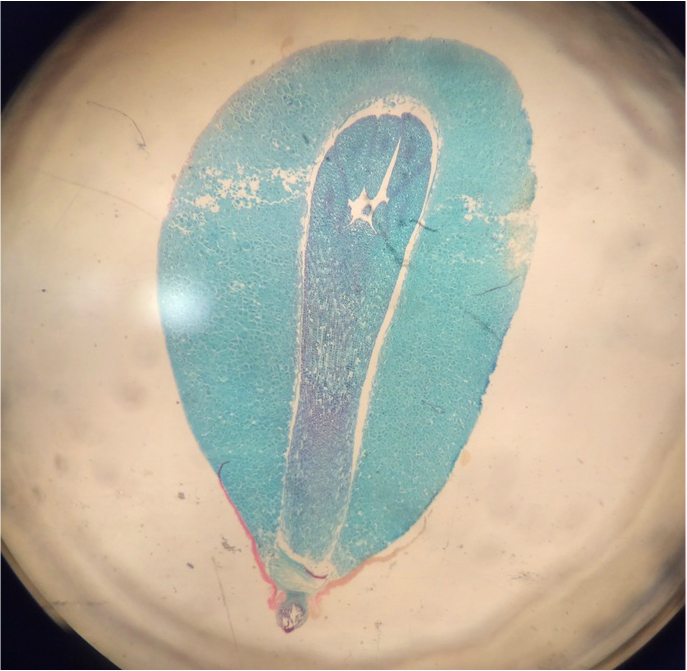
- Mature Pine (Pinus) Embryo - Prepared Longitudinal Section Slide - Dissecting Scope - 30X Magnification - Photo Credit: Athena Downes -
|
|
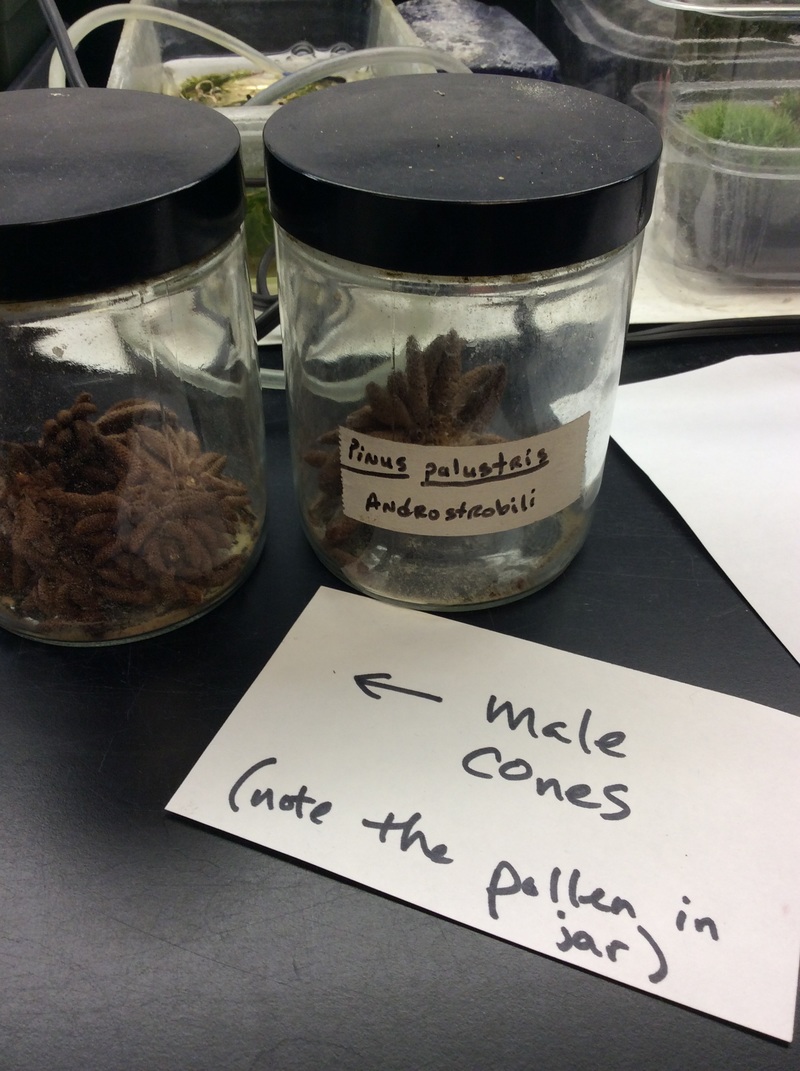
- Mature Male Pine (Pinus sp. ) Cone - Prepared Slide - Compound Microscope - 40X Magnification - Photo Credit: Athena Downes - Note the Pollen Ready to be Released -
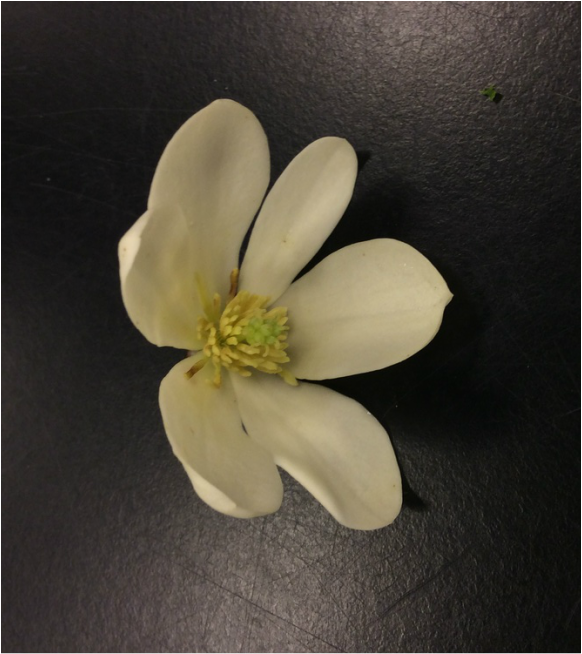
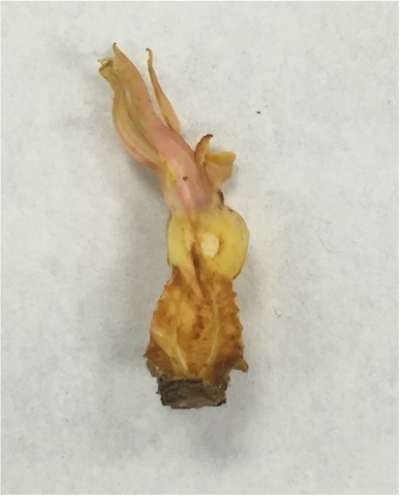
- Brown Velvet Magnolia ( Magnolia laevifolia ) - Specimen Collected for Dissection by Athena Downes - Photo Credit: Athena Downes -
|
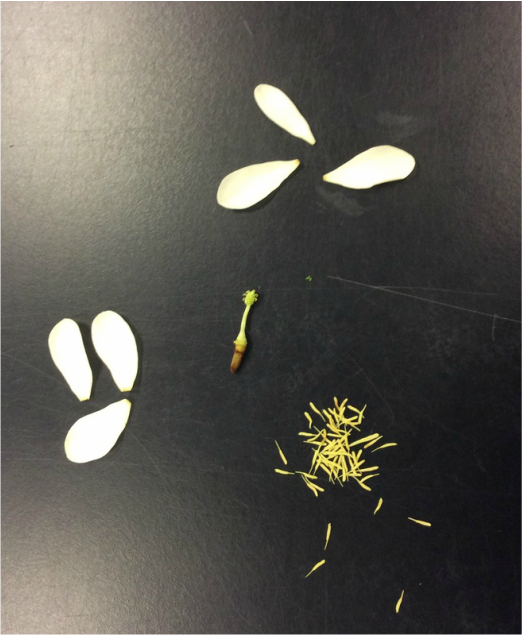
- Floral Dissection Results ( Magnolia laevifolia) - Actinomorphic (Radial) Symmetry - Complete (Four Whorls Present) - Perfect (Male Stamen and Female Carpel Present) - Superior Ovary Position - Photo Credit: Athena Downes -
|
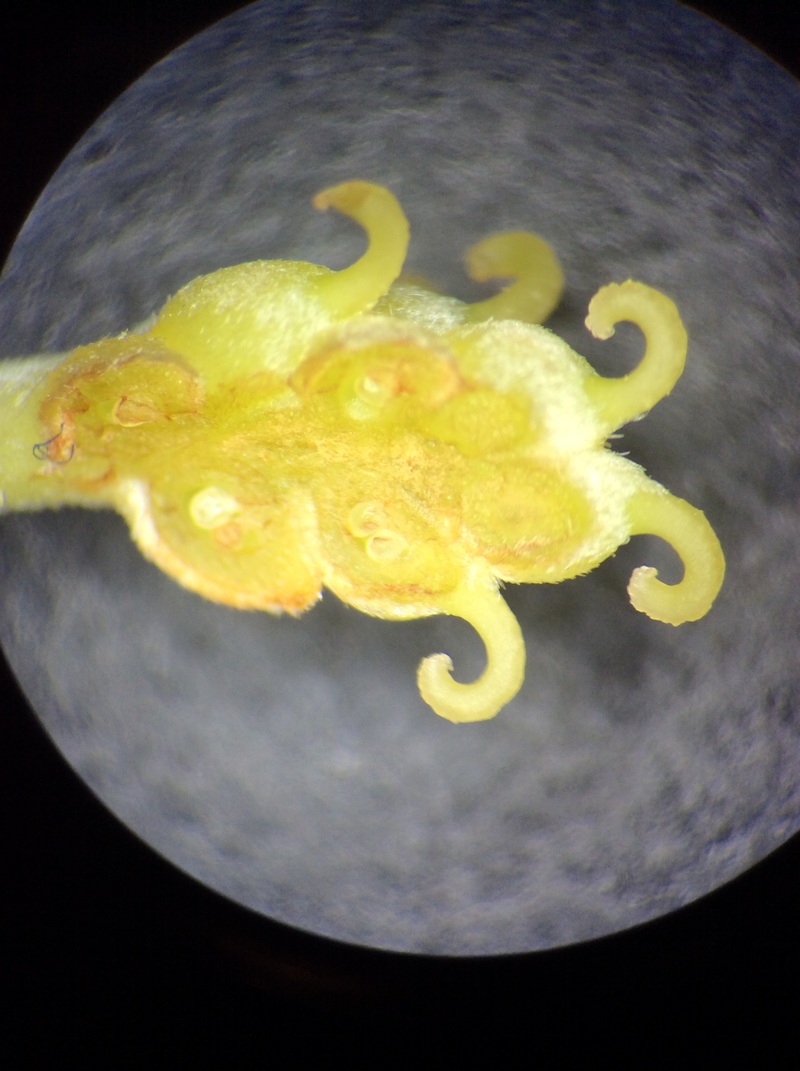
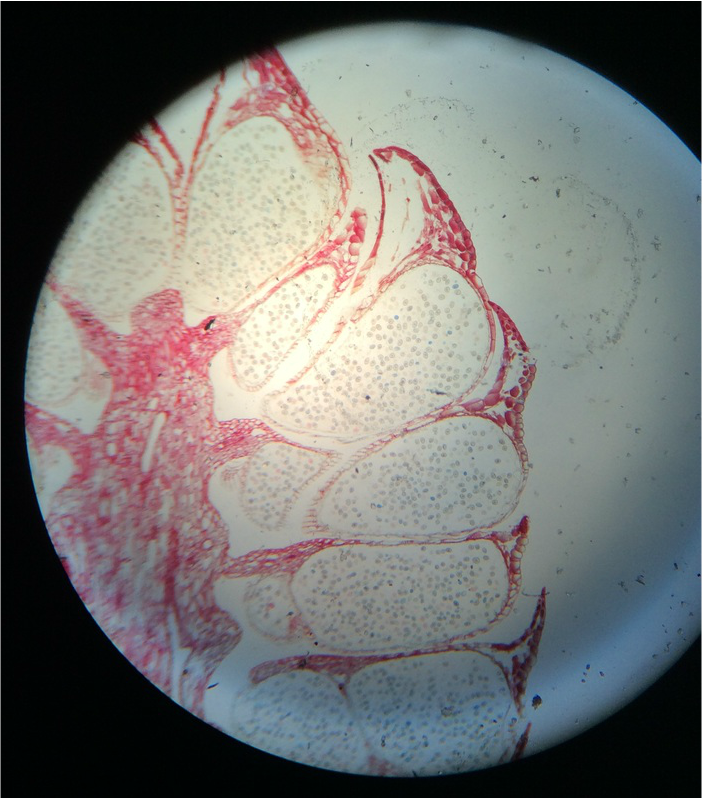
- Longitudinal Section of Magnolia laevifola - Specimen Prepared by Athena Downes - Dissecting Scope - 30X Magnification - Note the Multiple Stigma, Style, Carpels - Also the Ovaries and Seeds - Photo Credit: Athena Downes

- Gymnosperm - Gingko tree (Gingko biloba) - Phylum Ginkophyta - Photo Credit: Kelsey Hymel - This tree drops all of its leaves seasonally and is the only species left in Phylum Gingkophyta. When a ginko tree loses its leaves, they they fall all at once and sound like a waterfall. -
|
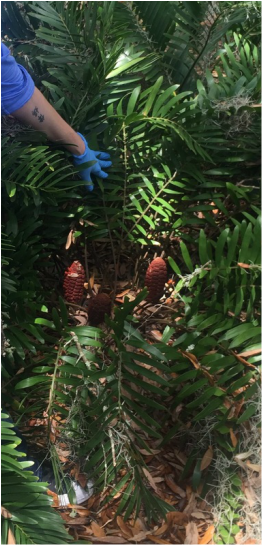
- Gymnosperm - Cycad with Toxic Female Cones Present ( Cycas sp.) - Phylum Cycadophyta - Photo Credit: Kelsey Hymel - These plants were present 300 million years ago, and their cones were a diet staple of the dinosaurs. The high fiber content of these cones are likely to have been a major digestive irritant to the dinosaurs. -
|
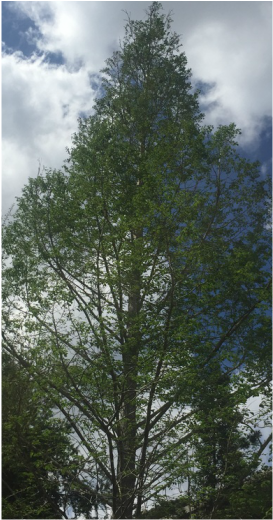
- Gymnosperm - Dawn Redwood (Metasequoia glyptostrobiodes) - Phylum Coniferaphyta - Photo Credit: Kelsey Hymel - Note each "needle" is a leaf. This is a deciduous (drops all its leaves annually) conifer. Also, this tree, originally native to China, was thought to be extinct and known only as a fossil until 1944 when it was found in a gorge in the Szechuan Province of China! [Side note, the leaves feel silky soft.]
|
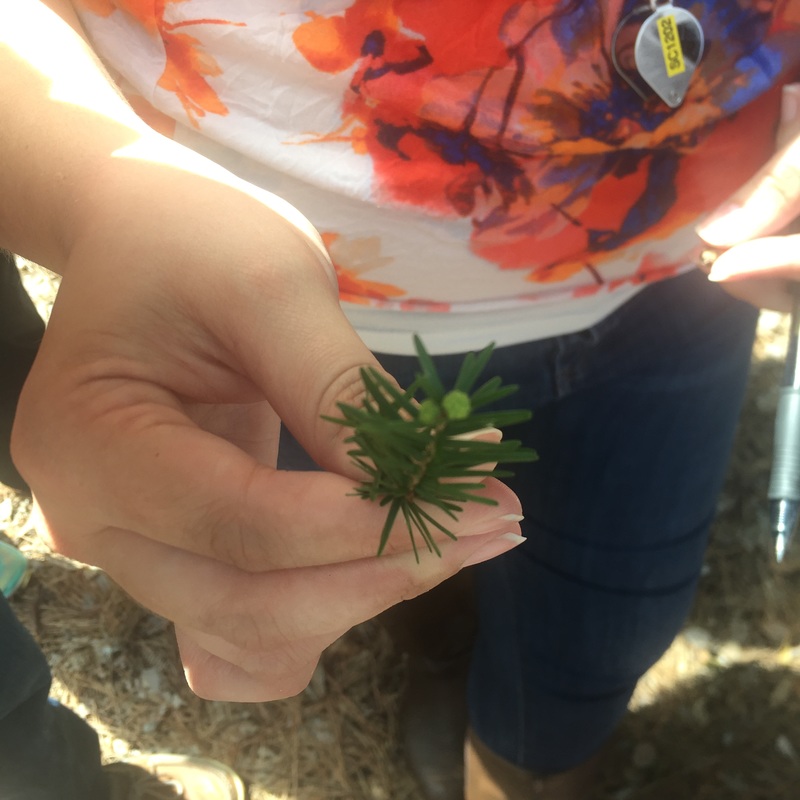
- Gymnosperm - Branch with Leaves and Male Cones (Above) and Female Cone (Below) of Canadian Hemlock (Tsuga canadensis) - Phylum Coniferaphyta - Photo Credit: Kelsey Hymel - Note this is an evergreen, and its stomata are arranged on the bottom of each leaf to prevent water loss. -
|
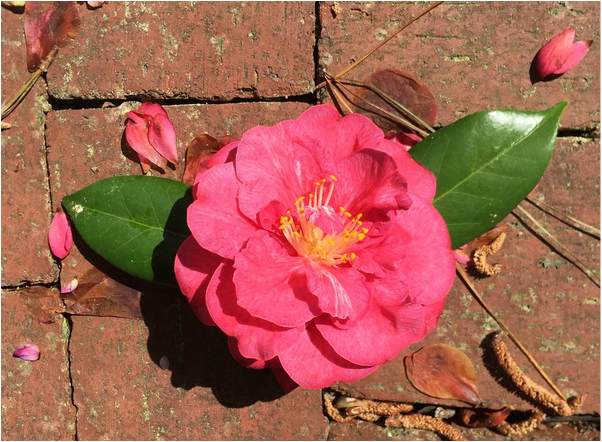
- Flower of Japanese Camellia (Camellia japonica) - Specimen Collected for Dissection by Kelsey Hymel - Photo Credit: Kelsey Hymel -
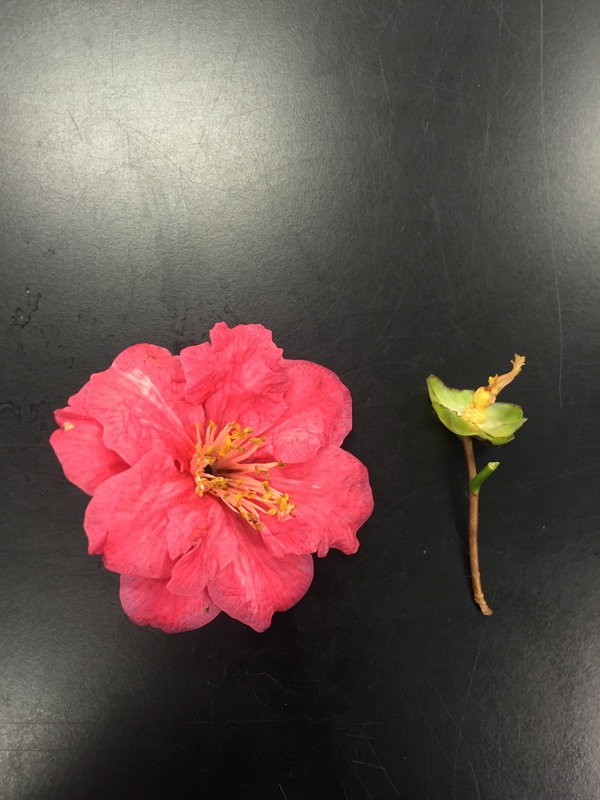
- On the Left: Flower Petals and Stamens of Japanese Camellia (Camellia japonica) - On the Right: Carpal and Sepals attached to Receptacle of Japanese Camellia (Camellia japonica) - Actinomorphic (Radial) Symmetry - Photo Credit: Kelsey Hymel -
|
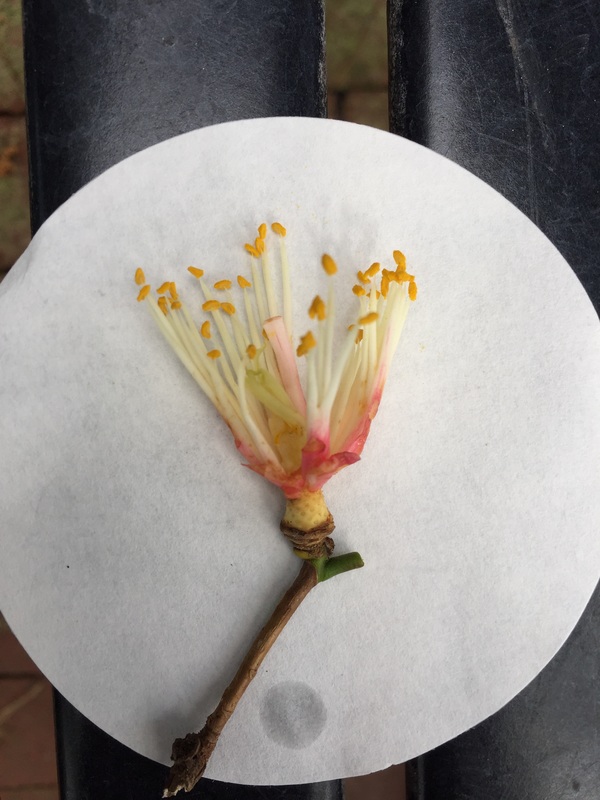
- Stamens and Carpal of Japanese Camellia (Camellia Japonica) - Perfect Flower (Both Male and Female Parts) - Photo Credit: Kelsey Hymel -
|
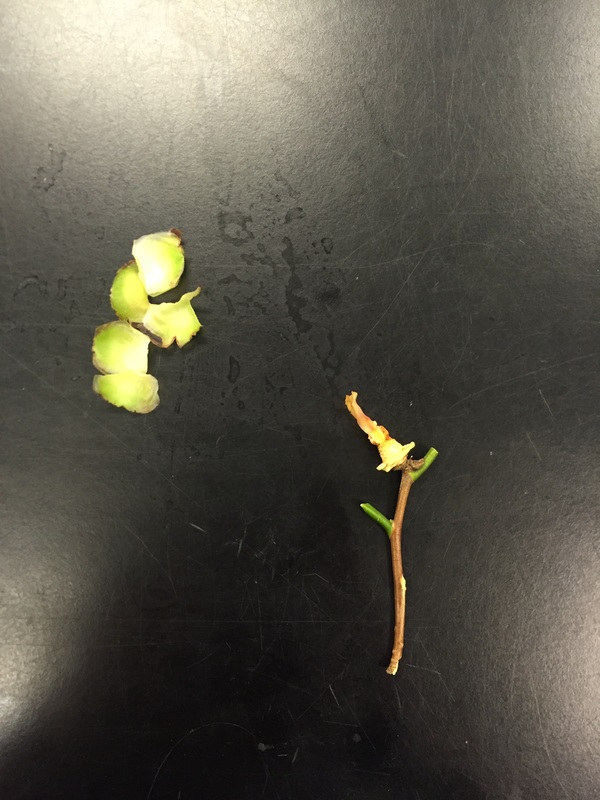
- On the Left: Sepals of Japanese Camellia (Camellia japonica) - On the Right: Carpal of Japanese Camillia (Camellia japonica) attached to Receptacle - Complete Flower with all Four Whorls Present (Sepals and Carpal Present in this Photo; Petals and Stamens Present in Photo on Far Left Showing Radial Symmetry) - Photo Credit: Kelsey Hymel -
|
- Longitudinal Cross Section of Carpel from Japanese Camellia (Camellia japonica) with Unaided Eye - Superior Ovary Placement - Photo Credit: Kelsey Hymel -
|

- Longitudinal Cross Section of Japanese Camellia (Camellia japonica) Showing Ovules in the Center - Dissecting Scope - 30X Magnification - Specimen Prepared and Photographed by Kelsey Hymel -
|
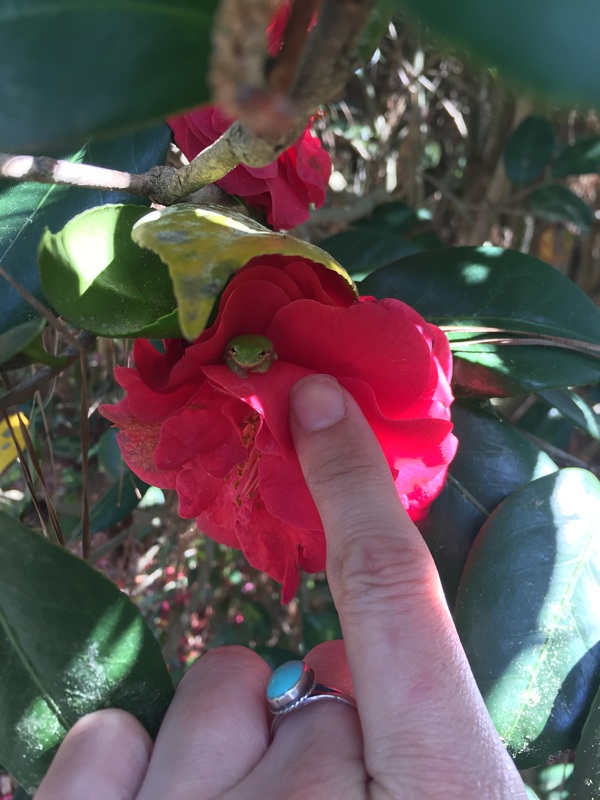
Georgia Green Tree Frog (Hyla cinerea) in Flower of Japanese Camellia (Camellia japonica) - Photo Credit: Kelsey Hymel - Note how lucky she is to have observed this cute little guy! -
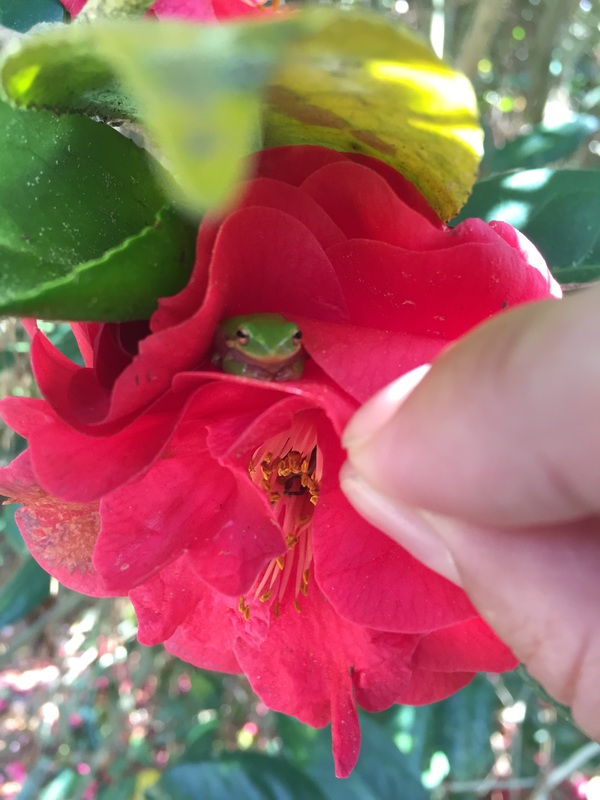
Georgia Green Tree Frog (Hyla cinerea) in Flower of Japanese Camellia (Camellia japonica) - Photo Credit: Kelsey Hymel - Seriously he is so cute you have to look at another picture! #getoutside #natureisamazing -
LAB NINE:
Root and C-Fern Observations (& Shoot Cuttings)
This week in lab we used our sporophyte agar plates and sketches of monocot and dicot roots to identify the external features of plant roots, including root hairs. We also examined the internal structures with our compound microscopes and cross sections of the one week old monocot and dicot roots. We learned to distinguish the external morphology and internal anatomy of dicot roots from monocot roots.
Roots anchor plants to substrate; absorb water and minerals; conduct water, minerals, and carbohydrates; and store carbohydrates in the form of amyloplast starches.
"My favourite thing this lab period was the mitotic squash. What a joy to see the stages of mitosis frozen in time, and to think about how this is the way that living things grow. Amazing!" -Athena Downes
"My favorite part of this lab was the primary root cross-section I prepared from the monocot Zea mays (or corn). Generally, I am able to prepare my own slides with little trouble, however, this time that was not the case. Not only did I try using the stain for suberin unsuccessfully, I had to prepare two additional slides using the TBO stain, which stains for lignin, in order to slice the cross-section just right. The difficulty of cutting the primary root from such a small specimen proved to be a challenge, and though I do enjoy a challenge, I was not alone in the frustration of producing an adequate cross-section. However, patience and consistency eventually paid off, and I was pleased with my final results at last!" -Kelsey Hymel
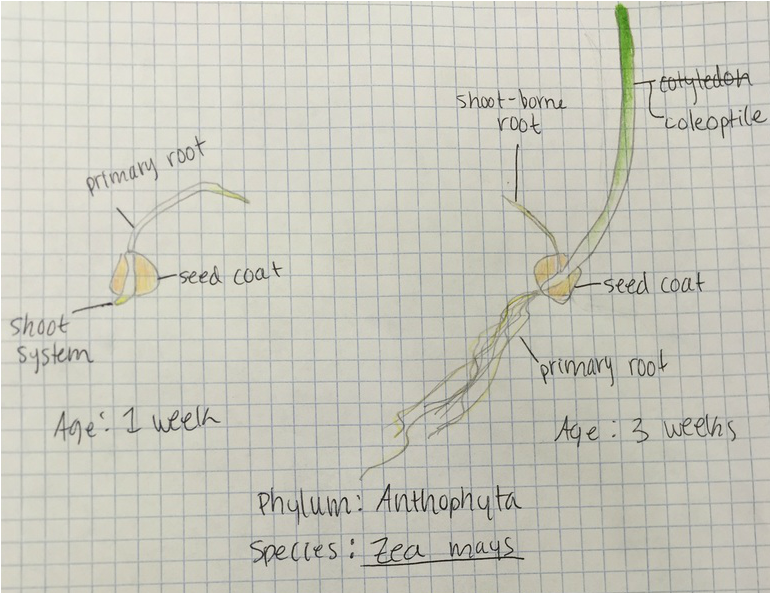
Sketch of Monocot Corn ( Zea Mays ) Seedlings at Age 1 Week and Age 3 Weeks by Kelsey Hymel - Photo Credit: Kelsey Hymel - This Monocotyledon Shows a Primary Root at 1 Week that is Short-Lived and Develops into a Fibrous Root System Composed of Adventitious or "Shoot-Born" Roots -
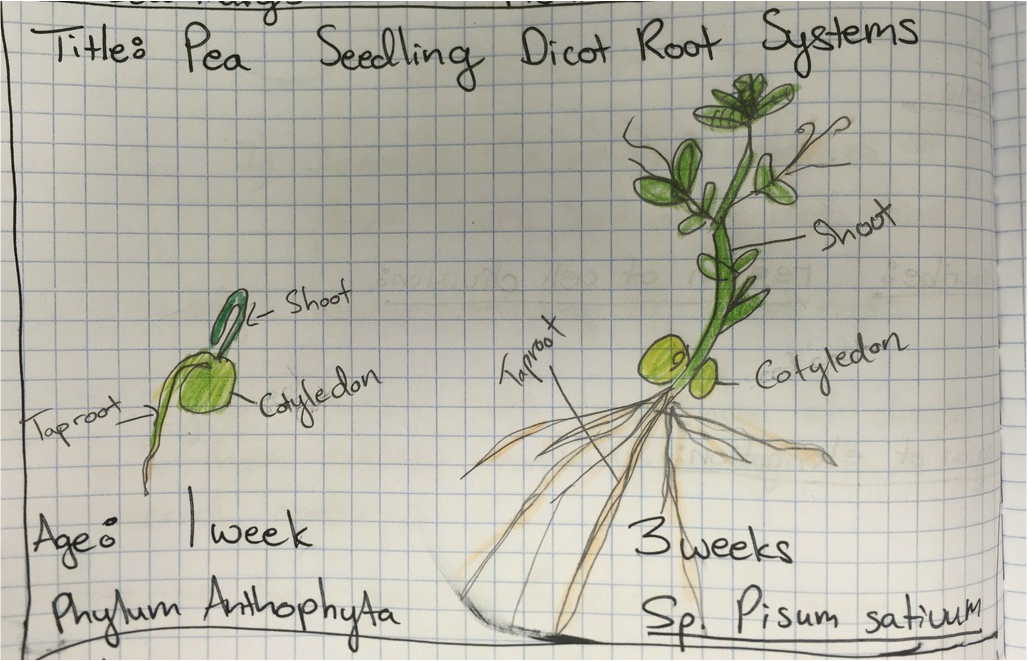
Sketch of Dicot Pea (Pisum sativum) Seedling at Age 1 Week and Age 3 Weeks by Athena Downes - Photo Credit: Athena Downes - This Dicotyledon Develops its Primary Root as a "Taproot" Which Gives Rise to Secondary or Lateral "Branch" Roots -
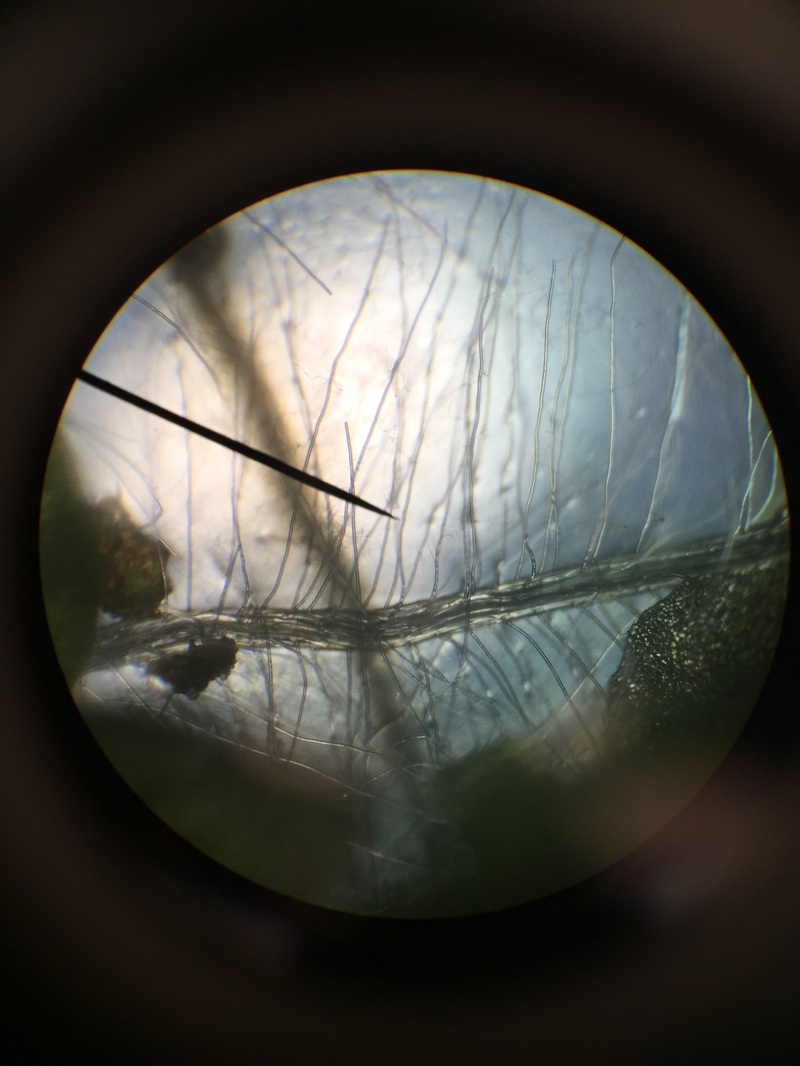
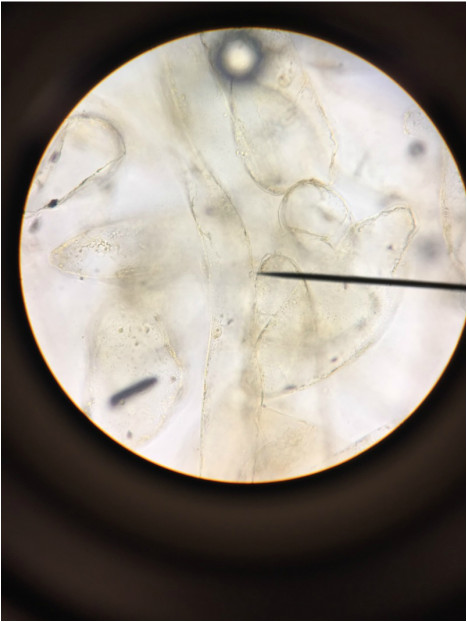
Observation of C-Fern Roots (Ceratopteris richardii) - Wholemount Slide Prepared by Athena Downes - Photo credit: Athena Downes - Compound Microscope - Total Magnification: 100X - Notice how the root hair ARE the epidermal cells! -
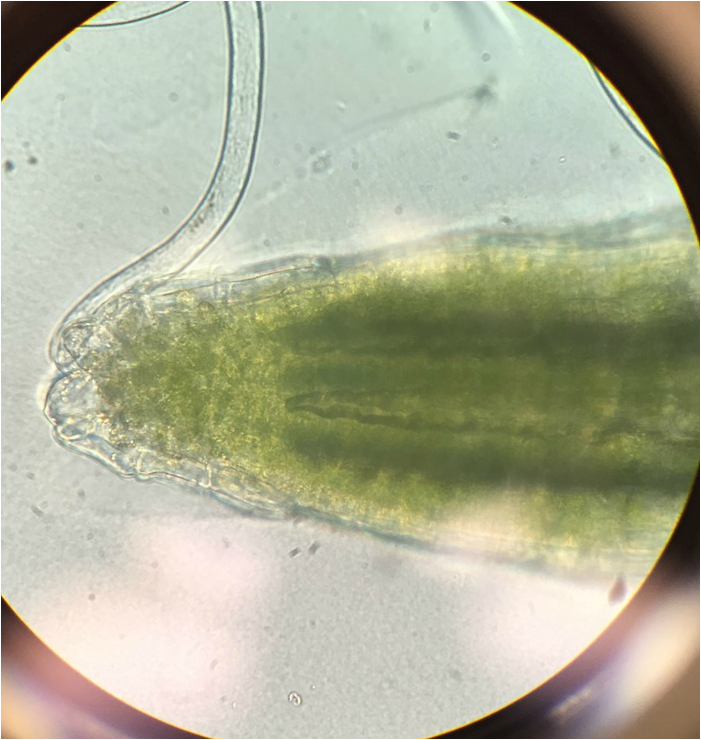
Observation of C-Fern Roots (Ceratopteris richardii) - Wholemount Slide Prepared by Athena Downes - Photo credit: Athena Downes - Compound Microscope - Total Magnification: 400X - Notice the visible root cap/tip just behind the primary root. Also the three areas of growth: the region of cell division, the region of elongation, and the region of maturation. -
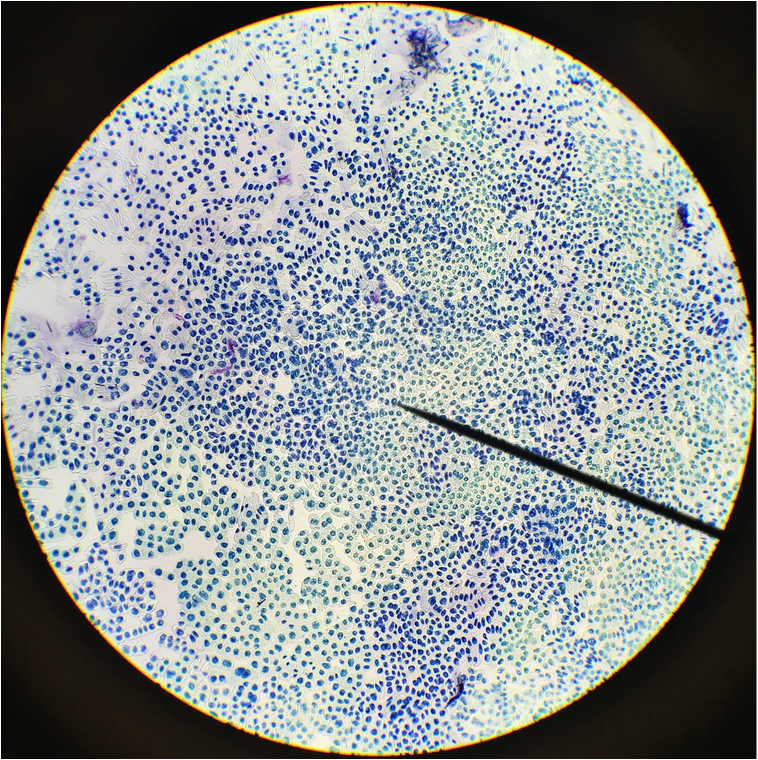
Mitotic Squash of Allium cepa [Onion] Root - Slide Prepared by Athena Downes - Photo Credit: Athena Downes - Compound Microscope - Total Magnification: 40X - In This Apical Meristem Region We Observed the Cell Division of Primary Growth Occurring in the Root Tip -
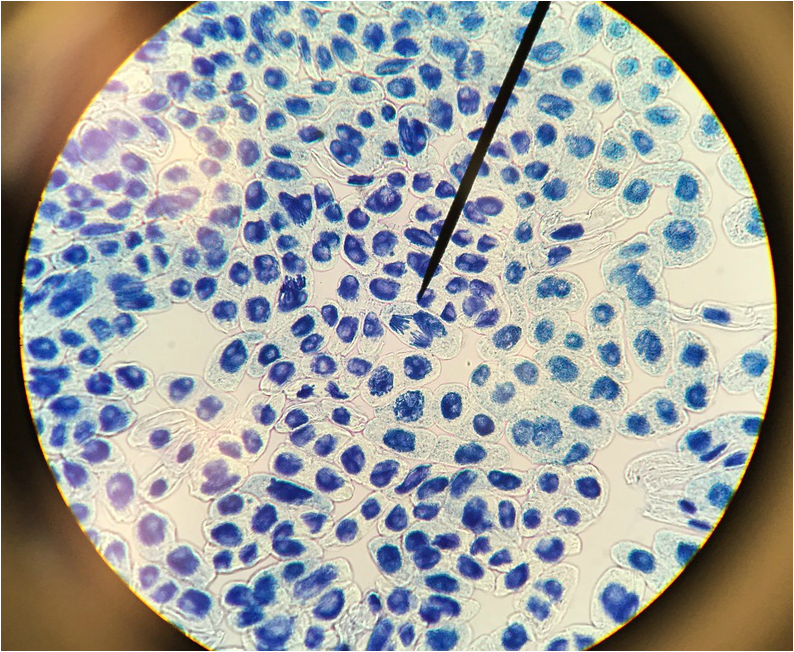
Mitotic Squash of Allium cepa [Onion] Root - Slide Prepared by Athena Downes - Photo Credit: Athena Downes - Compound Microscope - Total Magnification: 400X - Visible Prophase at the Tip of the Pointer -
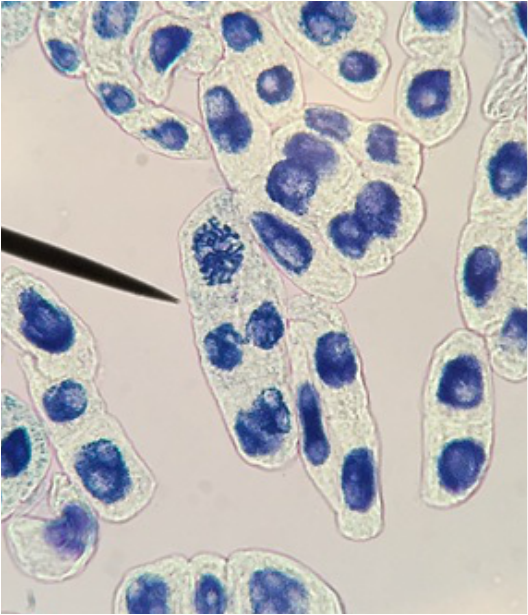
Mitotic Squash of Allium cepa [Onion] Root - Slide Prepared by Athena Downes - Photo Credit: Athena Downes - Compound Microscope - Total Magnification: 400X - Visible Chromosomal Duplication at the Tip of the Pointer
|
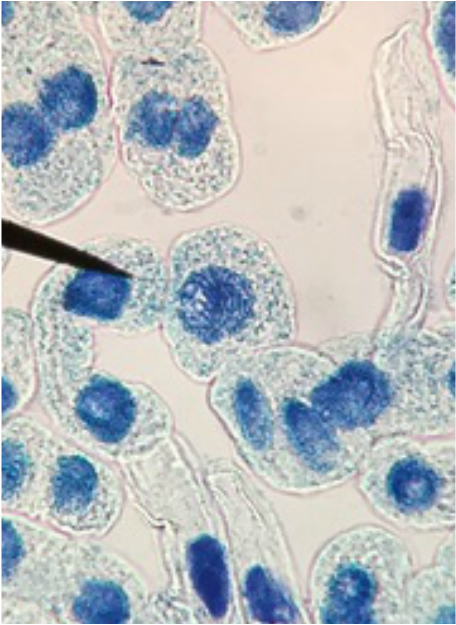
Mitotic Squash of Allium cepa [Onion] Root - Slide Prepared by Athena Downes - Photo Credit: Athena Downes - Compound Microscope - Total Magnification: 400X - Visible Telephase at the Tip of the Pointer -
|
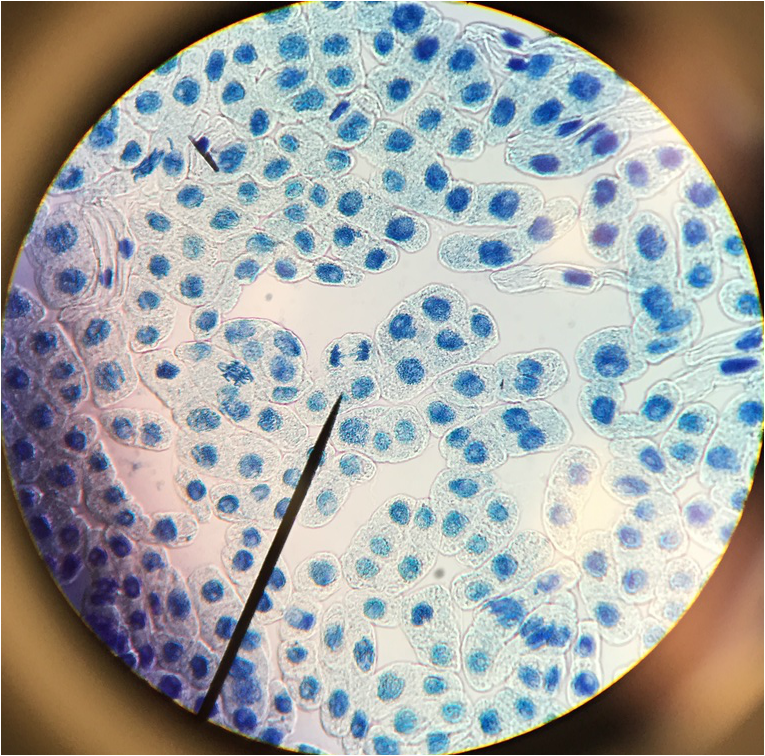
Mitotic Squash of Allium cepa [Onion] Root - Slide Prepared by Athena Downes - Photo Credit: Athena Downes - Compound Microscope - Total Magnification: 400X - Visible Anaphase One Cell Above the Tip of the Pointer
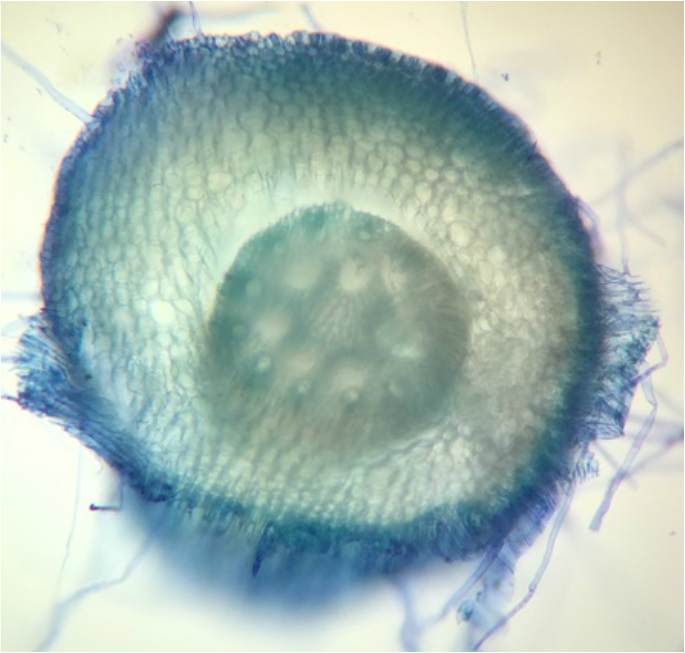
Monocot Corn ( Zea Mays ) Cross Section of Primary Root - Age 1 Week - Slide Prepared by Kelsey Hymel - Photo Credit: Kelsey Hymel - TBO Stain Applied Showing Blue-Green Color of Lignin Containing Cell Walls - Also Note the Parenchyma Cells in the Center Core, The Large Circular Xylem, and the Smaller Circular Phloem -
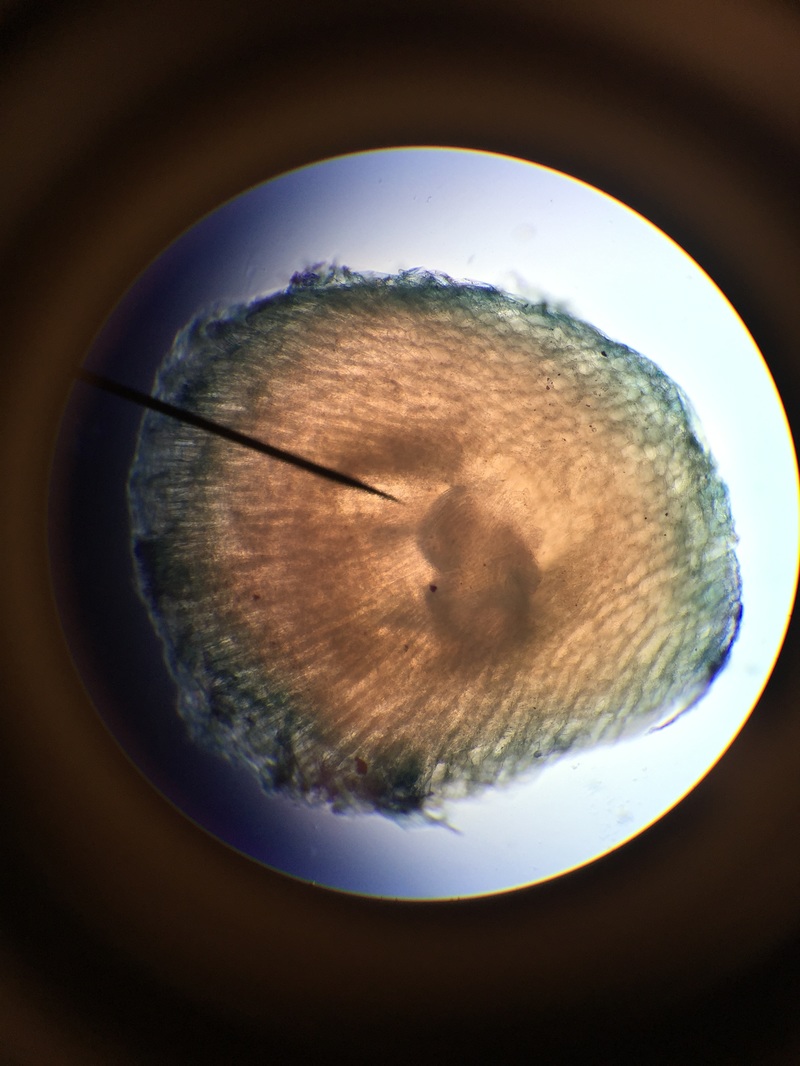
Dicot Pea (Pisum sativum) Cross Section of Primary Root - Age 1 Week - Slide Prepared by Athena Downes - Photo Credit: Athena Downes - Sudan Red Stain and 50% Glycerol Applied in an Attempt to Observe the Lipids in the Tissues - Lipids are Supposed to Show in Bright Pink - Compound Microscope - Total Magnification: 40X - Note the Presence of Some Pink - Also You can Just About See the Cross-Shaped Vascular Core Made of Xylem and Phloem-
|
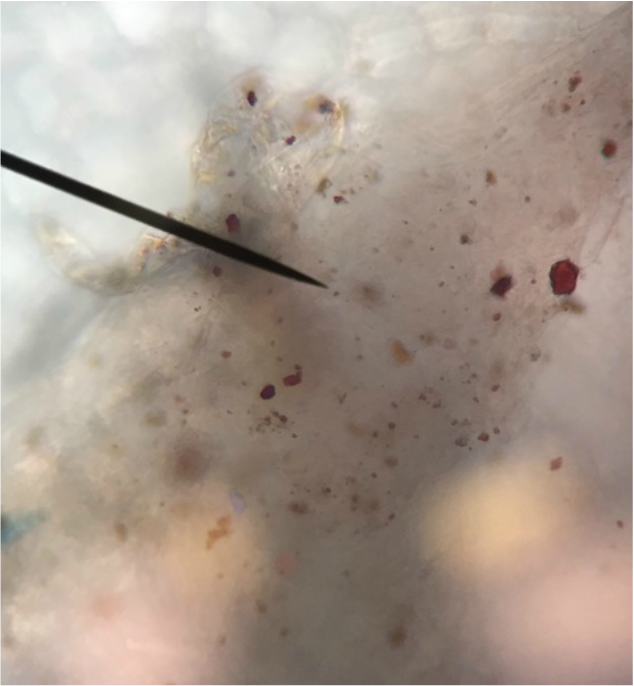
Dicot Pea (Pisum sativum) Cross Section of Primary Root - Age 1 Week - Slide Prepared by Athena Downes - Photo Credit: Athena Downes - Sudan Red Stain and 50% Glycerol Applied in an Attempt to Observe the Lipids in the Tissues - Lipids are Supposed to Show in Bright Pink - Compound Microscope - Total Magnification: 400X - Note the Presence of Some Pink -
|
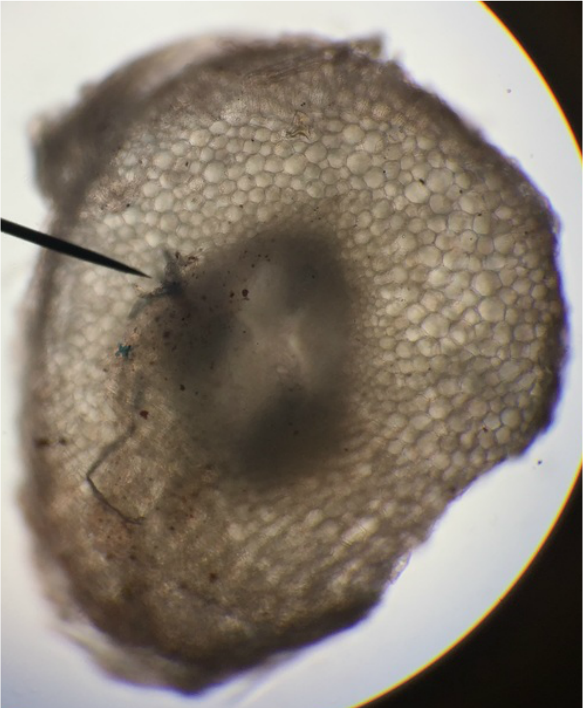
Dicot Pea (Pisum sativum) Cross Section of Primary Root - Age 1 Week - Slide Prepared by Athena Downes - Photo Credit: Athena Downes - TBO Stain Applied to Highlight in Blue-Green Presence of Lignin Containing Tissues - Compound Microscope - Total Magnification: 400X - Note the Outer Epidermis, The Center Should Reveal a Cross-Shaped Group Of Vascular Tissues with Both Xylem and Phloem, but the Double Stain has Obscured These Tissues -
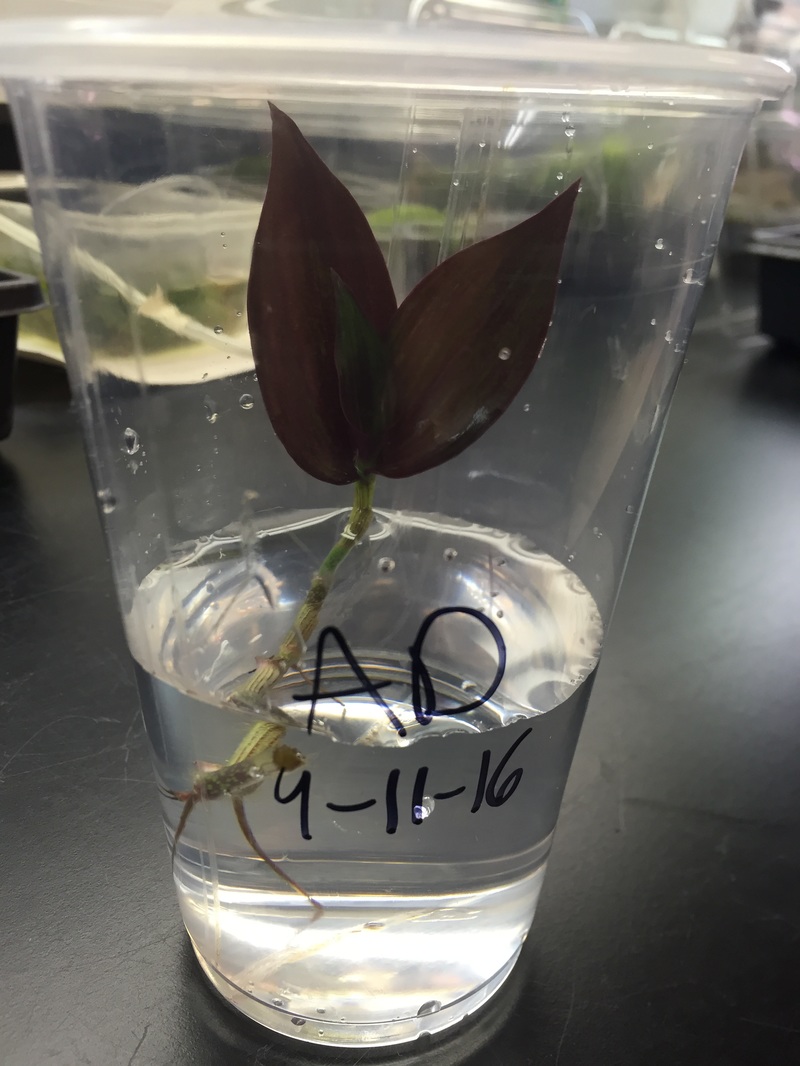
Tradescantia zebrina Stem Cutting - Three Leaves - Specimen Prepared by Athena Downes - Photo Credit: Athena Downes -
|
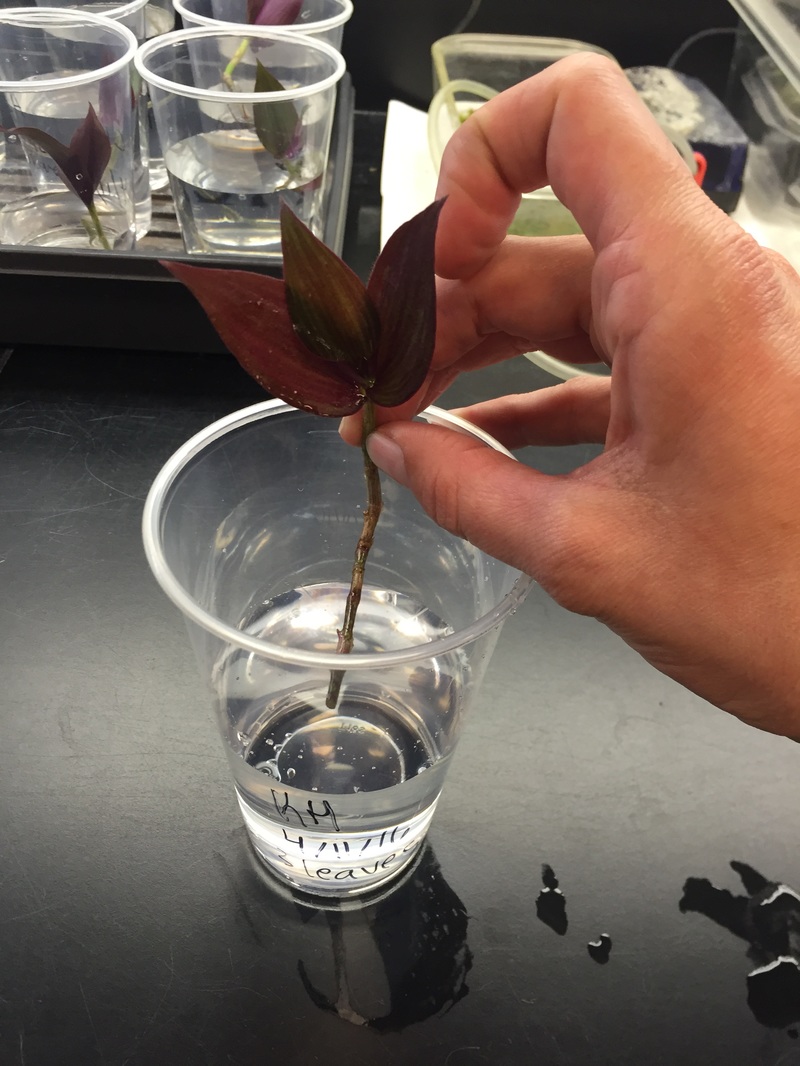
Tradescantia zebrina Stem Cutting - Three Leaves - Specimen Prepared by Kelsey Hymel - Photo Credit: Kelsey Hymel -
|
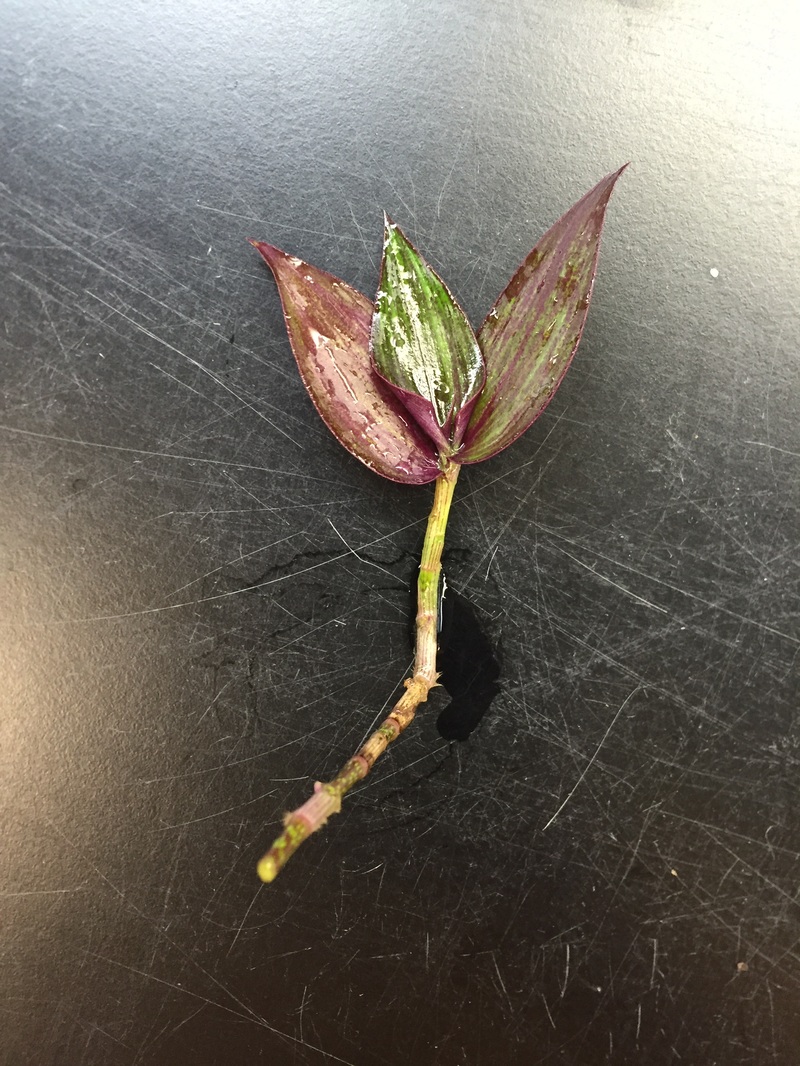
Tradescantia zebrina Stem Cutting - Three Leaves - Specimen Prepared by Kelsey Hymel - Photo Credit: Kelsey Hymel -
|
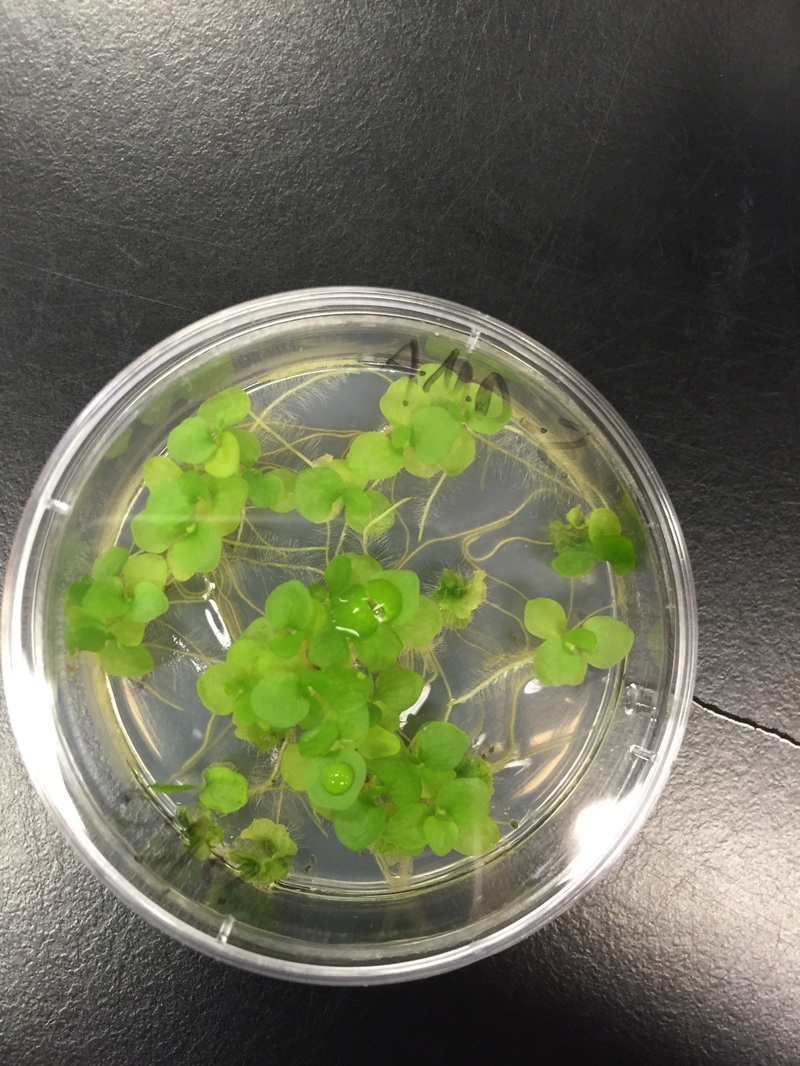
C-Fern (Ceratopteris richardi) Sporophytes on Agar Plate - Specimen Prepared by Athena Downes - Photo Credit: Athena Downes -
|
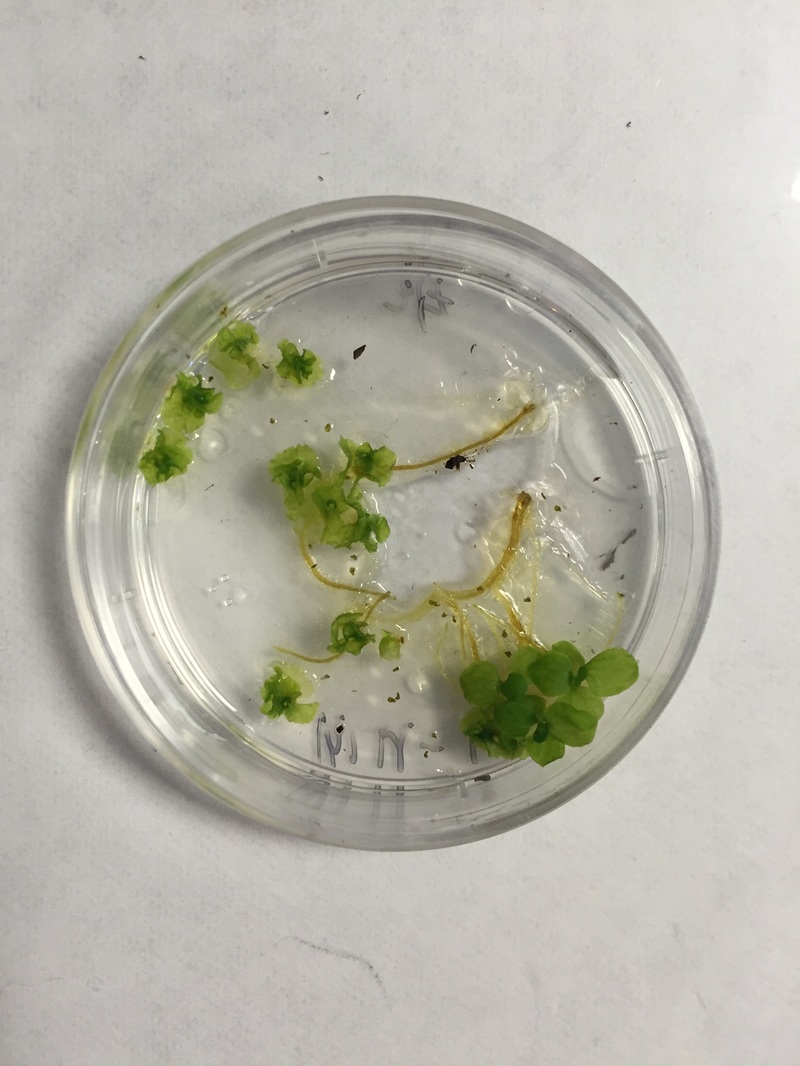
C-Fern (Ceratopteris richardi) Sporophytes on Agar Plate - Specimen Prepared by Kelsey Hymel - Photo Credit: Kelsey Hymel -
|
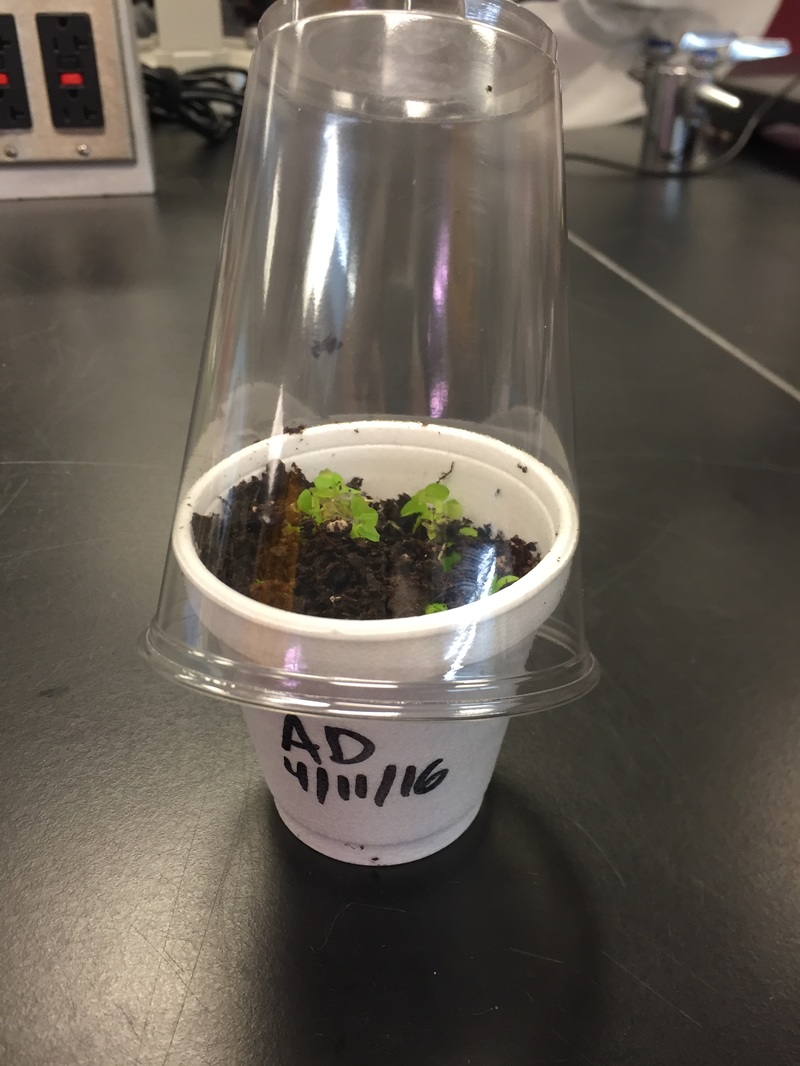
C-Fern (Ceratopteris richardi) Sporophytes Planted in Potting Media with Bio-dome - Specimen Prepared by Athena Downes - Photo Credit: Athena Downes -
|
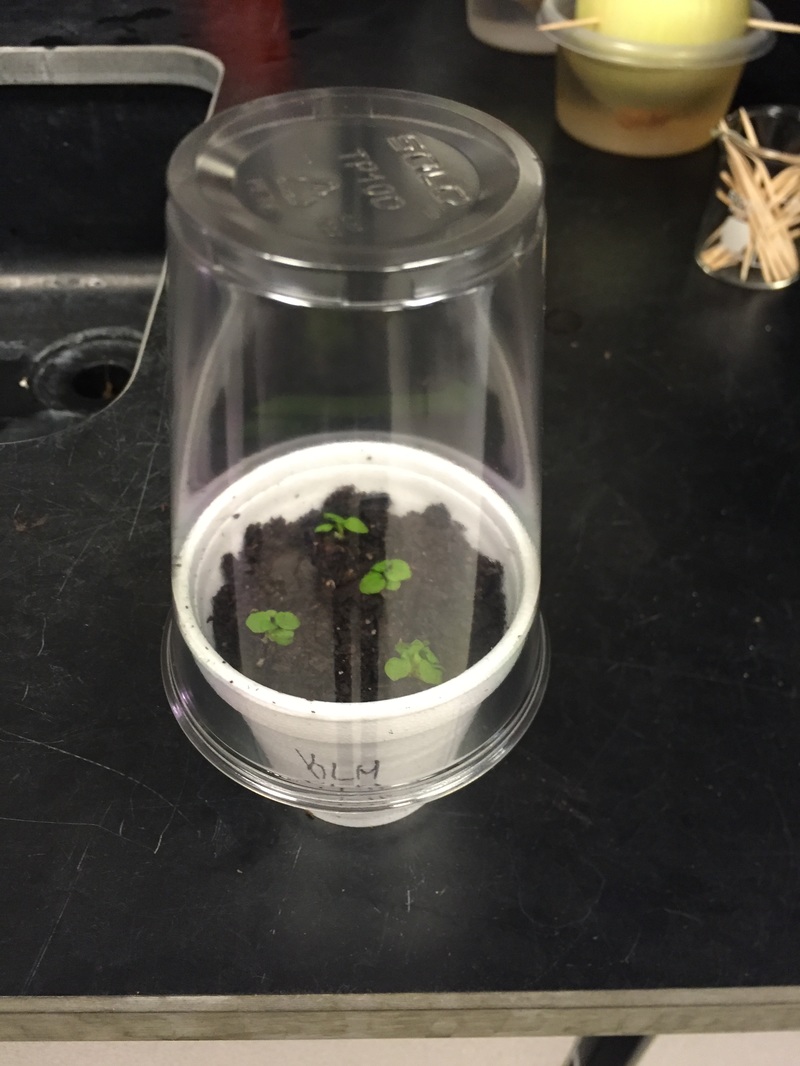
C-Fern (Ceratopteris richardi) Sporophytes Planted in Potting Media with Bio-dome - Specimen Prepared by Kelsey Hymel - Photo Credit: Kelsey Hymel -
|
